********************************************************************************
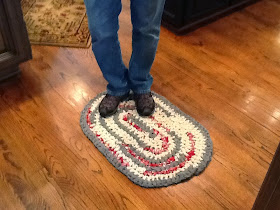
OK, so we went to a Goodwill and bought four sheets for 15 bucks, then to a Hobby Lobby where I purchased a Q hook for a couple more. I think a P hook would have been ideal, but the rug is shaping up just fine (and a little quicker) with the huge Q.
I have been ripping off 4" wide strips of the fabric, then ripping that in half for 99% of its length for a 2" wide strip that is twice as long as the sheet was. I just chained an arbitrary amount and then started single crochets in an oval pattern, adding knots on the ends whenever I thought it necessary. I didn't place any additional knots along the length, and the rug has started to take on a peanut shape, so now I'm rectifying that by adding another knot or two each time I'm on a straight side. A peanut shaped rug would actually be pretty cool, now that I think about it.
To join strands of fabric, I cut a 1/2" slit near the end of the current strand, then threaded the new strand into it and folded about 4" back in the direction of the crochet, and the 4" tail is simply getting knotted in the mix like usual.
It's over a half inch thick, and pretty soft. I'm going to have to figure out a way to hide some of the ends of strands that are sticking out, because I didn't have my color-switching technique set before I started the rug. I'm thinking of just jamming the extra bits into a knot and securing them with a few small stitches of needle and thread.
The color scheme was dictated by whatever shlop I could find at the Goodwill. I think I might scavenge some garage and estate sales for a while in the hopes of building an arsenal of colors, because I plan to make a few more of these rugs. Hardwood floors seem to be all the rage in Texas, and my tootsies will be bruised if I don't take action!
The finished product:
Here is Jordan's post-mortem analysis:
A few hard lessons I would like to impart if I may be so bold:
I used a Q hook, which was too big. It made for quick progress, but the knots are too large and the texture is a bit lumpy. The lumpiness makes for discomfort under your feet. This couldn't be a rug for a place that requires prolonged standing, like in front of the kitchen or bathroom sink. It would be better suited for a doorway.
I didn't use any in-the-round pattern, so my oval became somewhat amoeboid. The reshaping process was hard fought to get it back into a sorta oval, but was only marginally successful. I need to derive a mathematical pattern for a circular shape using a Q hook for my next attempt, or I may just wing it and see what sort of splatter pattern results. Forensic crochet ballistics, I suppose.
The weight difference of the fabrics is causing some issues. I'm just hoping it will all average out in the end. One of my sheets makes for a smaller row of crochets than the others. I'd recommend getting fabric of the same type/different color for a truly homogenous product. It's like slipping in a different weight of yarn in the middle of a project, makes for uneven results. I'd even go as far as purchasing the fabric instead of scavenging from random sheets, but then that takes away from the coolness factor of using your own old sheets/clothing. I suppose I could also combat this by ripping the lighter sheet into thicker strips, but haven't tried that yet.
Two of my fabrics are one-sided patterns, and they seem to fold over during the crochet so as to hide the pattern and show the "blank" side. Ma recommended I iron the strip with the pattern outward to combat this, and I think I will do so for the next rug. For now I'm merely fighting the folding tendency with each crochet, and it makes for slower progress.
The method I use to make longer strips is causing an issue with corners. i'm ripping the fabric in a serpentine back and forth pattern. At the turn of the serpentine, the new "corners" of fabric are poking out here and there. I started to cut these off in a 45 angle to make the U-turn of fabric smoother with less pronounced corners, and it's working well.
Rip each entire sheet into one big serpentine, then choose the next length of color according to what contrast you want for the next addition, then rip it into a custom length of strip for how long you want it to go. The variety looks much more random that way and keeps Lady Luck from bunching like colors together due to sheer repetition of the pattern.
Jordan then did a second attempt, this time in a circular pattern:
Here's his analysis of attempt #2:
The center opened up as I enlarged this one, I suppose the method I used to start the round was faulty. I patched the hole with an ill-fated attempt to crochet inward, reducing stitches as I went, but it just looks bugly. I may remove it and just have a hole there, or call it Whatever and put it in the garage or something. We'll see.
Jordan is a chemist, so his scientific analysis combined with crocheting is spot-on and (I think) hilarious! Maybe I'll try to convince him to make me a crocheted rag rug for Christmas....


BWAHAHAHAHAHAHAHAHAHAHA!!! I love our little brother. He is all kinds of awesome.
ReplyDelete