My brother-in-law, Corey, is a Michigan State University graduate and probably the university's biggest fan. A few years back, his dog chewed up his
Sparty (the Michigan State mascot) doll, leaving behind only Sparty's little Spartan helmet. So sad. Amigurumi to the rescue! I scoured the internet for either find patterns or just to ogle others' creations, and I found very little Michigan State crocheted items. Not one Sparty doll. Curious, I searched for crocheted items relating to my alma mater, Notre Dame, and found just a few things as well. I guess crochet mania has yet to truly embrace fans wishing to support their place of higher learning? Time for me to put my amigurumi skills to work and go rogue.
SPARTY!!!!
Since I would need to make two of several items, I realized I was going to have to write down the pattern that I created. Can't have a Sparty with mismatched arms! I am posting my Michigan State University Spartan Mascot (aka Sparty) crochet pattern to the Roonie Ranching blog to save it for posterity and help any other crocheters out there fulfill their Sparty crochet needs.
Michigan State University Spartan Mascot (Sparty) Doll
Materials used:
- US - F/5 hook (3.75mm) and E/6 hook (3.50mm)
- Yarn needle
- Red Heart Super Saver Yarn in white, green (Dark Sage), black, gray, skin color (Buff), and brown (Coffee)
- 9mm safety eyes
- Polyester stuffing
- Marker to mark the end of a round
Stitches/techniques/abbreviations used:
- st (stitch)
- ch (chain)
- sl st (slip stitch)
- sc (single crochet)
- hdc (half-double crochet)
- dc (double crochet)
- trc (treble crochet)
- sc inc (two single crochets in the same stitch)
- sc dec (single crochet two stitches together)
- 3sc dec (single crochet three stitches together)
- hdc dec (half-double crochet two stitches together)
- Rd (round), Rds (rounds)
- Magic circle (can also just chain 2 and work the number of stitches in the second chain from the hook)
Finished doll is approximately 12" tall. Crochet in both loops unless otherwise indicated. Do not join rounds or turn at the end of rounds/rows unless otherwise indicated. Use F hook for all items except nose.
Head:
(with buff yarn)
Rd 1: Magic Circle 6 sc
Rd 2: sc inc in each st around (12)
Rd 3: (sc, sc inc) around (18)
Rd 4: (2 sc, sc inc) around (24)
Rd 5: (3 sc, sc inc) around (30)
Rds 6-9: sc around (30)
Rd 10: (3 sc, sc dec) around (24)
Rds 11-13: sc around (24)
Rds 14-15: 8 sc, 8 hdc, 8 sc (24)
Rd 16: 9 sc, 8 hdc, 7 sc (24)
**place safety eyes between rounds 9 and 10, 4 stitches apart, centered above where the half-double crochet stitches are forming the chin**
Rd 17: (2 sc, sc dec) twice, sc, hdc, hdc dec, 2 hdc, hdc dec, hdc, sc, sc dec, 2 sc, sc dec (18)
Rd 18: (sc, sc dec) three times, hdc, hdc dec, (sc, sc dec) twice (12)
**stuff head**
Rd 19: (sc dec) around (6)
Finish off, leaving long tail to sew onto body.
Nose:
(with buff yarn and G hook)
Ch 8, turn; working down side of ch, 2 hdc in 3rd ch from hook, 5 sl st, rotate to other side of ch, 5 sl st, 2 hdc in last ch, join with sl st to first hdc. Finish off, leaving long tail to sew onto face (with "wrong" side showing).
Right Leg:
(start with coffee yarn)
Rd 1: Ch 6, turn & skip first ch from hook; sc inc, 3 sc, 3 sc in last ch, rotate work, 4 sc, 1 sc in last ch (13 st in an oval shape)
Rd 2: sc inc in next two st, 4 sc, sc inc in next 3 st, 4 sc (18)
Rd 3: In back loops only, sc around (18)
Rd 4: In both loops, sc around (18)
Rd 5: sc dec, sc dec, sc around (16)
Rd 6: 3sc dec, sc around (14)
Rds 7-12: sc around (14)
Rd 13: 10 sc, switch to buff yarn, 4 sc (14)
Rds 14-21: sc around (14)
Switch to dark sage yarn
Round 22: sc around (14)
Finish off (no need to leave long tail for sewing).
Left Leg and Body:
(with coffee yarn)
Work the same as Right Leg through round 20.
Rd 21: 9 sc, switch to dark sage yarn, 5 sc (14)
Rd 22: sc around (14) (do not finish off)
**firmly stuff both legs**
Rd 23: 8 sc, hold Right Leg next to Left Leg; start working on Right Leg in 1 stitch past where you finished off, 14 sc, switch back to Left Leg, 6 sc (28)
Rds 24-25: sc around (28)
Rd 26: (5 sc, sc dec) around (24)
Rds 27-31: sc around (24)
Rd 32: (7 sc, sc inc) around (27)
Rd 33: (8 sc, sc inc) around (30)
Rds 34-40: sc around (30)
Rd 41: (4 sc, sc dec) around (25)
Rd 42: (3 sc, sc dec) around (20)
43: (2 sc, sc dec) around (15)
**stuff**
44: (sc, sc dec) around (10)
45: (sc dec) around (5)
Finish off.
Arms (make 2):
note: Stuff arms as you go; you will be working from the shoulders down to the hands.
(with buff yarn)
Rd 1: Magic circle 6 sc, leaving long tail at top for sewing arms to body
Rd 2: (sc inc) around (12)
Rd 3: (sc, sc inc) around (18)
Rds 4-7: sc around (18)
Rd 8: (4sc, sc dec) around (15)
Rd 9: (4sc, sc inc) around (18)
Rds 10-12: sc around (18)
Rd 13: (sc, sc dec) around (12)
Rds 14-16: sc around (12)
Rd 17: (2 sc, sc dec) around (9)
Rds 18-19: sc around (9)
Rd 20: (sc, sc dec) around (6)
Rd 21: ch 3, skip 1st ch next to hook, sl st in next 2 ch, sl st in next st (thumb made), ch 2, 3 trc, dc, sl st (fingers made), then bypass thumb and sl st in the first sl st made in this round.
Finish off and sew closed.
Epaulets (shoulder armor/decoration) (make 2):
(with dark sage yarn)
Row 1: Magic Circle 6 sc (do not join)
Row 2: ch 1, turn; sc inc in each st across (12)
Row 3: Turn; ch 5, skip first ch, hdc in next 4 ch; sl st in st #11 from Row 2. *sl st into next st, ch 5, skip first ch, hdc in next 4 ch, sl st in next st* Repeat from * to * four more times. 3 or 4 sc evenly across ends of rows, join with sl st to first ch in Row 3.
Finish off, leaving long tail for sewing to shoulders.
Wrist Gauntlets (make 2):
note: do not turn work at end of rounds
(with gray yarn)
Rd 1: ch 12, sl st in first chain to form a circle (12)
Rd 2: ch 1, sc in same ch as joining and in each ch around; sl st join to first sc of round (12)
Rd 3: ch 1, sc in same st as joining, 5 sc, sc inc, 5 sc; sl st join to first sc of round (13)
Rd 4: ch 1, sc in same st as joining, 6 sc, sc inc, 5 sc; sl st join to first sc of round (14)
Rd 5: ch 1, sc in same st as joining, 13 sc; sl st join to first sc of round (14)
Finish off, leaving long tail for sewing to wrists.
Greaves (shin guards) (make 2):
(with dark sage yarn)
Row 1: ch 7, turn; skip first ch, 6 sc (6)
Row 2: ch 1, turn; sc dec, 2 sc, sc dec (4)
Row 3: ch 1, turn; 4 sc (4)
Row 4: ch 1, turn; in back loop only, sc inc, 2 sc, sc inc (6)
Rows 5-8: ch 1, turn; 6 sc (6)
Row 9: Turn (no ch 1); sl st, sc, 2 dc, sc, sl st (6)
Finish off, leaving long tail to sew onto boots. After greaves are sewn onto boots, use white yarn to sew straps around the back of the boots as if the white yarn is holding the greaves onto the boots (see picture).
Skirt Armor:
(with dark sage yarn)
Rd 1: ch 30, join with sl st to first ch (30)
Rds 2-4: ch 1, sc in same st as joining, 29 sc, join with sl st, finish off. (30)
Rd 5: Count over 18 st from where you finished off on round 4 and join with sc, 26 sc (leave 4 st at front of skirt unworked)
Rd 6: ch 1, turn; 26 sc, finish off.
Rd 7: (with white yarn) Join at back of skirt; sl st around top of skirt, join with sl st; finish off, leaving long tail to sew onto body.
Rd 8: (with white yarn) sl st around bottom of skirt, join with sl st, finish off.
Rd 9: (with dark sage yarn) Working in back loop only of round 8, join with sc in last sl st of round 8 and sc around, join with sl st to first sc (30)
Rd 10: turn; *ch 6, skip first ch, 5 hdc, sk next st, sl st in next st*, repeat from * to * 14 times.
Finish off, leaving long tail to sew onto body.
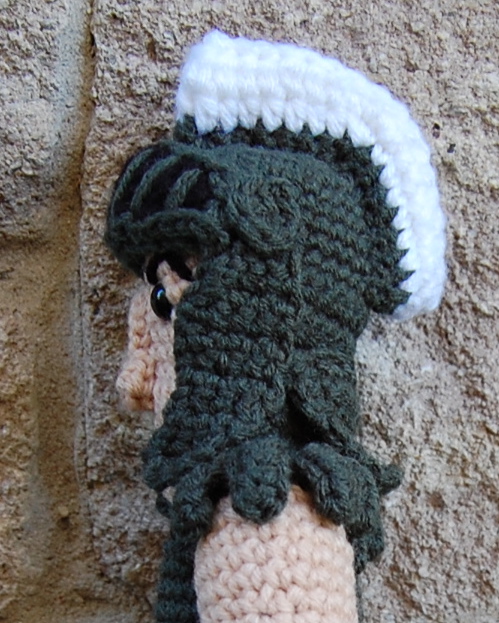
Helmet - main part:
(with dark sage yarn)
Rd 1: Magic circle 6 sc (6)
Rd 2: sc inc around (12)
Rd 3: (sc, sc inc) around (18)
Rd 4: (2 sc, sc inc) around (24)
Rd 5: (3 sc, sc inc) around (30)
Rd 6: (9 sc, sc inc) around (33)
Rds 7-9: sc around (33)
Rd 10: 20 sc (leave remaining st unworked)
Rds 11-13: ch 1, turn; 20 sc (20)
Rd 14: ch 1, turn; sc dec, 18 sc (19)
Rd 15: ch 1, turn; sc dec, 17 sc (18)
Rd 16: ch 1, turn; sc dec, 16 sc (17)
Rd 17: ch 1, turn; sc dec, 15 sc (16)
Rd 18: ch 1, turn; sc dec, 12 sc, sc dec (14)
Rd 19: ch 1, turn; sc dec, 10 sc, sc dec (12)
Finish off.
Helmet - visor:
(with black yarn)
Row 1: ch 3, turn; skip first ch, 2 sc (2)
Row 2: ch 1, turn; 2 sc (2)
Row 3: ch 1, turn; sc inc, 2 sc (3)
Rows 4-6: ch 1, turn; 3 sc (3)
Row 7: ch 1, turn; 2 sc, sc inc (4)
Row 8: ch 1, turn; 4 sc (4)
Row 9: ch 1, turn; 3 sc, sc inc (5)
Row 10: ch 1, turn; sc dec, 3 sc (4)
Row 11: ch 1, turn; 4 sc (4)
Row 12: sc dec, 2 sc (3)
Rows 13-15: 3 sc (3)
Row 16: sc dec, sc (2)
Rows 17-18: 2 sc (2), finish off.
Edging:
(with dark sage yarn) Rotate work and sl st along long sides, sc on ends. Join with sl st to first stitch of edging. Finish off, leaving long tail to sew onto hat.
Vertical stripes:
(with dark sage yarn) Embroider 6 vertical stripes with two strands of yarn. Finish off.
Helmet - side circles (make 2):
(with dark sage yarn)
Magic circle 6 hdc, join with sl st to first hdc, finish off, leaving long tail to sew onto hat.
Helmet - jaw protectors (make 2):
(with dark sage yarn)
Row 1: ch 4, turn; skip first ch, 3 sc (3)
Row 2: ch 1, turn; 3 sc (3)
Row 3: ch 1, turn; 2 sc, sc inc (4)
Row 4: ch 1, turn; sc inc, 3 sc (5)
Row 5: ch 1, turn; 3 sc, sc dec (4)
Rows 6-7: ch 1, turn; 4 sc (4)
Row 8: ch 1, turn; 2 sc, sc dec (3)
Row 9: ch 1, turn; 2 sc, sc inc (4)
Row 10: ch 1, turn; sc inc, sc, sc dec (4)
Row 11: ch 1, turn; sc dec, sc, sc inc (4)
Finish off, leaving long tail to sew to helmet.
Helmet - neck armor:
(with dark sage yarn)
Row 1: ch 14, turn; skip first ch, sc across (13)
Row 2: ch 1, turn; 13 sc (13)
Row 3: ch 1, turn; sc dec, 9 sc, sc dec (11)
Row 4: ch 1, turn; 11 sc (11)
Row 5: ch 1, turn; sc dec, 7 dec, sc dec (9)
Row 6: ch 1, turn; 3sc dec, 3 sc, 3sc dec (5)
Row 7: ch 1, turn; sc, 3sc dec, sc (3)
Finish off.
Helmet - brush/crest:
(with dark sage yarn)
Row 1: ch 46, turn; skip first ch; 7 sc, sc inc, 14 sc, sc inc, 14 sc, sc inc, 7 sc. (48)
Finish off dark sage yarn, leaving long tail for sewing.
Row 2: (with white yarn) Join with sc, 6 sc, sc inc, 16 hdc, sc inc, 14 sc, sc inc, 8 hdc (51)
Row 3: ch 2, turn; 7 hdc, 2 sc, sc inc, 14 sc, sc inc, 2 sc, 14 hdc, 2 sc, sc inc, 7 sc (54)
Finish off, leaving long tail for sewing.
Take the long green and white length of crocheting that you just created and fold into thirds to form the brush/crest.
Assembly tips:
The easiest order in which to assemble Sparty is:
1) Pull skirt armor onto body over boots and legs and sew into place.
2) Sew greaves (shin guards) onto boots and embroider white straps.
3) Sew wrist gauntlets to arms.
4) Sew arms onto body.
5) Sew epaulets onto shoulders (covering the tops of the arms and touching the green of the body).
6) Sew head onto body.
7) Sew nose onto face and embroider eyebrows and mouth with black yarn.
8) Sew all pieces onto helmet.
9) Sew helmet onto head (unless you want to leave it unattached so you can remove Sparty's helmet during the national anthem).
Here are more glamor shots of Sparty.... and a four-year-old Sonia to give you an idea of Sparty's size.
Uh-oh.... What's that I spy on the water spigot? A mention of a.... WOLVERINE?!?!
Happy birthday, Corey!! If any brave crocheters out there attempt to work up this pattern, please let me know how it goes... and definitely let me know if you have any questions or find any mistakes in the pattern!
Tutorial for personal use only, please.
Linking up to: The Stichin' Mommy, Nap Time Crafters, Today's Creative Blog, Flamingo Toes, U.S.S. Crafty, And Sew We Craft


