Showing posts with label clutch. Show all posts

Monday, July 28, 2014

Convertible/Reversible Bag Tour and Giveaway!

I am so excited I can't see straight.  Seriously.  I'm helping kick off a blog tour for an amazing pattern for the Convertible/Reversible Bag that I helped test for Cozy Nest Design, and it includes a giveaway AND a discount code for the pattern!  My four favorite things on earth are indie pattern designers, downloadable patterns, giveaways, and discounts, so this is like a dream come true.  I feel like I have been pulled up from the minor leagues to shine in the majors.  Check out the awesomely official graphic Sarah (the genius behind CND) created for us:

Bag Tour Graphic


ANYWAY, this bag is seriously amazing.  And I'm not just saying that because I was a tester and got the pattern for free.  This puppy converts into four different bags.  Maybe it's because my four-year-old son and six-year-old daughter are obsessed with all things Transformers related, but a bag that transforms is all kinds of fabulous in our opinion.  Here is my version of the bag (with Sarah's nifty descriptions overlaid on top):

Roonie Ranching Version Convertible/Reversible Bag


With just one bag, you get:
  • a shoulder bag,
  • a cross-body (or cross-over) bag,
  • ANOTHER cross-body/cross-over bag in a completely different set of fabrics, and
  • an evening clutch.
No, I'm not joking!  Here they are in greater detail:

1.  The shoulder bag:


2.  The cross-body/cross-over bag:


3.  Another cross-body/cross-over bag in totally different fabrics:


4.  And the best part (in my opinion), an adorable evening clutch:


The pattern even includes instructions for a clear vinyl insert you can use so your purse necessities won't get the fabric all dirty.  Seriously cool.  You can also make the bag with laminated cotton, which sounds like a great idea.

Sometimes, you find patterns for purchase that really aren't worth the money, but this is most certainly not the case with the Convertible/Reversible Bag.  The pattern and instructions make what could be a really complex project and break it down in an understandable way.  There are so many pieces, in fact, that the pattern includes little labels you can stick on to keep everything straight once you have cut the fabric and interfacing.  I mean, check out this photo I shot of the whole shebang before I started the assembly:


YIKES.  It was at that point that I started to fear for Sarah's sanity, because how on earth could that all go together to become a bag?  (Yes, that is my black lab, Connie, chilling out under the dining room table in the bottom right-hand corner -- her idea of "helping" me sew.  I much prefer that to the cats' idea of helping, which consists of lying on top of the cutting mat on the table next to my sewing machine and shedding all over my fabric.  Ahem.)

Despite the intimidating number of components, the pattern instructions are extremely clear and easy to follow.  For a design this complex, that is no minor feat.  Sarah uses neat graphics to accompany the instructions that keep you on target.  I can't even imagine how she came up with this fantastic design AND figured out how to engineer it all.  I was blown away by the terrific method she uses to create the boxed bottom of the bag.  I have made a zillion bags over the past few years, and I had never before seen something like this.  I love how the side of the bag looks with her boxing technique:


So. Stinkin'. Cute.  This was also my first time making adjustable straps using tri-glides, and it was much easier than I thought it would be.  I'm definitely going to do that again with any bag I try to design myself.  Honestly, I'm really kind of bummed that I gave this bag to my daughter's kindergarten teacher (thought she completely deserved a rad bag like this).  I guess I need to get cracking on making one for me.


Discount Code and Giveaway!

For this week only (good through August 2, 2014), you can pick up your own copy of the Convertible/Reversible Bag pattern at a 25% discount by entering the code "bagtour" at checkout.

And now for the giveaway!!!

a Rafflecopter giveaway

Where is the tour going next?  To a bunch of other way cool sewing blogs authored by other bag testers from all over the world, of course.  They all sewed the same bag with very different fabric choices, and it's really neat to see how they all turned out.  I'm kind of in awe of the bloggers on this tour, and hope that no one figures out that I am just pretending to be even half as talented as these folks.  The best part is each day has its own unique giveaway!  Here is the schedule for the whole tour:

Monday, July 28th
Maria of Mia's Creations 
Niki Stringer of Roonie Ranching 
Alyssa Carrion at Keep Calm & Carrion

Tuesday, July 29th 
Lynn Potts of PottsCrafty 
Marilyn Brandt at Shades of Bold

Wednesday, July 30th 
Vicky Myers of Vicky Myers Creations
Liz Schaffner at MOMENTS

Thursday, July 31st
Amy Macdonald with Friends Stitched Together 
Judith Clauss of Judith Stitches and More

Friday, August 1st 
Jonie Brooks with Knot Sew Normal 
Lorena Rey of my way of... 
Bethany Rapp with Sweet Bee Buzzings


At the risk of making this post ridiculously long, I have to point out that I am a diehard Cozy Nest Design fan as evidenced by quite a number of my past projects.  I truly enjoyed sewing Sarah's patterns, including a modified version of the Petal Cosmetic Bag, the Play and Store, the Sweet Escapes Cosmetic Bag, and the Petal Pocket Purse.  I look forward to trying more in the future, for sure.

Convertible/Reversible Bag Tour and Giveaway!


Thank you, Sarah, for letting this minor leaguer play in the big leagues for a bit!  I'm one of your biggest fans and can't wait to see what you dream up next.

Friday, January 31, 2014

Printed vinyl changing pad clutch

Nothing is more fun than sewing something by request.  It's almost more fun than sewing something as a surprise gift because you're never truly sure the recipient really wants or needs such an item.  It's a little scary, however, when someone mentions something -- like, say, a laminated cotton/oilcloth changing pad -- and you pipe up and say "I could totally make something like that for you!"  Poor Toni had the misfortune of such an encounter with me, and suddenly found herself the collaborator in my first-ever venture into sewing a wipeable changing pad.  Luckily, it all turned out pretty darn well.
Here it is closed:


And here it is, open:


I totally should have stuck a stuffed animal or baby doll on there for a more interesting photo.  I was just proud of myself that I still had some pull-ups on hand to stuff in there to showcase the two pockets that hang down, which can hold diapers, wipes, diaper cream, etc.


I used a great tutorial for a Travel Diaper Changing Pad, but altered it in one major way -- instead of using a layer of clear vinyl paired with regular cotton fabric, I made both the inside and the outside using a printed vinyl that is sort of like laminated cotton or oilcloth.  It's pretty tough, so I figured it would stand up to a thrashing toddler during a wild diaper change.  The original tutorial calls for cotton fabric on the outside, but I figured that since the vinyl would preclude it from being thrown in the washing machine, a wipeable exterior would also be a good idea.  There's a layer of felt between the vinyl, but it's not so bulky that it would take up tons of room in the diaper bag.

A note about the tutorial -- it calls for waaaaaaaaaay more fabric than you actually use.  You really only need 2/3 of a yard of the exterior fabric, and 14" of the pocket fabric (with a good amount of scraps left over even then).  As for the padding, you only need a 12" x 23" piece that could easily be pieced together from scraps of felt/batting already lying around.  I also think a shank button might work better than a regular one, but I didn't have a good matching one on hand to try it with.  If I made this pattern again, I might try it with PUL (polyurethane lined fabric, which is what diaper covers are sometimes made from) if I can find some better prints than the seriously barfy ones I saw at Jo-Ann's.

I am a little worried about the security of the button, though.  If yanked too hard, it could possibly pull through the vinyl.  Be careful, Toni!  I could easily stitch on a strap that used a velcro closure if that happened, though.  

Monday, September 30, 2013

Pattern testing -- the All-In-One Bag by Flutter from.Kat

Last week, I had a really fun opportunity to test out a bag pattern for a great sewing/crafting blogger -- Kat, from Diary of a Flutter.Kat.  She sews amazing quilts and other fun things in New Zealand, and her blog has many free tutorials as well as some terrific patterns for sale.  When she put out a request for pattern testers for her new bag, I jumped at the chance and was thrilled that she picked me.

Here is a shot of the "All-In-One Bag" I made (as posted on Kat's Instagram feed):


It really was a blast sewing a pattern and being able to make comments.  Kat and I e-mailed back and forth a few times over the past week about various parts of the pattern, and she did make some alterations to the instructions that I and the other pattern testers suggested.  The pattern was already in great shape when I tested it, and now it's perfect as far as I can tell.

Here is a shot I took as I started sewing last week.  I love capturing all of the various pieces that go into the bags I sew.  (Too bad I forgot to lay out the magnetic snap and the material I had cut for the strap.  Just ignore the second lobster clasp I laid out -- I really only needed one.)


The bag has a neat shape due to the darts Kat has you sew in at the top on the outside and on the lining.  It can be carried like a traditional bag if you attach the lobster clasp to the opposite side . . .


. . . or it can be more of a clutch/wristlet if you attach the lobster clasp at the same side.


I should have put cards in the card pockets to show how perfectly they fit.


There is also a divider inside created by an internal zipper pouch -- so handy to corral the band-aids, chapstick, tissues, etc. that I need to carry.


Here is the view from the back.


It's a purse!


No!  It's a clutch/wristlet!


I loved the bag so much that I wanted to try making it again after Kat sent me the second draft of the pattern.  This time I tried the alternate strap suggestion involving a ribbon sewed to twill tape, and I think it turned out pretty cute.  I'm mad because I accidentally put the magnetic clasp on the wrong side of the flap (it was totally my fault -- not the pattern's!) so the brown should have been the underside and the salmon/coral color on the outside.  (Yes, it appears I am on a floral fabric kick right now.)


Here it is converted to clutch/wristlet.


On the other side of the bag from the card pocket is an internal patch pocket that fits my cell phone perfectly.


Thank you so much for the opportunity to test this great new pattern, Kat!  It was fun corresponding with someone on the other side of the world (it's something like 17 hours later there, which is pretty cool).  Best wishes on selling the pattern -- it's worth every NZ$!

Click here to purchase a digital download of the All-In-One Bag pattern directly from Kat (in NZ$).

Click here to purchase the digital download of the All-In-One Bag pattern via Craftsy (in US$).

Wednesday, September 18, 2013

Kym's Gathered Clutch

I should probably just consider this post to be my bid to be president of the Noodlehead Gathered Clutch fan club (if such a thing existed, that is).  This is the fourth one I have made, and I actually have plans to make another one as well.  There may be a restraining order out on me by the end of the week if Anna sees this post.

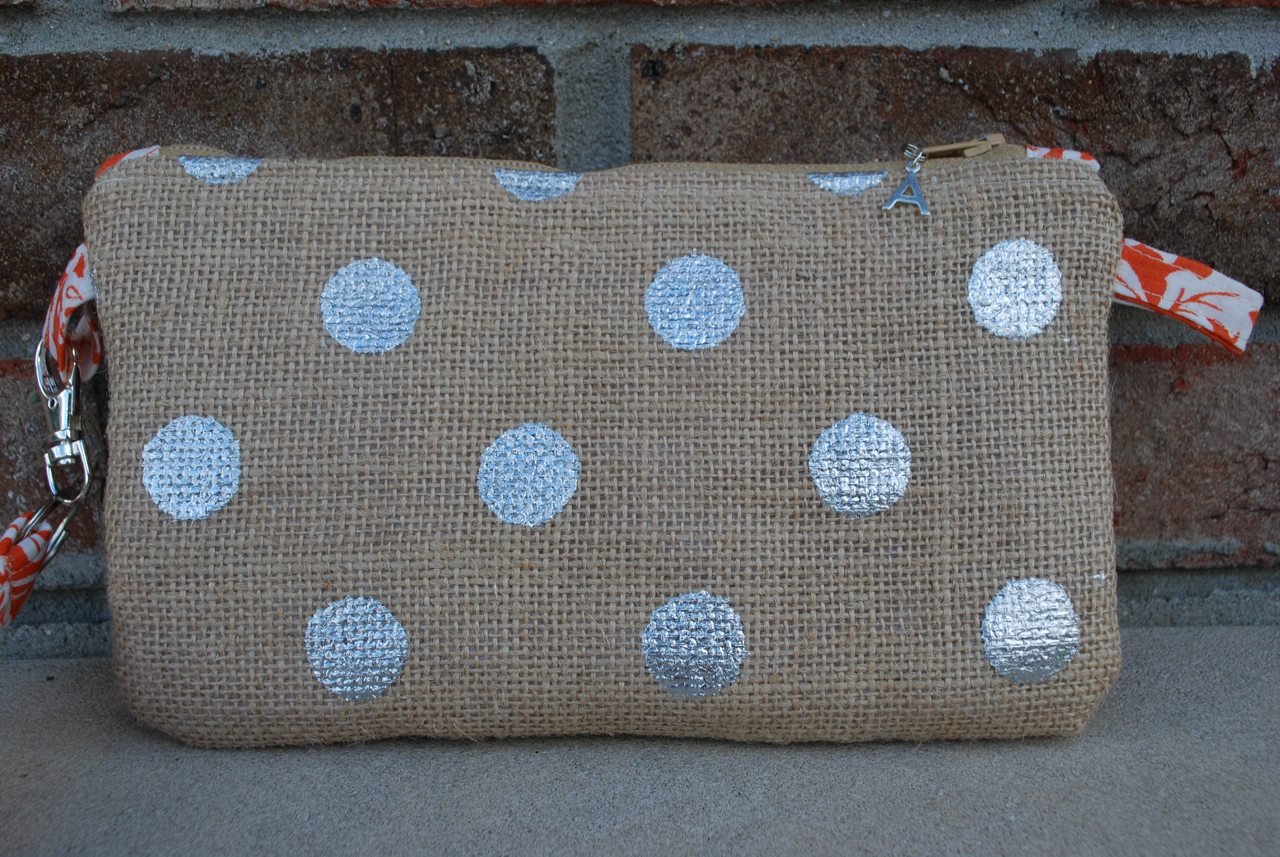
As a "welcome back to Michigan!" present of sorts, I made Kym this clutch from fabric she selected from my stash.  We though the band across the front would look better a little wider since she wanted the silver dotted burlap -- to make it the size the pattern calls for would only show one row of dots.  I also didn't sew the band into a tube first just to avoid a bulky seam across the center.  I just folded the edges of the burlap under and ironed it flat before stitching it to the gathered piece.  Worked like a charm.


Gotta put a "K" charm on the zipper pull, of course!


I texted Kym a photo of the finished product and she was thrilled.  She doesn't know, however, that I added a super secret surprise lining.  Like Corey, she is an MSU alum (in a mixed marriage to a U of M alum!) so I thought she would get a kick out of the MSU fabric.  Let's just hope her husband, Drew, doesn't take offense.


It's really hard to take a good photo of the lining of a bag -- especially one this small!  Kym has an iPhone with a big Otterbox case like mine, so this will be perfect for that as well.  As with the first three I made, I added a layer of felt to each side for extra padding, rounded the bottom corners, sewed in a tab to attach a wrist strap to, and made the credit card slots vertical instead of horizontal.

She's back in Tennessee packing up the house this weekend, but we hope to have the whole family over for dinner Sunday.  Hope she likes it!

Saturday, August 24, 2013

Yet another Gathered Clutch

I have so many patterns that I want to sew that I rarely repeat previous ventures, but I have now made a third Gathered Clutch.  It's a great pattern, with a fabulous end result.  This one, I made for my friend, Natalie, from some of Amanda's fabric.  I thought it would be fun to take a picture of just all of the pieces that go into one of these little clutches, so I shot this picture for Instagram.


I realized afterward that I had actually forgotten to cut a piece, so just imagine a 4" by 9" strip of the gray and yellow lining fabric (for the band on the gathered side of the clutch) added to all of that.  Of course, I have added to the original tutorial an additional layer of interfacing on the non-gathered side as well as some felt batting, not to mention the side tabs, wristlet strap, and appropriate interfacing/felt batting for those as well.  It makes for a time-consuming cutting process, but a pretty quick sew.

Anyway, here is the finished clutch.  It's got a very modern combination of fabrics.  I hope Natalie likes it!

Friday, August 23, 2013

Gathered Clutch collaboration with Amanda

Amanda has good taste in fabrics I can sew -- together we make a good team!  She was interested in a Gathered Clutch too, so she went to Jo-Ann's and bought an assortment of cool fabrics and notions for me as bribery.  How could I say no to that?  On a related note, I think I need to take her with me on future fabric-buying expeditions.

This silver stamped burlap is so cool!  It was my first time sewing with it, and it will definitely not be my last.  It was stiffer to work with than I was used to, but not too difficult.  I'm trying to convince Amanda to let me make her a table runner for the console table in her living room with the rest of it.


I love the burnt orange lining material too.  I actually followed the directions a little better this time and got the zipper ends done much better.  It's a fun pop of color from the lining and it makes the zipper look so nice.


I won a prize pack of crafting goodies from a blog giveaway a few weeks ago, and it included a little package of silver letter charms -- perfect to decorate a zipper pull.


I added a layer of felt that I quilted to the lining, plus I sewed in little tabs on both sides of the pouch to assist with opening and closing the zipper (though perhaps they are a little too long?).  The bottom corners were rounded like the last one I did, but not as dramatically.  I also fused a layer of interfacing on the ungathered side of the pouch because I had seen a tip that it would help stabilize the burlap.  Apparently, burlap (probably the thinner kind) can get a little unruly at times.


Amanda liked the wrist strap I had added to my gathered clutch, so she bought me a pack of a few of those cool lobster claw thingies to use, too.  No scavenging for hardware this time -- what a luxury!


Now the test is to see how the burlap holds up to repeated use.  I honestly have no idea how it will behave over time, but I think the interfacing will help with the snagging issue that I just read about on another blog.

I tend to give away a lot of the things I sew whether the recipient is interested or not, so it's really fun to sew for someone who actually wants me to make something!

Wednesday, July 31, 2013

Gathered clutch

I had so much fun making this clutch/wristlet, and it may be the best phone holder/wallet option yet!  I like my other clutch I made, but I wish I had rounded the bottom corners.  I also wish it held my credit/loyalty/insurance cards a little neater.  I saw this tutorial from 2010 for a gathered clutch on one of my favorite sewing blogs, noticed the card holder and internal divider options, and decided I needed to give it a try.


Unfortunately, the pattern of the fabric kind of camouflages the cute gathered part of the clutch.  If you look closely, you can see how the purple rose fabric is gathered behind the denim band.  It might look more obvious with a different print.  I could also make that pattern piece longer so that it gathered more, but that might make a little too much bulk.


Inside, there is a divider that can keep my phone separate from the cash, and little pockets that can hold the cards.  I altered the design to make the cards stand up vertically so I could have three instead of only two sections.  I also added a wrist strap because I am on a kick of only carrying around a wallet/wristlet thingy instead of a full purse.  I'm sure I will be back to purses again soon, but it feels so nice not to haul around a big bag for a change.  Hooray for (sort of) potty-trained kids!  I also rounded the bottom corners in the 11th hour and am happy with the result.

Ooh -- actually, it fits even better when I put the cash behind the divider and my cell phone in the middle!


I stole the hardware for attaching the wrist strap from a flash drive we have.  How's that for upcycling?

If I make it again, I will use a different fabric so the gathers are more noticeable and I will pad it with a layer of felt as batting.  My phone could use a little more protection (even with that whole Otter Box, I'm still petrified of anything happening to my precious phone!).  I also had a really hard time with the zipper tabs and want to try that whole thing again, only making the zipper a little shorter.  I think I used too wide of a seam allowance to sew the whole clutch together and there was no way to avoid sewing through the zipper tabs (which is the trick to using zipper tabs).  Oh well -- this is certainly not the worst zipper I have ever sewn!  I also should have put the strap on the same side as the zipper pull when it's closed, so I can open the zipper easier.  Whoops.

Charlotte just saw it and said "it's the coolest wallet ever!  We skould make one for everyone we know!  For Shelby's mom, Grandma JoJo, NanaB, Ivette, Miss Kym . . ."  WHOAH there, cowgirl.  Learn to sew yourself (we're starting with a few little quickie projects, including a simple fleece sleeping bag for her beloved Charlotte Doll!) and then you can start planning out future sewing projects.

Friday, July 12, 2013

Redemption -- Double-Zip Wristlet

After yesterday's battle, I wanted to redeem myself by making a better pouch/clutch/wristlet/whateveryoucallit.  I had loved sewing from a previous tutorial by this particular blogger (the brick pouch), so I figured this tutorial would be a heck of a lot easier.  Happily, I was right!  Behold, the Double-Zip Wristlet:


I used a bit of the fabric I found in the remnants bin at Jo-Ann's (it's 100% polyester -- perfect for a bag or wristlet), and lined it with some material left over from Charlotte & Shelby's May Day Skirts.  I loooooove that the bottom zipper opens to its own separate section.  Wheeeee!


The zipper is still kind of creased from being in the package, but that will flatten out over time, right?  Now I kind of wish I had rounded the corners at the bottom of the pouch.  That would have been cute (and prevented things from getting stuck/lost in the corners).  Still, I love the pouch, and will be using it to stash my phone, credit cards, and cash when running errands!

Thursday, July 11, 2013

Back from the war: another pouch/clutch I will NEVER sew again

Okay, so I don't really feel like I just got back from active combat, but I swear my current foul mood is a direct result of this project.  I came across this woman's craft blog and saw some links for sewing tutorials that looked fun.  Then, I discovered she was one of those idealistic bloggers who believes Pinterest is destroying creativity and the business of being a craft blogger.

I know nothing about making money by blogging (nor do I ever care to), but I can attest that I have visited more blogs (thus upping their view counts, or whatever you call them) and sewn more than ever in my entire life since I signed up with Pinterest.  Maybe this blogger's attitude should have been a red flag, because her tutorial gave me major fits.  She even wrote at the top of the blog entry that she understood some people had problems with this tutorial.  Did that stop me?  No.  I have made tons of pouches and bags and understand the basics of bag construction.  Apparently, my understanding differed wildly from hers.  I should have just clicked onto another one of the umpteen pouch/clutch tutorials I have pinned and forgotten all about this Scrappy Clutch.

I won't bore you with an enumeration of my problems with the construction of this clutch/pouch/disaster, but my chief complaint was the method for installing the zipper.  I couldn't do it her way properly if my life depended on it.  I tried and tried, and eventually got something workable, but it's far from decent.  I'm not sure what she had against the way virtually everyone else on the planet does it, but I do know I should have just ignored her instructions and sewn the zipper the right way.  Here is the finished product, which is made from all sorts of scraps I had in my stash.


Come to think of it, I'm not sure why I even really tried this pouch and wasted a zipper on it.  It's pretty similar to a much-better constructed pouch, whose tutorial I could have altered to add padding and a strap (in addition to making it a little bigger).  I know bloggers who post free sewing tutorials don't owe me anything, but I still feel extremely frustrated and cranky after making this pouch.  I think I need a nap.

Wednesday, May 1, 2013

Erin's past projects

I first taught myself how to crochet right after grad school, in the summer of 2000, in an effort to combat boredom during the weeks between graduation and starting my job in Chicago.  For the next 9 years, I crocheted a lot of doilies and afghans, but I sometimes took a year off in between projects, so I wasn't all that prolific. Then, Sonia was born in the spring of 2009, and I stopped crocheting altogether.  My brain just couldn't handle childcare AND being creative.

But, as Sonia got older (she's about to turn 4), I started thinking about crocheting again.  Niki got me the Amineko book (which is utterly hilarious and awesome), so I picked up my hooks and gave crocheting another try.  The first blue amineko (that's Japanese for crochet cat) was a success, so I crocheted a little pink one.  Niki finally convinced me to give Pinterest a try during this past Christmas, and when I saw the insane amount of awesome free crochet patterns available on the internet these days, I got instantly and hopelessly addicted to crocheting once again.

Here are a few of the projects that I've made since Christmas:

Octonauts!!  Because Octonauts is a relatively new cartoon and series of books, the British and American crocheters of the world took it upon themselves to create their own toys.  People posted a bunch of free patterns!  I found Kwazii (the orange cat) here, Captain Barnacles (the polar bear) here, Tunip (the turnip-fish vegetal) here, Peso (the penguin) here, and I free-handed the rest. These guys were some of my first forays into the world of amigurumi (that's the Japanese word for crocheted or knitted plush figure), and now that I've completed a lot more amigurumi work, I kind of want to go back and re-do the Octonauts to make them better.  But Sonia barely even watches this show anymore (it was a brief love affair), so it seems like a bit of a waste.


Hello Kitty hats for my two favorite girls in the world, Sonia and Charlotte!  I found the pattern here.


Batman hat for Peter!  I found the pattern here.


After I made the Hello Kitty and Batman hats, I wanted to try to find a dragon hat to make for Sonia's BFF, Ike.  None of the patterns I found on the internet looked all that great (I couldn't even find a good pattern to buy!), so I decided to create one myself by copying an awesome crocheted dragon hat picture that I found on the internet. I used the Hello Kitty base hat design and then emulated the picture as well as I could.  Unfortunately, I only have cell phone pictures of the hat because I keep forgetting to take better pictures of Ike the Dragon!


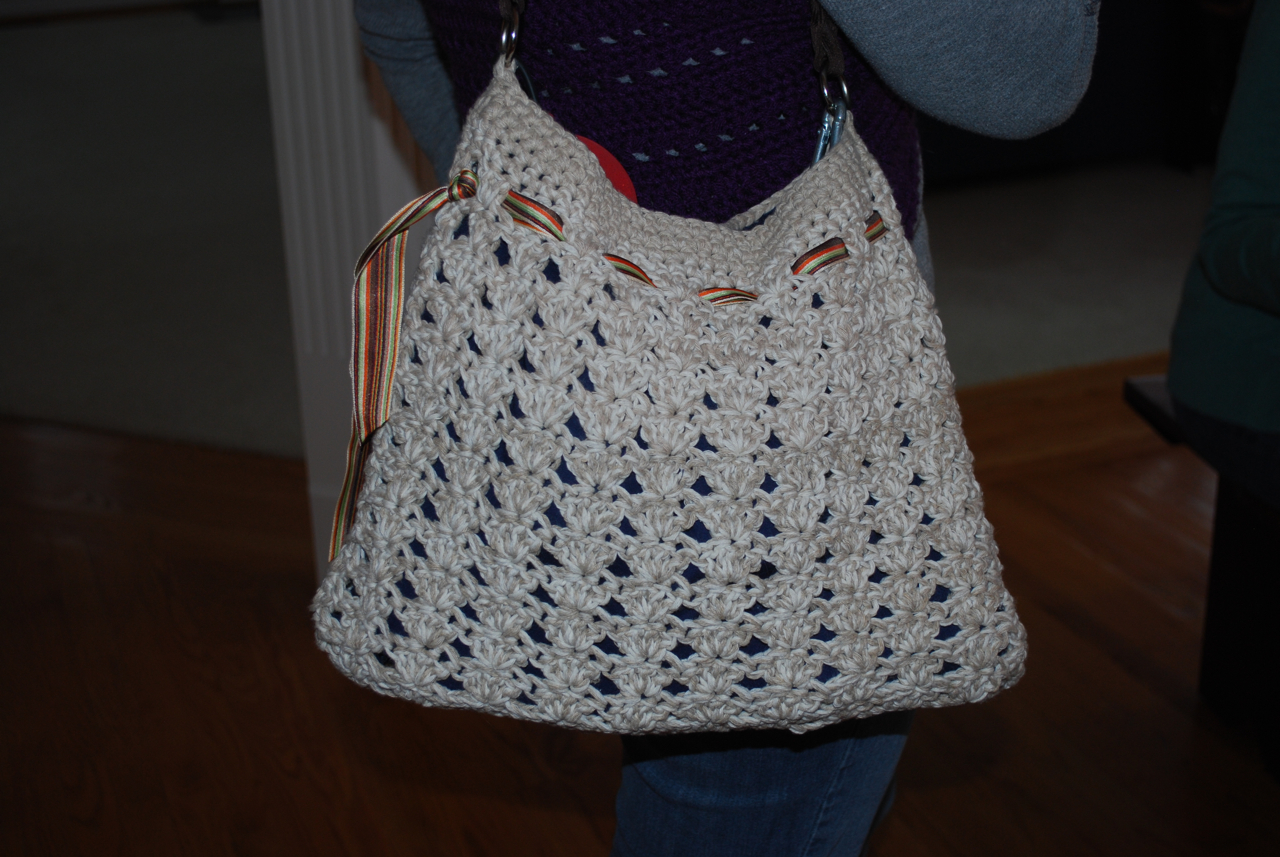
Crocheted purse!  I made one for me and one for Niki....  She lined them both with her mad sewing skills.  Niki, we need to take pictures of the linings!  I bought the leather strap from Joann Fabrics and found the pattern for the purse here.


Ladybug backpack!  Free pattern from Red Heart Yarns, my favorite cheap yarn to use!


Owl change purse! I decided to try out using a clutch clasp that I found at Joann Fabrics by adding it to this pattern.


Ella's dinosaur purse!  This was completely freehanded because as far as I could tell, no crocheted dinosaur purse exists on the internet either for free or to buy....


Sonia's Easter basket.... Freehanded as well because I wasn't able to find a pattern that I liked.  I did model it after this pattern a bit.


Max's Yoda hat!  I still need to tweak the forehead wrinkles a bit, but it turned out okay.  I made it using a pattern posted on a craft forum, and the pattern wasn't entirely complete or detailed, so I had to do a lot of extrapolating.


This post just scratches the surface of all the crocheting I've done over the past 4 months....  When I find or take more pictures of my projects, I'll post them!