I am STILL catching up on blogging about all of my Christmas crochet projects. I'll stop mentioning Christmas soon, I promise. One of our neighbors still has her Christmas tree up (with the lights turned on every evening!).... We're in a sort of race to see who can make Christmas last as long as possible.
Two more scalloped potholders (numbers 10 and 11) from my favorite pattern:
I was so in love with these hilarious little Christmas stockings that I made four in various sizes. What a cute pattern!
My cousin, Lauren, commissioned me to make four sets of coasters to give as gifts. I used my all-time favorite coaster pattern, of course.
I found a chart for a map of the state of Michigan, and I knew I had to try to make something out of it for my Michigan-loving brother-in-law, Corey. I tried to see if it could be a potholder or dishcloth, but it turned out a wee bit big for either purpose. I gave it to him anyway, and he decided that it would look nice framed. Then, he had me add french knots to mark some of his favorite places in the state.
Whoa-- I THINK I might be done talking about Christmas crochet projects. On to the next major holiday! I whipped up this cute little Rosy Heart to add to Sonia's teacher's valentine card, and despite a pretty complicated pattern (I fudged a bit on the last two partial rounds), I think it turned out great. Made with worsted-weight yarn, it turned out to be about two inches across.
You might be wondering if all the area yarn stores were cleaned out after all the Christmas crocheting I did, but I promise that I left a bit of yarn on the shelves for everyone else.
Showing posts with label potholder. Show all posts
Saturday, February 21, 2015
Monday, September 1, 2014
And even more potholders (with a bonus hot pad)
I tried to make myself another potholder using a really cool afghan block by Julie Yeager called "Firenze", but unfortunately, it came out too large. So, now I have a really beautiful hot pad! I had planned to crochet the pattern until it got to the right size and then stop, leaving off the rest of the rounds, but unfortunately, the way Firenze was designed, it didn't "square up" until it got past potholder size. Oh well! It still turned out nice anyway.
After I posted pictures of my last round of scalloped potholders, I got orders for five more! I made one for my Aunt Janet (Niki's and my crafting goddess muse) and four for my mother. Mom gave them to our relatives who hosted her in Indiana when she went there last week for a family reunion. My crocheted goods are being spread all over the country!
Potholder #1:
Potholder #2:
Potholder #3
Potholder #4 (whoops, forgot to take outdoor glamor shots of it, so these flash-lit ones are all I have):
Potholder #5 (whoops, forgot to take a shot with my real camera before I sent it to Aunt Janet, so this blurry cell phone picture is all I have... the other (not pictured) side of the potholder is all in the Lily Sugar 'n' Cream Cottage Twists):
More potholders are being planned and crocheted.....
After I posted pictures of my last round of scalloped potholders, I got orders for five more! I made one for my Aunt Janet (Niki's and my crafting goddess muse) and four for my mother. Mom gave them to our relatives who hosted her in Indiana when she went there last week for a family reunion. My crocheted goods are being spread all over the country!
Potholder #1:
Potholder #2:
Potholder #3
Potholder #4 (whoops, forgot to take outdoor glamor shots of it, so these flash-lit ones are all I have):
Potholder #5 (whoops, forgot to take a shot with my real camera before I sent it to Aunt Janet, so this blurry cell phone picture is all I have... the other (not pictured) side of the potholder is all in the Lily Sugar 'n' Cream Cottage Twists):
More potholders are being planned and crocheted.....
Thursday, July 31, 2014
More Potholders and Coasters
Lately, I've been crocheting up a storm of potholders and coasters.... I haven't worked this much with 100% cotton yarn since my doily crocheting days! Acrylic yarn is still more comfortable for me to crochet with and far more economical for amigurumis, but cotton is the only way to go when you need heat protection and absorbency.
The first three potholders were crocheted for my mother- and father-in-law, who told me that they were in dire need of new ways to protect their hands from hot pots & pans. My mother-in-law grew up on the Jersey Shore on Long Beach Island, and she still owns her childhood home, so we went with a seafood theme for the two potholders that will reside in that house's kitchen. This lobster potholder pattern came out of a vintage (1951) crochet pattern book that is out of print, but the pattern was posted on Free Vintage Crochet.
The lobster is appliquéd onto a plain square potholder (I used a natural color for the front and red for the back), and it is crocheted in just two pieces! What an ingenious design. I love the texture on the tail (using slip stitches in front loop only and then going back behind with double crochet stitches in the back loops) and how the feelers are layered over the claws. So cool!
This crab potholder is also from a vintage pattern available for free, and while the appliqué pattern is not as ingeniously designed as the lobster (all the crab's legs and claws were crocheted and then sewed onto the potholder separately), it still turned out very nice.
The only problem with this crab potholder is that my mother-in-law has declared it too pretty to use! I guess I'll have to make her a couple of boring-looking yet functional ones to stash in a drawer. Ha!
My parents-in-law also received this version of the scalloped potholder for their house here in Texas. I loved the blue one that I crocheted for myself so much (it's gorgeous and works really, really well) that I memorized the pattern and started churning them out. They take about 2 hours each, and the pattern is simply lovely.
Isn't that Lily Sugar 'n' Cream Twists yarn cool? The yarn is 4 ply, and each of the 4 strands is a different color (red, yellow, blue, and green). I thought it looked great with this pattern. I paired it with a sold red for the back.
Niki said she would like a potholder, too, so I stash-busted and paired this pretty Lily Sugar 'n' Cream yellow and green.
I still had more of the Lily Sugar 'n' Cream Twists yarn left, and I was itching to use it, so I decided to make one for my mom, too.
I didn't have enough yellow to make the entire back that color (even though that would have looked really pretty!!), so I put it in the center of the backside and finished off with red. It looks kind of like a poinsettia to me!
When I went to Jo-Ann Fabrics to get some other yarn, I had cotton on the brain, so I took a quick look at the Lily Sugar 'n' Cream section. Yes, I should be stash-busting rather than buying more, but look at this cool Ombre yarn!! Love the color combination.
This is a classic potholder pattern worked in single crochet stitches on the diagonal, and I love how it worked with the ombre yarn.
I had a hard time gauging how big it would turn out, and I made several versions before I was able to make one the perfect size. Potholders don't work so well if they're too big or too small, and I was being very Goldilocks about the size. I kept this beauty for myself!
In my quest to make the perfect coasters, I finally found a pretty pattern that was quick, easy, and works great to soak up condensation! I can whip one of these coasters out in about 20 minutes, I think. The color combinations were created through my stash-busting efforts.
Sonia loves these eye-catching coasters and uses them in her imaginative play a lot. But, I steal them back to stick under my drinks.
One more cotton yarn project: I was commissioned to crochet another hair accessory holder for a very cool girl named Nadia, so I used some more of my cotton stash to create this:
The plastic hanger is a lot more sturdy than the one I made for Sonia with a thin wire hanger! Apparently, Nadia loves it and was very happy to start clipping her hair accessories onto it as soon as it came in the mail. Happy organizing, Nadia!! She's a girl after my own heart.
The first three potholders were crocheted for my mother- and father-in-law, who told me that they were in dire need of new ways to protect their hands from hot pots & pans. My mother-in-law grew up on the Jersey Shore on Long Beach Island, and she still owns her childhood home, so we went with a seafood theme for the two potholders that will reside in that house's kitchen. This lobster potholder pattern came out of a vintage (1951) crochet pattern book that is out of print, but the pattern was posted on Free Vintage Crochet.
The lobster is appliquéd onto a plain square potholder (I used a natural color for the front and red for the back), and it is crocheted in just two pieces! What an ingenious design. I love the texture on the tail (using slip stitches in front loop only and then going back behind with double crochet stitches in the back loops) and how the feelers are layered over the claws. So cool!
This crab potholder is also from a vintage pattern available for free, and while the appliqué pattern is not as ingeniously designed as the lobster (all the crab's legs and claws were crocheted and then sewed onto the potholder separately), it still turned out very nice.
The only problem with this crab potholder is that my mother-in-law has declared it too pretty to use! I guess I'll have to make her a couple of boring-looking yet functional ones to stash in a drawer. Ha!
My parents-in-law also received this version of the scalloped potholder for their house here in Texas. I loved the blue one that I crocheted for myself so much (it's gorgeous and works really, really well) that I memorized the pattern and started churning them out. They take about 2 hours each, and the pattern is simply lovely.
Isn't that Lily Sugar 'n' Cream Twists yarn cool? The yarn is 4 ply, and each of the 4 strands is a different color (red, yellow, blue, and green). I thought it looked great with this pattern. I paired it with a sold red for the back.
Niki said she would like a potholder, too, so I stash-busted and paired this pretty Lily Sugar 'n' Cream yellow and green.
I still had more of the Lily Sugar 'n' Cream Twists yarn left, and I was itching to use it, so I decided to make one for my mom, too.
I didn't have enough yellow to make the entire back that color (even though that would have looked really pretty!!), so I put it in the center of the backside and finished off with red. It looks kind of like a poinsettia to me!
When I went to Jo-Ann Fabrics to get some other yarn, I had cotton on the brain, so I took a quick look at the Lily Sugar 'n' Cream section. Yes, I should be stash-busting rather than buying more, but look at this cool Ombre yarn!! Love the color combination.
This is a classic potholder pattern worked in single crochet stitches on the diagonal, and I love how it worked with the ombre yarn.
I had a hard time gauging how big it would turn out, and I made several versions before I was able to make one the perfect size. Potholders don't work so well if they're too big or too small, and I was being very Goldilocks about the size. I kept this beauty for myself!
In my quest to make the perfect coasters, I finally found a pretty pattern that was quick, easy, and works great to soak up condensation! I can whip one of these coasters out in about 20 minutes, I think. The color combinations were created through my stash-busting efforts.
Sonia loves these eye-catching coasters and uses them in her imaginative play a lot. But, I steal them back to stick under my drinks.
One more cotton yarn project: I was commissioned to crochet another hair accessory holder for a very cool girl named Nadia, so I used some more of my cotton stash to create this:
The plastic hanger is a lot more sturdy than the one I made for Sonia with a thin wire hanger! Apparently, Nadia loves it and was very happy to start clipping her hair accessories onto it as soon as it came in the mail. Happy organizing, Nadia!! She's a girl after my own heart.
Friday, June 27, 2014
Potholders & Coasters
Not sure what first inspired me, but I have made a bunch of potholders lately! I have a bunch of worsted weight cotton yarn on hand right now, so this is great for stash busting. The first one is the Flower Potholder by Jennifer Martin. I hooked this cool design for my sister-in-law's birthday, and I think it turned out really lovely!
The double layer really does make a good heat shield, and it turned out to be the perfect size (using a G hook).
The surface crocheting was kind of a grind (and hard on the hands), but it looks awesome. It even looks nice from the back!
I crocheted this next one for my mother, who has really embraced her new home state.... This pattern, like her armadillo, is by Wolfdreamer, and it was so much fun to crochet. Something about my crochet tension made it turn out more rectangular than square, but that's ok.
This next potholder was SO much fun to crochet! The Interlocking Rings Hotpad by Caitlin Pensak is constructed by crocheting 7 separate rings and weaving them together. Then, you crochet a solid backing, and join both pieces together with a round of sc stitches. Our brother, Jordan, was the recipient of this awesome potholder, so I used Denver Broncos colors in honor of his favorite NFL team.
Jealous of everyone else's cool potholders, I decided to make one for myself. I used Prescilla Hewitt's Scalloped Potholder pattern, and it worked up very quickly and easily.
My only regret is that I used this pretty Lily Sugar & Cream ombre yarn that does not properly show off the nice design (which is created with front post stitches).
You can see it in the navy on the back, though.
I also crocheted myself some coasters to help combat the insane amount of condensation that forms on the outsides of drinks in Texas. I know the humidity in Dallas is nothing compared to other places in the world (or even Texas), but it's more than I'm used to. Anyway, I first gave Asami Togashi's Star Stitch Coaster pattern a try.... The pattern was more complicated than I was hoping it would be (making it too hard to crochet while chatting or watching TV), so I don't think I'm going to make a whole set of them. This one that I finished is pretty, though! It uses sock weight yarn, interestingly enough.
I also gave Moogly's Nautical Crochet Coasters a try....
....but I still wasn't all that happy with the results. I had a hard time working with the thin cork (boy, is it easy to rip!!) and had to experiment a lot to be able to crochet the borders without ripping through the holes. I had to use a smaller hook to get it through the holes punched in the cork, so then I wasn't able to use Moogly's exact patterns. When I made up my own, I had less-than-stellar results. This red one doesn't lie flat (whoops).
This one turned out a bit better.
This is probably the best one. I doubled up on the coasters after I punched the holes and that made the coaster feel a bit more substantial.
I still have plenty more cotton yarn left, so I'll keep experimenting with coaster patterns. Coasters are fun, fast projects that are easy to tuck in a purse and do during my daughter's various activities, so I have a feeling I'm going to be working on them all summer long.
The double layer really does make a good heat shield, and it turned out to be the perfect size (using a G hook).
The surface crocheting was kind of a grind (and hard on the hands), but it looks awesome. It even looks nice from the back!
I crocheted this next one for my mother, who has really embraced her new home state.... This pattern, like her armadillo, is by Wolfdreamer, and it was so much fun to crochet. Something about my crochet tension made it turn out more rectangular than square, but that's ok.
This next potholder was SO much fun to crochet! The Interlocking Rings Hotpad by Caitlin Pensak is constructed by crocheting 7 separate rings and weaving them together. Then, you crochet a solid backing, and join both pieces together with a round of sc stitches. Our brother, Jordan, was the recipient of this awesome potholder, so I used Denver Broncos colors in honor of his favorite NFL team.
He asked for a hanger to be added to the potholder so he could hang it up above his stove, ready for action.
Jealous of everyone else's cool potholders, I decided to make one for myself. I used Prescilla Hewitt's Scalloped Potholder pattern, and it worked up very quickly and easily.
My only regret is that I used this pretty Lily Sugar & Cream ombre yarn that does not properly show off the nice design (which is created with front post stitches).
You can see it in the navy on the back, though.
I also crocheted myself some coasters to help combat the insane amount of condensation that forms on the outsides of drinks in Texas. I know the humidity in Dallas is nothing compared to other places in the world (or even Texas), but it's more than I'm used to. Anyway, I first gave Asami Togashi's Star Stitch Coaster pattern a try.... The pattern was more complicated than I was hoping it would be (making it too hard to crochet while chatting or watching TV), so I don't think I'm going to make a whole set of them. This one that I finished is pretty, though! It uses sock weight yarn, interestingly enough.
I also gave Moogly's Nautical Crochet Coasters a try....
....but I still wasn't all that happy with the results. I had a hard time working with the thin cork (boy, is it easy to rip!!) and had to experiment a lot to be able to crochet the borders without ripping through the holes. I had to use a smaller hook to get it through the holes punched in the cork, so then I wasn't able to use Moogly's exact patterns. When I made up my own, I had less-than-stellar results. This red one doesn't lie flat (whoops).
This one turned out a bit better.
This is probably the best one. I doubled up on the coasters after I punched the holes and that made the coaster feel a bit more substantial.
I still have plenty more cotton yarn left, so I'll keep experimenting with coaster patterns. Coasters are fun, fast projects that are easy to tuck in a purse and do during my daughter's various activities, so I have a feeling I'm going to be working on them all summer long.
Wednesday, May 1, 2013
Really really long post of Niki's past projects
Don't hate me because I have a pathological burning need to be complete in documenting my sewing adventures. Holy cow, I really DO keep Jo-Ann Fabrics in business . . .
Oh my gosh, tissue pack holders are crazy fun to make. I made the one on the top from this tutorial, and the one on the bottom from another one that I have since deleted off my Pinterest board because I liked the other one so much better. The bottom one is totally lame compared to the top one.
I love love love this sewing caddy. I obviously don't use it for carrying sewing supplies, but I totally could. It features pockets on the inside AND on the outside, and was fun to sew. The handles are floppier than I would like, but I can't remember if that is because I didn't follow the exact instructions. that is always a strong possibility since I usually just use what I have on hand rather than running out to buy the exact brand and type of interfacing or weight of fabric.
I'm using the caddy to hold all sorts of other little goodies I sewed.
Like this really lame camera case for Charlotte's camera! Early last year, I got all ambitious and tried to quilt some material and wing some little bags for Charlotte's and Sonia's new cameras. I learned two things: (1) quilting needs a walking foot and is a lot more complicated than throwing together a sandwich of fabric and batting, and (2) I needed a lot more practice actually sewing bags before trying to design one myself. In fact, at this point, I don't think I had discovered online sewing tutorials.
The very first online sewing tutorial I followed was for a "Car Cozie" (a car caddy to bring to restaurants, doctor's appointments, etc. to hold cars and provide a street for them to run the cars on). I fell in love with them and made something like 14 of them by the time the summer was over (for all of the cousins, friends, and even one for Corey -- per his request). I made this one for Charlotte:
And this one for Peter:
This is what it looks like all rolled up so you can throw it in your purse:
Since the car caddy was such a huge hit, I followed another tutorial (that I have since deleted because the directions were cruddy) to make all of the kids crayon caddies (they roll up in a similar manner, but I didn't take a picture of one all rolled up for some reason):
This diaper caddy (Do you see a theme? I seem to like caddies . . .) worked out great until Peter got (sort of) potty-trained last month. Now it's waiting to find a new use. Too bad I can't find the tutorial I used for this one, either.
At some point, I discovered what I thought was oilcloth in the remnant bin at Jo-Ann's. I made Steph and myself "wet bags" (thought the tutorial calls them "grocery totes") to bring wet bathing suits home from the beach in last summer. Turns out, this is really some sort of cross between vinyl and oilcloth, and I have yet to figure out the exact name. It's found in the utility fabrics section. This was my first round-bottomed bag, and it was fun to see how it all went together:
I winged this tote to give Peter a little bag for carrying around his treasures. Turns out he's not as interested in doing that as Charlotte is, but he certainly likes the bag. I brought it with me filled with Peter's car caddy and crayon caddy when I needed to entertain Peter during Charlotte's ballet classes:
This Olivia Bag was fun to make, but turned out smaller than I had imagined. I also had a rough time with the top stitching, never really fixed it, and just gave up on it after Erin crocheted me my awesome new purse. I loved that the tutorial taught me how to do an internal zipper pocket, though!
All last fall, Erin and I carried these purses that I made out of my old jeans. I found a couple of tutorials on the web for jeans purses and hated that they had stupid things like raw edges inside and really thin bottoms, so I used the skills I had learned from making a bunch of other bags and to sort of design this myself. I made a few more of them from Charlotte's old jeans and cords and they turned out even cuter (since her butt is so much smaller!).
This winter, I bought some Insul-Bright and went a little crazy making potholders for a while. This "oven hand mitt" is the one I made that I liked the best. I'm kicking myself for not taking pictures of the cool one I made for Jordan or the Star Wars one I made for his friend (to match the aprons I made for each of them, too!).
This fun little "fabric box" turned out to be perfectly-sized as a pencil holder.
Here is the super cool purse Erin crocheted for me. I sewed the lining for the purse based on this tutorial, and I used the wrap from Erin's bridesmaid dress for Ali's wedding as the fabric! Erin had given me the fabric ages and ages ago. and it works perfectly as a purse lining. I also sewed the little fabric key chain to match the jeans purse that I used to carry, but it still looks cute with the crochet purse.
Here is another one of the snappy bags. Fun fact: I got in huge trouble with Corey when I cut up his nicest tape measure to use in it. Whoops.
I adore adore adore this dumpling pouch. The fabric is cute, the pattern was fun to follow, and it holds a surprising amount of stuff in my purse.
I have sewn some pretty superfluous and unnecessary things just for the fun of it, but this may take the (cup)cake. It's a cover for my checkbook. I made the not-cut-on-the-bias tape myself, which is awfully cute in the strawberry fabric.
This little boxy zipper pouch was great to make, but it's unlined and you just can't zigzag enough with a regular sewing machine to get the raw edges inside to look good. I have since found tutorials for lined box zipper pouches, and would choose those tutorials instead next time I make one.
I made this tablecloth and the set of cloth napkins for Charlotte's tea parties. I sewed them over a year ago (before I discovered the wonders of online tutorials and the effect of the grainline in fabric) and they're a little bit funky as a result. I designed it myself and couldn't have done a worse job. Please don't look too closely at any of it.
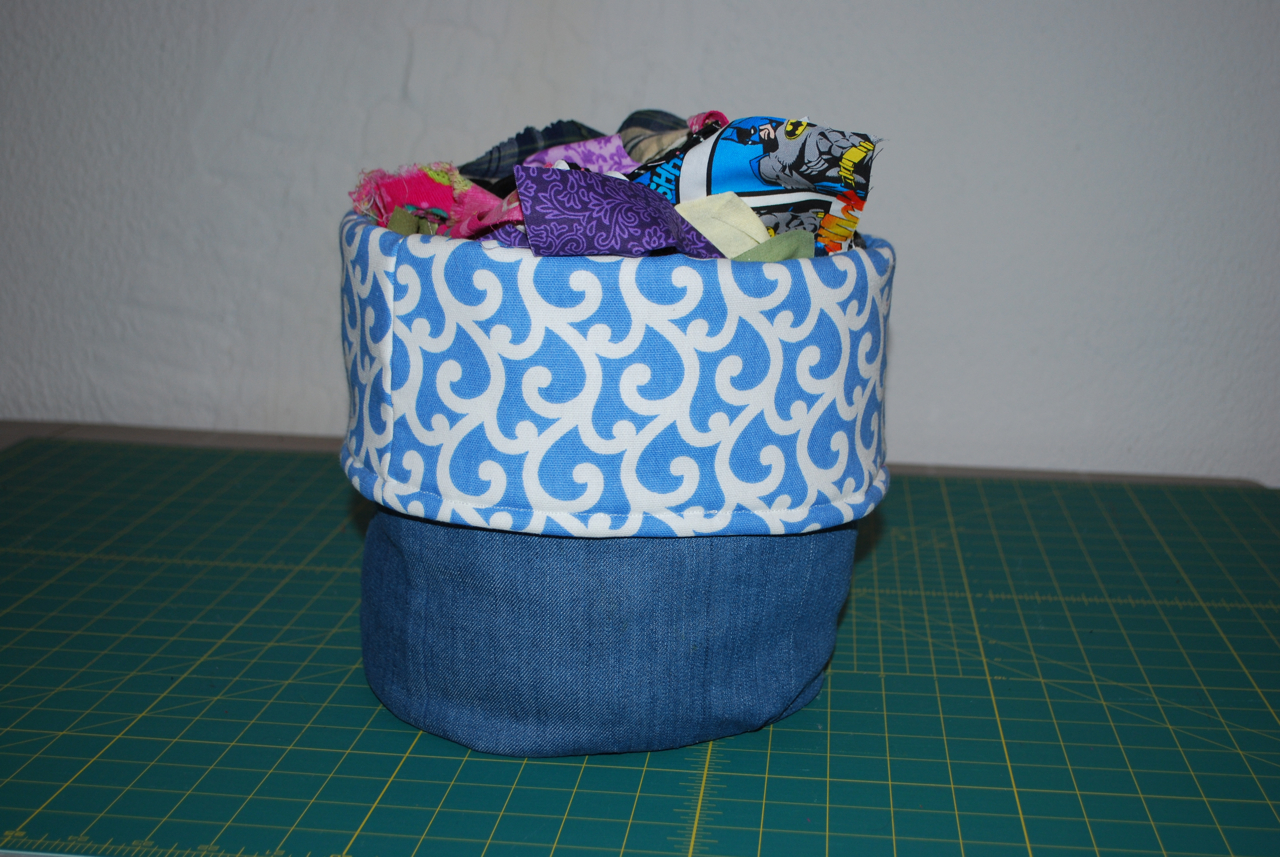
This is my denim scrap basket. Charlotte loves looking through my old scraps, and I need to come up with some sort of project for her to use them so they don't overflow!
Now THIS is actually oilcloth (aka laminated cotton). Once I finally buy some more bright green thread, I will finish topstitching around the edges of them and will have some great kid-friendly laminated place mats for the summer!
Here is the backside (a great heavy oilcloth I found on my pilgrimage to Haberman Fabrics in Royal Oak):
I made these curtains for Charlotte's room back in 2009. They are actually two separate valances (because her old room had two skinny windows) squished together on one rod to fit the big window in her new room. The buyers of our house in Tennessee had checked the option that they wanted our "window coverings" which technically included the valances, but since I was pretty darn sure the buyers didn't actually want my hand-made crap, I left them a stamped, addressed envelope for them to mail back to me any of the valances they didn't want. They sent back these, the ones from Peter's room, and the ones from the bonus room, but they didn't send me back the valance I REALLY wanted -- the cool tab topped one I had made a decade ago and still adored. Wah!
My great pillow sham piping experiment turned out better than I feared when I made Charlotte these two throw pillows for her bed. The purple one actually has a zipper closure! Too bad I only had a black zipper on hand and was too anxious to finish the project to wait until I had a matching zipper. Charlotte really loves the one with the heart applique, and insisted on sleeping on it instead of her real pillow for several weeks.
This dresser scarf was made to match Charlotte's valances and to test out the decorative stitches on my new (well, it was new then) Brother sewing machine. It was made out of my own imagination, before my imagination knew about things like batting and quilting.
I actually took an old t-shirt of mine and downsized it to fit Peter! I used Dana's tutorial for the pattern and technique of putting it together, but cheated by using the hems off of the original shirt sleeves, hemline, and the shirt's original neck binding. I really should have rebound the neckline because an adult t-shirt neckline has too shallow of a curve. The shirt is a little funky, but Peter doesn't care.
This diaper caddy has been transformed to an underwear caddy now that Peter is sort of potty trained! Petey can't reach his underwear drawer, so I put his undies in this in his closet since he needs to change them so often. Ahem.
I used the method of putting in a waistband a la the circle skirt, but the bottom part (recycled from some old t-shirts, is not a circle. The skirt is NOT super flattering on me, but Corey loves it because it has the Michigan State logo appliqued on it.
This little tote bag was a blast to make. I cut the pocket off of one of Corey's old shirts and it looks hilarious on there.
This pleated tote looks huge, but doesn't really hold a ton because it's flat. It was a fun introduction to pleats, though! After I made it I decided I hated the fabric, so it hasn't been used that much.
This tote has has been really handy. Who knows where I found this original tutorial, because I can't find it anymore. The tote has six pockets on the outside and I really love the stripes. I want to find more of that material to make some more stuff. That's the problem with always buying remnants -- yes they are 50% off, but they also are hard to ever find again!
This is Petey's other cape (made from a pattern created in my own little pea brain). It was not the original one -- that one was quickly destroyed because I made it out of my high school graduation gown, which was some crazy thin man-made nasty material. I salvaged the "P" applique and reapplied it to this new cape. The blue nylon fabric was from an old laundry bag that had never been used much.
This pleated zippered pouch is of my favorite pouches ever! I use it every time I travel. The pleated pouch tutorial is really well-written and easy to follow. The striped fabric was left over from some valances I made for Erin's apartment when she was first married.
Finally, this is the wardrobe I made for Charlotte Doll for Charlotte's birthday. This "Katie Dress" was my first dress that has a bodice! It has a zipper in the back and my first use of piping in a fashion sewing project. I got the skirt's pleats all wonky when I sewed the skirt to the bodice because that darn polyester does NOT like to hold a pleat in place, no matter how much you iron it. Yes, Charlotte Doll's hair is all wonky because I was practicing different types of braids and didn't bother to restyle it for the photo shoot.
Charlotte doll also needed her own pillowcase dress. I figured Hello Kitty fabric was a good choice, but it doesn't do much for Charlotte Doll's figure. Hee hee.
My first experiment in shirring! The bias tape along the top is kind of lame, so I would skip that step next time. The straps Velcro closure in the back. The top and the matching tote were made from my little pea brain. Now Charlotte Doll needs some coordinating shorts!
Auntie Ernie crocheted this awesome top, and I made a teeny circle skirt to match.
My first attempt at a t-shirt for Charlotte Doll was a disaster. This is take #2, and despite the fact that it looks like a mock turtleneck (barf!), the rest of it worked out well. The back has a Velcro closure. The tutu underneath is just a circle skirt stitched to 1" elastic for the waistband.
Oh my gosh, tissue pack holders are crazy fun to make. I made the one on the top from this tutorial, and the one on the bottom from another one that I have since deleted off my Pinterest board because I liked the other one so much better. The bottom one is totally lame compared to the top one.
Here is another one of the cool kind. It's a great way to use up tiny scraps from old projects.
I love love love this sewing caddy. I obviously don't use it for carrying sewing supplies, but I totally could. It features pockets on the inside AND on the outside, and was fun to sew. The handles are floppier than I would like, but I can't remember if that is because I didn't follow the exact instructions. that is always a strong possibility since I usually just use what I have on hand rather than running out to buy the exact brand and type of interfacing or weight of fabric.
I'm using the caddy to hold all sorts of other little goodies I sewed.
Like this really lame camera case for Charlotte's camera! Early last year, I got all ambitious and tried to quilt some material and wing some little bags for Charlotte's and Sonia's new cameras. I learned two things: (1) quilting needs a walking foot and is a lot more complicated than throwing together a sandwich of fabric and batting, and (2) I needed a lot more practice actually sewing bags before trying to design one myself. In fact, at this point, I don't think I had discovered online sewing tutorials.
The very first online sewing tutorial I followed was for a "Car Cozie" (a car caddy to bring to restaurants, doctor's appointments, etc. to hold cars and provide a street for them to run the cars on). I fell in love with them and made something like 14 of them by the time the summer was over (for all of the cousins, friends, and even one for Corey -- per his request). I made this one for Charlotte:
And this one for Peter:
This is what it looks like all rolled up so you can throw it in your purse:
Since the car caddy was such a huge hit, I followed another tutorial (that I have since deleted because the directions were cruddy) to make all of the kids crayon caddies (they roll up in a similar manner, but I didn't take a picture of one all rolled up for some reason):
This diaper caddy (Do you see a theme? I seem to like caddies . . .) worked out great until Peter got (sort of) potty-trained last month. Now it's waiting to find a new use. Too bad I can't find the tutorial I used for this one, either.
At some point, I discovered what I thought was oilcloth in the remnant bin at Jo-Ann's. I made Steph and myself "wet bags" (thought the tutorial calls them "grocery totes") to bring wet bathing suits home from the beach in last summer. Turns out, this is really some sort of cross between vinyl and oilcloth, and I have yet to figure out the exact name. It's found in the utility fabrics section. This was my first round-bottomed bag, and it was fun to see how it all went together:
I winged this tote to give Peter a little bag for carrying around his treasures. Turns out he's not as interested in doing that as Charlotte is, but he certainly likes the bag. I brought it with me filled with Peter's car caddy and crayon caddy when I needed to entertain Peter during Charlotte's ballet classes:
This Olivia Bag was fun to make, but turned out smaller than I had imagined. I also had a rough time with the top stitching, never really fixed it, and just gave up on it after Erin crocheted me my awesome new purse. I loved that the tutorial taught me how to do an internal zipper pocket, though!
All last fall, Erin and I carried these purses that I made out of my old jeans. I found a couple of tutorials on the web for jeans purses and hated that they had stupid things like raw edges inside and really thin bottoms, so I used the skills I had learned from making a bunch of other bags and to sort of design this myself. I made a few more of them from Charlotte's old jeans and cords and they turned out even cuter (since her butt is so much smaller!).
This winter, I bought some Insul-Bright and went a little crazy making potholders for a while. This "oven hand mitt" is the one I made that I liked the best. I'm kicking myself for not taking pictures of the cool one I made for Jordan or the Star Wars one I made for his friend (to match the aprons I made for each of them, too!).
This fun little "fabric box" turned out to be perfectly-sized as a pencil holder.
Here is the super cool purse Erin crocheted for me. I sewed the lining for the purse based on this tutorial, and I used the wrap from Erin's bridesmaid dress for Ali's wedding as the fabric! Erin had given me the fabric ages and ages ago. and it works perfectly as a purse lining. I also sewed the little fabric key chain to match the jeans purse that I used to carry, but it still looks cute with the crochet purse.
Here is another one of the snappy bags. Fun fact: I got in huge trouble with Corey when I cut up his nicest tape measure to use in it. Whoops.
I adore adore adore this dumpling pouch. The fabric is cute, the pattern was fun to follow, and it holds a surprising amount of stuff in my purse.
I have sewn some pretty superfluous and unnecessary things just for the fun of it, but this may take the (cup)cake. It's a cover for my checkbook. I made the not-cut-on-the-bias tape myself, which is awfully cute in the strawberry fabric.
This little boxy zipper pouch was great to make, but it's unlined and you just can't zigzag enough with a regular sewing machine to get the raw edges inside to look good. I have since found tutorials for lined box zipper pouches, and would choose those tutorials instead next time I make one.
I made this tablecloth and the set of cloth napkins for Charlotte's tea parties. I sewed them over a year ago (before I discovered the wonders of online tutorials and the effect of the grainline in fabric) and they're a little bit funky as a result. I designed it myself and couldn't have done a worse job. Please don't look too closely at any of it.
This is my denim scrap basket. Charlotte loves looking through my old scraps, and I need to come up with some sort of project for her to use them so they don't overflow!
Now THIS is actually oilcloth (aka laminated cotton). Once I finally buy some more bright green thread, I will finish topstitching around the edges of them and will have some great kid-friendly laminated place mats for the summer!
Here is the backside (a great heavy oilcloth I found on my pilgrimage to Haberman Fabrics in Royal Oak):
I made these curtains for Charlotte's room back in 2009. They are actually two separate valances (because her old room had two skinny windows) squished together on one rod to fit the big window in her new room. The buyers of our house in Tennessee had checked the option that they wanted our "window coverings" which technically included the valances, but since I was pretty darn sure the buyers didn't actually want my hand-made crap, I left them a stamped, addressed envelope for them to mail back to me any of the valances they didn't want. They sent back these, the ones from Peter's room, and the ones from the bonus room, but they didn't send me back the valance I REALLY wanted -- the cool tab topped one I had made a decade ago and still adored. Wah!
My great pillow sham piping experiment turned out better than I feared when I made Charlotte these two throw pillows for her bed. The purple one actually has a zipper closure! Too bad I only had a black zipper on hand and was too anxious to finish the project to wait until I had a matching zipper. Charlotte really loves the one with the heart applique, and insisted on sleeping on it instead of her real pillow for several weeks.
This dresser scarf was made to match Charlotte's valances and to test out the decorative stitches on my new (well, it was new then) Brother sewing machine. It was made out of my own imagination, before my imagination knew about things like batting and quilting.
I actually took an old t-shirt of mine and downsized it to fit Peter! I used Dana's tutorial for the pattern and technique of putting it together, but cheated by using the hems off of the original shirt sleeves, hemline, and the shirt's original neck binding. I really should have rebound the neckline because an adult t-shirt neckline has too shallow of a curve. The shirt is a little funky, but Peter doesn't care.
This diaper caddy has been transformed to an underwear caddy now that Peter is sort of potty trained! Petey can't reach his underwear drawer, so I put his undies in this in his closet since he needs to change them so often. Ahem.
I used the method of putting in a waistband a la the circle skirt, but the bottom part (recycled from some old t-shirts, is not a circle. The skirt is NOT super flattering on me, but Corey loves it because it has the Michigan State logo appliqued on it.
This little tote bag was a blast to make. I cut the pocket off of one of Corey's old shirts and it looks hilarious on there.
This pleated tote looks huge, but doesn't really hold a ton because it's flat. It was a fun introduction to pleats, though! After I made it I decided I hated the fabric, so it hasn't been used that much.
This tote has has been really handy. Who knows where I found this original tutorial, because I can't find it anymore. The tote has six pockets on the outside and I really love the stripes. I want to find more of that material to make some more stuff. That's the problem with always buying remnants -- yes they are 50% off, but they also are hard to ever find again!
This is Petey's other cape (made from a pattern created in my own little pea brain). It was not the original one -- that one was quickly destroyed because I made it out of my high school graduation gown, which was some crazy thin man-made nasty material. I salvaged the "P" applique and reapplied it to this new cape. The blue nylon fabric was from an old laundry bag that had never been used much.
This pleated zippered pouch is of my favorite pouches ever! I use it every time I travel. The pleated pouch tutorial is really well-written and easy to follow. The striped fabric was left over from some valances I made for Erin's apartment when she was first married.
Finally, this is the wardrobe I made for Charlotte Doll for Charlotte's birthday. This "Katie Dress" was my first dress that has a bodice! It has a zipper in the back and my first use of piping in a fashion sewing project. I got the skirt's pleats all wonky when I sewed the skirt to the bodice because that darn polyester does NOT like to hold a pleat in place, no matter how much you iron it. Yes, Charlotte Doll's hair is all wonky because I was practicing different types of braids and didn't bother to restyle it for the photo shoot.
Charlotte doll also needed her own pillowcase dress. I figured Hello Kitty fabric was a good choice, but it doesn't do much for Charlotte Doll's figure. Hee hee.
My first experiment in shirring! The bias tape along the top is kind of lame, so I would skip that step next time. The straps Velcro closure in the back. The top and the matching tote were made from my little pea brain. Now Charlotte Doll needs some coordinating shorts!
Auntie Ernie crocheted this awesome top, and I made a teeny circle skirt to match.
My first attempt at a t-shirt for Charlotte Doll was a disaster. This is take #2, and despite the fact that it looks like a mock turtleneck (barf!), the rest of it worked out well. The back has a Velcro closure. The tutu underneath is just a circle skirt stitched to 1" elastic for the waistband.
Subscribe to:
Posts (Atom)