Showing posts with label upcycle. Show all posts

Wednesday, December 10, 2014

Pattern testing for Eco Friendly Shopping Bags


I am horrified to admit that I wrote this post in early October but am now just publishing it!  I was lucky enough to be selected to be a pattern tester for the lovely Jill (she's a Brit living in Australia who writes the awesome blog Creating My Way to Success) when she was in the process of writing her E-book on Eco Friendly Shopping Bags.  More accurately, I was a PATTERNS tester, because this bag actually contains a few other bags inside it as well!  

The bag is made from a lot of upcycled materials, including virtually all of a pair of adult jeans.  I really love using old jeans!  In addition to the upcycling aspect, there are also great features including an internal zipper pocket . . .


. . . and two adorable internal patch pockets using the back pockets of the jeans.


On the outside, there is a hidden zipper pocket too!  I love the flap covering the zipper because it makes the outside of the bag look more polished than an exposed zipper would.  (I took the next two pics before I had added the handles for some reason.)


But wait!  What is that inside that hidden pocket?


It's a pair of reusable mesh produce bags!  Jill's original tutorial for these bags used upcycled machine lace curtains, which looked really cool.  I used a type of tulle instead (because I already had it in my stash) and they turned out pretty fun if I do say so myself.


As if that wasn't enough, there is also a nifty little secret compartment in the bottom of the bag that you access by unzipping a hidden zipper at the side.


Inside is a nice little bag shaped like this.  Well, this is it empty, anyway.


The bag is designed to be filled, as shown below.


But what's inside?  It's a whole bunch (eight, to be exact) of reusable grocery sacks!


I made these from some old sheets (Erin gave my Sonia's old sheets after she got new ones!).  Here's a shot of one up close (which unfortunately does not demonstrate that the bottom of the bag is boxed out so it can sit flat when filled with groceries).


Can you believe all of this fits inside that bag, plus room for all of your normal purse items?


I have been a big fan of Jill's tutorials for a long time now, and I was very impressed with the ingenuity and design of this bag.  She did such a terrific job!  You can buy her E-book from her blog, where you can also find about a zillion other fantastic tutorials for all sorts of neat things.  Thank you for the opportunity to be a tester, Jill, and I hope you sell lots of the E-books!

Saturday, March 22, 2014

Andrew's Notre Dame lunch bag

DARN IT!  I did it again.  I made a gift for someone and forgot to document it before sending it on to the recipient.  Since the recipient is Erin's husband, Andrew, you would think it would be easy to just ask Erin to take some photos.  Andrew has, however, already started a new job in Texas while Erin and Sonia stay behind to get the house sold, and I sent the birthday present to Andrew in Texas.  Someday I might get some better photos, but for now all I have is this cruddy cell phone pic taken in my basement sewing area.


Yes, even though Erin and I started this goofy blog to document our sewing/crocheting adventures for each other, we still send each other cell phone pics of projects in varying stages of completion because we are obnoxious like that.  Maybe it's a twin thing.

This is the third lunch bag I have made using the fabulous Pink Penguin tutorial.  This time, I used fabric from Andrew's old Notre Dame baseball jersey and some old plaid golf shorts that Erin gave me to make something out of.  The lining of the bag is also made from the plaid, which is some sort of sporty fabric that almost feels a bit like ripstop nylon.  I chose to use cotton webbing for the handles instead of sewing fabric handles, and it turned out great.  The cording in the drawstring top is parachute cord.

Next time I make one of these lunch bags, I will remember to cut the top cover pieces a bit wider so I can sew in French seams.  Ayumi (the genius behind Pink Penguin) mentions this modification possibility deep into the tutorial, but it is unfortunately long after the cut list.  Each time I have made this bag, I cut the fabric before figuring out the raw edge issue and didn't have enough fabric left over to recut the cover pieces.  Grrrrrrrr...

Sunday, March 16, 2014

LET'S GO DUKE!

In less than an hour, Duke University (my alma mater) will be playing University of Virginia in the ACC championship title game.  Charlotte now has a fabulous new circle skirt made from our old t-shirts so she can cheer on the Blue Devils in style!


I pieced together squares cut from the backs from four t-shirts (the lighter blue one was actually Corey's old Duke shirt, but the other three just happened to be in good colors), then cut it into shape.  Afterward, I appliquéd on the logos so they would be in the right place near the hemline.  The border between the gray and navy panels is the front middle of the skirt.  Finally, I sewed on a 3" wide elastic waistband and zigzagged around the bottom of the skirt for a little extra detail.


I sewed the skirt while Charlotte was at school on Friday and just sort of winged the length.  It came out a tad long, but it is winter after all, right?  I stuck it on Charlotte right after she got off the bus and had her pose a little.  Her hair looks a little bedraggled because this dry winter air is not kind to Charlotte's fine hair -- especially after taking hats on and off all day!


Best thing about a circle skirt?  The twirlability!  Yes, that is a word (at least in this household).


Crossing our fingers for an ACC championship trophy to get March Madness started out on the right foot!

Tuesday, December 31, 2013

Denim Tooth Fairy Pillow -- Sewing Tutorial


The possibilities for embellishing this Denim Tooth Fairy Pillow are endless, but here are basic instructions for making a bare-bones version as a jumping-off point.  It would be adorable to make one with some of that pom-pom edging, use colored denim or heavy canvas, add a little appliqué detail, or even simply sew some decorative stitching on the pockets.  These would be great gifts for any upcoming birthday parties the kids are invited to, because it's one-size-fits-all and everyone loses teeth!

You can use strongly contrasting denims (as with the one on the left, which was a prototype with slightly different sizing), and any color or stitching or piping that your heart desires.  I can't wait to make a few more with some bright colors.


Denim Tooth Fairy Pillow -- Sewing Tutorial

Materials Needed:

Old jeans (or denim off the bolt) or heavy canvas, in two contrasting shades if you desire
     * Cut the denim meant for the main part of the pillow into two 8" squares
     * Slightly round the corners of each of the main pillow pieces
     * Pattern drafting directions for the pocket shape are below
Piping -- at least 36"
Thread color of choice for topstitching
Thread to match piping
Denim/leather/heavy duty needle
Pillow stuffing
Paper (just a small scrap)
Zipper or piping foot (not required, but helps a bunch)

Seam allowances vary throughout the project and are indicated at the appropriate times.


Instructions for drawing pocket pattern:

Draw a rectangle with a width of 3 1/2" and a height of 3 3/4".  Draw a dot on both the right and left sides (the longer sides) at 2 3/4" down from the top.  Draw a dot in the center of the bottom (shorter) side (at 1 3/4" from the edge).  Connect the side dots to the bottom center dot to form the upside down pentagon shape for the pocket pattern.


Cut out the pattern and cut two of these shapes from the denim meant for the pockets.  I love to use freezer paper so that I can iron the shiny side of the pattern piece to the fabric, which temporarily makes it stick and prevents it from slipping around while I'm cutting.


STEP ONE: Preparing the pockets

Press under each side of both pockets 1/4" and steam the heck out of them with your iron.  With a thicker denim, it works better to press about 1/3" under, which won't make much difference in the finished product.


Denim does NOT like to stay in shape, so flip each of the pockets over at add some topstitching 1/8" from the edge to keep it all stable.  Add a second line of top stitching 1/4" below the top horizontal line.  I went over both of the horizontal lines of stitching twice to make them darker.  The other four lines will get a second layer when you stitch the pockets on to the pillow, so no need to reinforce those at this time.  Repeat the whole process with the second pocket, then press them well.


STEP TWO: Adding decorative topstitching to the pillow

With a blue pen (or a disappearing fabric marker), draw two vertical parallel lines 1/4" apart on either side of the center of the main pillow piece.   It's hard to see in this photo, but you can see it if you squint.  Top stitch down both of this lines.  I used the triple stitch function on my machine so the stitching would look extra strong, and it looked pretty cool.  If you don't have a triple stitch function or don't know what the heck I'm talking about, you can achieve a similar effect by just sewing over the lines two or three times.


Doesn't the triple stitch look nice?  Anyway, with your pen, make a dot on both the left and right sides that is 2" down from the very top (where the corners would have been if you hadn't already rounded them off) and another one 1/4" below.  Then, draw dots down the center line (between the two lines of stitching you just did) at 3" down from the top edge, and then draw another one 1/4" below that.  Connect the top dots on each side with the top dot in the center, and the lower dots on each side with the lower dot in the center to form the two parallel chevrons.  It probably makes more sense just to look at the photo below.


Stitch over those lines in the same manner as the vertical lines (triple stitch if you have it, several layers of topstitching if you don't).


STEP THREE: Sewing on the pockets

Pin on the pockets with their edges about 1/4" or so from the vertical lines of stitching, and about 1/2" below the bottom point of the chevron point.  You can totally just eyeball it, but make sure that the pockets aren't too close to the edges of the pillow piece -- keep them at least 3/4" inches away or so.


Stitch the pockets on by going over the side and bottom lines of stitching.  Don't sew across the horizontal, or else you will stitch the pockets shut.  Sew a few reinforcing stitches at the tops of the pockets to make sure overeager Tooth Fairies don't accidentally pull the pocket loose.


STEP FOUR: Adding the piping

Swap the regular foot on your machine out for the zipper foot.  I hear a piping foot is super awesome for projects for this, but I don't have one of those just yet.  Remind me to add one of those to my wish list!  Also, change your thread to match the piping.

Line the raw edge of the piping up with the raw edge of your pillow piece (it doesn't matter which piece you use) on the RIGHT SIDE of the fabric, starting near the bottom middle.  Starting in about an inch and a half from the end of the piping, stitch right on top of the stitching that holds the cord inside the piping cover, making sure to keep the raw edges of the piping and the fabric lined up.  I don't like to pin the piping ahead of time, but you can certainly do that if you prefer.

Before you get to each corner, clip the raw edge of the piping (almost all the way to the stitch line, but not quite there) in a few places to help ease the piping around the corner.  I wish I had remembered to take a picture of it.

When you get near the beginning, cut the end of the piping so it overlaps the piping at the start by about an inch and a half.  At this point, you can either cross over the piping ends (with the raw ends forced toward the outside of the pillow) or you can do a nifty trick I learned from Noelle O Designs to sneak one end into the other to make it appear almost like never-ending piping.  She explains the process far better than I ever could, so go to her tutorial for better instructions.


Here is what it should look like once your piping is added.  You can see the little clips I made (probably far more than necessary) at the corners.  I chose to use the continuous piping method and you can barely tell at the bottom where the ends of the piping come together.  Such a nifty little trick!


STEP FIVE: Final construction of the pillow

Pin the other 8" pillow piece to the piece with the piping with the right sides facing.  Make sure the piece with the piping is pinned on top, because you will be stitching the pillow pieces together by following the stitches you can see on the wrong side.  Line up the raw edges very carefully, because there is not a whole lot of room for error with such a small seam allowance.

Starting on the right side, a couple of inches up from the bottom corner, sew the two pieces together by stitching right on top of the line of stitching that attached the piping.  Make sure to stop about three inches before you reach the beginning so there is a gap left for turning.


It looks like I forgot to leave a gap when I stitched the pieces together, but that's just the piping stitching line that you can see in the gap.  In this photo, you can see some extra stitches in the seam allowance where I started and ended my stitching.  A better explanation of the reason for this is found in the Neat Finish Window Pouch Tutorial, but it helps the fabric turn in after the work it turned right side out.


I totally forgot to take pictures of it, but make sure to cut three tiny wedges out of the seam allowance around each corner (near the stitching line, but not through it) to reduce bulk once the piece is turned right side out.  After you cut those wedges, turn the pillow right side out and admire how adorable it it.

Add some stuffing (not tons -- don't overstuff it!), making sure that enough gets into each corner.  Then, grit your teeth, grab a hand-sewing needle and some of the thread that matches your piping and get to work using a blind ladder stitch to hand-sew the opening closed.  I HATE THIS PART, but it looks much nicer than if you try to sew it closed by machine.  I have tried and tried to get pillows to look nice by machine-sewing the opening closed, but it just doesn't seem to be possible.


All done!  Now grab the nearest kid and wiggle a baby tooth out of his or her head to use as bait for the Tooth Fairy.  Charlotte wanted to know if she had to lose two teeth at a time because there were two pockets on the pillow, but I told her the other pocket was so she could write the Tooth Fairy a note or something.  I don't always have all the answers, but I have no problem making them up in situations involving fairies.


Tutorial for personal use only, please.

Featured on: Threading My Way, Craft Gossip, Totally Tutorials, Gingerly Made, And Sew We Craft, Nap-Time Creations, One Krieger Chick, Sew Pretty Sew Free, Sewistry, Denim Do Over, A Bright and Beautiful Life, Modern Baby

Linking up to: Threading My Way, Funky Polkadot Giraffe, Mabey She Made It, Nap-Time Creations, Ginger Snap Crafts, Gingerly Made, The Stitchin' Mommy, The Idea Room, Peek-a-Boo Pattern Shop, I Heart NaptimeFlamingo Toes, Two It Yourself, U.S.S. Crafty, Sew Many Ways, Scattered Thoughts of a Crafty Mom, Creating My Way to Success, Sew Can Do, Craft-O-Maniac, Sumo's Sweet Stuff, Skip to My Lou, Blossom Heart Quilts, Sugar Bee Crafts, Feather's Flights, The DIY Dreamer, Made To Be A Momma, Sew Much Ado, The Princess and Her Cowboys, Accidentally Wonderful, Katherine's Corner, Craftberry Bush, Sugar and Dots, Sewlicious Home Decor, One Krieger Chick, Stitch by Stitch, The Chicken Chick, A Bright and Beautiful Life, I Have to Say, And Sew We Craft, The Tip Toe Fairy

Thursday, December 26, 2013

Guest post from our little brother, Jordan -- Memoirs of a Gigolo


Well of course- what would YOU call a male hooker?

Anyway, I set out to make a rag rug for Grandpa Chuck as a Christmas gift.  I figure the last thing he needs is another gadget or gewgaw he can't even see, but I can at least give him something comfy to stand on while he blindly brews coffee.  Happy Holidays from Dr. Scholl, or something like that.

I ripped the edging hems off of two sheets, one red and one pale green, measured 3" intervals all down one side, then ripped each measure down the length of the sheet to within an inch of the opposite side.


The result looked like one of those heavy, sloppy brushes you see in drive-through car washes.  Once this was complete, I tore each of these 3" strips in half starting from the 'spine' and ending within an inch of the free end.  This created one long serpentine of 'yarn' from the entire sheet.  Trying to keep it all together, I could imagine what it must be like trying to wrestle a jellyfish and its unholy mass of tentacles and slaw.


I say- tearing a sheet apart isn't exactly as impressive as ripping the Denver Metro phone book in half, but by the end of it my arms were tired!  Assuming standard sizes for sheets (green was a king, red a queen), an inch hem removed from both dimensions, and the inch reserved for continuity, I calculate that I ripped 15,226 inches of fabric.  That's 1,269 feet or nearly a quarter mile!  Hulk Hogan thinks he's a badass because he rips one T-shirt down its 2 foot length.  Try ruining 600 shirts in a row, Mr. Tough-Guy, then see if you can still full-nelson the Macho Man.  Betcha can't, homeskillet.

What a huge pile of sheet.


Once the sheets were rendered to a mountain of spaghetti, I rolled each into a yarn ball for easy wrangling during the crochet process.  Let it be said that for a dude to crochet it requires big balls.  Here they are next to a full size claw hammer for reference.


I set out to make a simple round rug for Gpa, starting with a chain of six and adding six each row, but before I knew it I had a base of seven knots and was mysteriously adding one extra knot each round.  I guess I forgot how to end a row and begin a new one when crocheting discrete circular rounds.  Halfway through I remembered how it's supposed to go, but I just let it ride and kept adding seven knots per row.

As the rug grew in size the ball-in-use kept yapping around my feet like a Yorkshire terrier.  I had fun kicking it across the room occasionally, but it would simply return and start nipping at my ankles again.  It reminded me of the time in high school when we tied a few shirts into a ball, dunked it in diesel, and played fireball soccer.  So much fun!  The town of Foresthill, CA dodged a burn-to-the-ground bullet that night.

Kittens run in fear of these oversized yarn balls.


Halfway through the rug I realized I might have enough stock for two rugs, so I did some quick calculations.  My scale said I had 875 grams left of the green ball, 634g of the red and 346g of rug already made for 1855 total grams of stock.  I had a circular rug 8" in radius, so pi-r-squared said I had 254 square inches of rug at 1.362g/square inch.  927g of stock (half of the total) would then allow for a 14" radius rug, which is a good size.  Using all the stock for one rug would make a 20" radius rug, which is huge- Gpa's condo isn't exactly the largest domicile in existence.  Two rugs it is!

For the second rug I decided to employ the hexagonal method, which is the same as crocheting in a circle except you add the stitches in the same place every time.  Eventually this creates corners.  I presume that if you added enough rows in this manner (like hundreds) it would eventually take on a snowflake shape with the corners stretching out further than the sides.  As it was, I barely had enough rows to form a definite hexagon, but give me a break-I was running out of stock quickly.

Near the end I finished the last red row with only about 2 feet of extra length.  This was almost as satisfying as arbitrarily grabbing the exact number of hangers required for the load of shirts coming out of the dryer.


So there they are, two freshies to add to the memory vault.  The lighting, when combined with an iPad camera and an apathetic attitude towards photography in general, makes the green look a little sickly.  In person it is a fine color combination anyone would take home to mother.  Which is, incidentally, exactly what I'm going to do.  The hexagon is for Ma.


_____________________________

Note from Niki -- GOOD LORD, I HAD NO IDEA ABOUT THE FIREBALL SOCCER GAME!  And I find it all kinds of hilarious that a claw hammer was used for scale while documenting a crochet project.  My brother is a complete goofball -- you would never know from reading this that he was a varsity wrestler in high school.  And how many chemists crochet rag rugs in their spare time?  Not many, I'd bet.  

Saturday, October 12, 2013

Neat Finish Window Pouch Tutorial


I have two weaknesses -- zipper pouches and clear vinyl.  Combine the two and I'm hard-pressed to pass up a chance to sew one.  My biggest complaint about all of the tutorials I have tried for window pouches so far is that they leave raw edges on the inside to some degree.  Designing a pouch with a clear vinyl window is tricky because you can't fully line it without blocking the window, thus negating the whole purpose!

I designed the size of this pouch to accommodate the car registration and insurance paperwork that we are required by law to carry around in the glove compartments of our cars.  Somehow, they always end up munched at the bottom of the compartment and are difficult to find when the need arises.  I have to credit Corey with the idea of sewing a window pouch to hold them, though I doubt he cares very much whether there are raw edges inside.  I wanted the pouch to have a little body to it so the paperwork would remain safe, so I grabbed a damaged canvas grocery bag, cut it apart, and came up with this:


Neat Finish Window Pouch -- Sewing Tutorial

Materials Needed:

Canvas (duck cloth, interfaced quilting cotton, or home décor weight fabric also work)
Lighter coordinating fabric (quilting cotton works great)
Clear Vinyl (any gauge)
Zipper (at least 8” long)
Coordinating thread
Denim or leather needle

Materials needed


Cutting instructions:

From the canvas, cut:
-       one piece 9” x 6 1/2"
-       six pieces 9” x 1 1/2"
-       four pieces 2 1/2” x 4”
-       two pieces, 4” x 1”

From the coordinating fabric, cut:
-       one piece 9” x 6 1/2"

From the clear vinyl, cut:
-       one piece 5” x 4”

Seam allowances will vary throughout the project, and will be indicated at the appropriate times.  You won’t need a Teflon foot or walking foot to deal with the vinyl, because your presser foot never actually touches the vinyl in this project!

Finished size of the pouch: approximately 8" x 6"


STEP ONE:  Framing the vinyl

Sandwich two of the 2 1/2" x 4” pieces of canvas around the short end of the vinyl, lining up the raw edges with the edge of the vinyl and with the right sides of the canvas facing the vinyl.  [Do not use pins – use binder clips or Wonder Clips instead or else you will end up with holes in your vinyl.]  

Step one: framing the vinyl


Sew with a 1/2" seam allowance.  Finger press the seam open.

Step one: framing the vinyl


Repeat on the other size of the clear vinyl.

Step one: framing the vinyl


Sandwich two of the 9” x 1 1/2” pieces of canvas along the long edge of the vinyl, lining up the raw edges of the canvas with the edge of the vinyl and with the right sides of the canvas facing in to the vinyl.

Step one: framing the vinyl


Sew with a 1/2" seam allowance.  Finger press the seam open along the vinyl, and use an iron to press the seam open where only fabric is sewn to fabric.  Don’t melt that vinyl!  

Step one: framing the vinyl


Repeat along the opposite edge.  Now the vinyl window is nicely framed.

Next, topstitch all around the edge of the fabric, right outside the vinyl.  I find that I need to tighten my upper tension a bit when sewing through vinyl and heavier fabrics.  It didn’t matter so much in the previous steps, but topstitching on the vinyl (and later for topstitching the canvas with the zipper) causes my machine to need this adjustment for some reason.  

Step one: framing the vinyl


Set this cute little framed window aside until the end of the next step.

Step one: framing the vinyl


STEP TWO:  Sewing in the zipper

Lay out your zipper and mark two places 6 1/2" apart from each other.  (I always keep long zippers on hand so I will have one long enough for whatever project I sew, so that’s why I’m using a 14” zipper.)  It doesn’t matter at this point where you mark the zipper in relation to the zipper pull, but just make sure neither of the marks are outside either side of the zipper stoppers.

Step two: sewing in the zipper


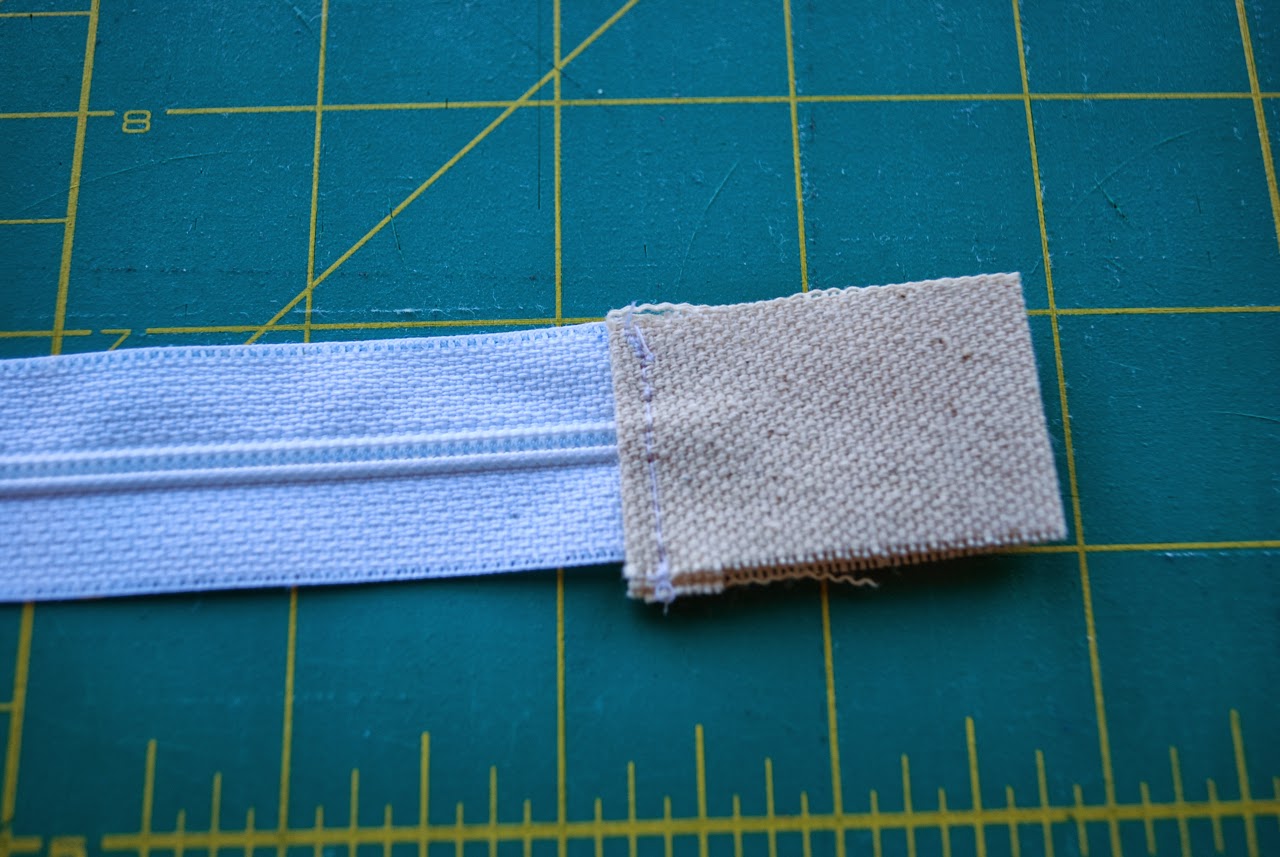
Take one of your 4” x 1” pieces and lay it with the right side facing the right side of the zipper with 1/4" of the fabric overlapping the mark you made at the end of the zipper (not the side with the zipper pull when the zipper is closed).  The fabric should be aligned with the zipper, but I pulled it down out of place to show where it is in relation to the mark.

Step two: sewing in the zipper


Sew the fabric to the zipper at the mark (with a 1/4" seam allowance from the end of the fabric piece).  

Step two: sewing in the zipper


Trim the zipper that extends past the material.

Step two: sewing in the zipper


Open up the seam and finger press (or very carefully press with an iron, being careful not to melt the zipper!) the fabric away from the zipper.

Step two: sewing in the zipper


Flip the zipper over and fold the fabric piece over to meet up with the its other end, tucking 1/4" of the fabric toward the wrong side to hide the raw edge.  Finger press (or carefully press with an iron) it all flat.  

Step two: sewing in the zipper


Flip the zipper back over again and topstitch the little fabric sandwich you have made at the edge of the fabric.

Step two: sewing in the zipper


Repeat the process with the other side, but first unzip the zipper so that the zipper pull is between the two marks. 

Step two: sewing in the zipper

Step two: sewing in the zipper


Take the last two unused 9” x 1 1/2" strips of canvas and sandwich the zipper between them (right sides of the strips facing inward), lining up the edge of the zipper tape with the raw edges of the canvas strips.  The fabric ends of the zipper will be longer than the canvas strips, so just center the zipper so that equal bits of the fabric ends stick out on each side. 

Step two: sewing in the zipper


Using a zipper foot (or if you’re lazy like me, just change the needle position to all the way over to the left), sew the sandwich all together.  It’s a little tricky because you can’t feel the zipper at the beginning where the fabric tabs are, so just sew with about a 1/4" seam allowance until the zipper begins.  Carefully press the seam open with the iron, and then topstitch at the edge of the fabric along the zipper.

Step two: sewing in the zipper

Step two: sewing in the zipper


Now this next step really bugs me, but there doesn’t seem to be any good way around avoiding sewing in the bottom side of the zipper this way.  To me, this is a completely bass-ackward way to insert a zipper, though I have seen tutorials that teach zipper installation this way.  First, you need to take your framed window and decide which way is up. 

Pull apart the top layers and trim the seam allowance inside down as far as you easily can.  This pic was taken before I had trimmed.

Step two: sewing in the zipper


Now carefully fold in both sides 1/4" and press them down.  

Step two: sewing in the zipper


It should look like this now:

Step two: sewing in the zipper


Now take your piece with the zipper and nestle the bottom of the zipper (the side not already sewn in between the canvas strips) between the folded-in edges of the window piece.  Try your best to get the edge of the folds lined up the same distance away from the zipper as the top is.  

Step two: sewing in the zipper


Now either temporarily tape the zipper in place or use some big binder clips to help you keep everything from shifting.  Sew the zipper in by topstitching it into place near the edge like you did when you topstitched the other side of the zipper.  It’s an ugly process and just doesn’t feel as neat and secure as the proper method does, but it does the trick. 

Step two: sewing in the zipper


Square off your window/zipper piece and cut off those pesky zipper ends that are still sticking out.

Step two: sewing in the zipper


STEP THREE: Assembling the pouch

Remember those other two 9” x 6 1/2" pieces you cut?  We’re finally going to use them!  First things first – lay one of them down on the table and place the window/zipper piece on top.  Is the window/zipper piece the same size?  Chances are, unless you’re a robot or are really good with consistent seam allowances, it will be off by a little.  Trim whichever one is bigger down to the size of the other.  If your 9” x 6 1/2" piece needed to be trimmed a little, make the same trim with the other 9” x 6 1/2" piece too.

Now lay down the 9” x 6 1/2" piece that you want showing on the outside of the pouch (the canvas one) on the table with the RIGHT SIDE UP. 

Then, lay down the window/zipper piece with the RIGHT SIDE DOWN on top of the canvas piece.  The right side is the side with the zipper pull sticking up.

Finally, lay the 9” x 6 1/2” piece of lining (the piece that you want to peek out through the window) on top of the other two pieces with the RIGHT SIDE DOWN.  Now you have your pouch sandwich all ready for final assembly.

Step three: assembling the pouch


You’re going to sew all the way around the pouch with a 1/3” seam allowance.  [That’s an odd size, I know, but it’s the width of my presser foot with the needle in the middle and it works for me.  You could totally sew with a 1/2” seam allowance if you prefer.]  BUT FIRST, you have to try this cool trick that I just learned and then completely forgot its source.  When I rediscover the genius to whom I need to give proper credit for this trick, I will give credit where credit it due!

At the bottom of the pouch (the edge opposite the one the zipper is closest to), find a spot two inches or so in from the corner.  From the very edge of the fabric, sew a few stitches perpendicular to the way your seam will run, just until you reach your seam line.  Then, leave the needle down in the fabric, lift up your presser foot, turn the work ninety degrees, and then start sewing your seam all the way around the edge of the pouch until you turn the corner onto the last side (the one you started on).  Only sew in a couple of inches (leaving open about a 5” space unsewn for turning the work right side out – kind of a big gap, but necessary because of the stiffness of the vinyl), then leave the needle down in the work, lift the presser foot, turn the work ninety degrees again, and sew to the edge of the piece. 

Step three: assembling the pouch

Step three: assembling the pouch


This encourages your seam allowance turn in after you turn the project right side out, and it helps somewhat to prevent the fabric from stretching due to the stress of inverting the pouch (aka “birthing the bag”, a phrase which totally cracks me up).  If the photos don’t help and you’re still confused, just ignore the previous couple of paragraphs and sew around the pouch with a 1/2" or 1/3" seam allowance, leaving unsewn a 5” space for turning.

Step three: assembling the pouch


STEP FOUR: Birthing the pouch and finishing up

After sewing the pouch together, trim the corners really well to get rid of bulk.  

Step four: birthing the pouch and finishing up


At the space left for turning, separate the layers between the window/zipper piece and the outside back canvas piece and turn it right side out.  Be careful not to munch up the vinyl too much.  The corners are difficult to poke out, but just do the best you can.  You can unzip the zipper now to peek inside and see that there are NO EXPOSED SEAMS!  Woo hoo!  Too bad you now have that annoying opening to close.  I know I didn't get the corners poked out very sharp, but the bulk of the canvas made that impossible. 

Step four: birthing the pouch and finishing up


I hate hand sewing.  HATE IT.  If I thought there was any pretty way to use a sewing machine to do the next step, I would totally have done it that way.  Unfortunately, I think the only good way to close up this gap is hand-sewing it closed with a ladder (aka blind) stitch.  It would be really unfortunate to go to such lengths to eliminate raw seams on the inside of the bag just to leave an ugly spot of whip stitching on the outside of the bag, right?  Here is a great tutorial on using a ladder stitch to close a gap.  Just make sure that the raw edges are going inside between the lining and the back outside canvas piece.  It's also important to make sure you are catching all of the internal layers, including the lining, or else there will be a hole left open inside the pouch.  Not that I accidentally did that the first time or anything.  Ahem.

This is what it looked like before I sewed it.  I forgot to take a close-up photo of it all sewed up nice and neat.

Step four: birthing the pouch and finishing up


All done!  Now stick in all the car registration and insurance paperwork and keep it safely inside the glove compartment.

finished pouch


Or take it outside and take pretty pictures of it among the fallen leaves.  I know I pulled in the turning gap a little too far when I was hand-sewing it closed, but just pretend you don't see that part.

Finished pouch


I love the back!  I'm so glad I found a good use for this old bag.  Fun fact -- my friend, Ivette, met her husband, Jon, at that brewery.

Back of finished pouch