Showing posts with label bag. Show all posts

Tuesday, August 25, 2015

Birthday presents for all ages

This summer, I made presents for four different gals -- one turning five, and three others turning, well, many years older than that.  And a couple of those presents led to little gifts for other women who weren't actually having birthdays.  Such is life.

For my sister, I sewed a bunch of project bags in which to keep her various knitting projects.  She just wanted very simple, unlined drawstring bags, and I was happy to oblige.  Here are two of the three I made, from fabric my Aunt Janet found me at her friend's garage sale:


And where is the third one?  Apparently, she GAVE IT AWAY.  Yes, it was to our grandmother, but STILL.  Hee hee.  But seriously, I fully supported the regifting --  our grandmother was visiting from Arizona and carrying her knitting project around in a plastic grocery bag.  As if!  So, when Erin came to visit me in Michigan a few weeks later, I made her another replacement bag.  This one I made with a  round bottom, so it's a little more interesting than the flat ones. The fabric was from my inherited stash.


Then, when we were in Texas a few weeks after that, Erin talked me into sewing our mom a project bag.  Apparently, Erin didn't think the bag Mom had been using (not sure what) was acceptable.  We found these cute fabrics in Erin's dusty fabric stash and I whipped one up at Erin's house one afternoon.  I seriously want more of these adorable fabrics!


For my friend Julie, I made some little zipper pouches out of oilcloth to hold her essential oils.  For those, I roughly followed this tutorial, but changed the dimensions.  I ended up making three bags, but only photographed two of them.  The third one was made from the green polka dotted oilcloth that the first two bags are sitting on in this terrible backlit photo.


When my friends Heather and Ivette saw the pouches, they immediately asked for pouches of their own.  Heather wanted one for her essential oils, and Ivette wanted one to put her camera and keys in when she goes to the beach.  I didn't photograph Heather's polka dotted bag, but here is a shot of Ivette's zipper pouch.


Next, my niece Maisie turned five years old.  She is totally obsessed with all things horse-related, so I made her a fun little tote bag for traveling with some of her herd.  It will not, however, fit the horse that NanaB gave her for her birthday.  That sucker is about two-feet tall and three feet long!  Anyhow, I had to go to three different fabric stores to find good horse fabric, so I hope she liked the bag!


Finally, last week I sewed my friend Sandra a lens cap cozy to put on the strap of her camera.  She is a professional photographer, but I have personally witnessed her shoving her camera's lens cap in the pocket of her jeans on many occasions.  Surely this will be cooler, right?  


Here is the cozy from the back, to show how where the strap feeds through.


I found the tutorial for this lens cap cozy here, but I think it originally appeared on the Crafty Staci blog.  I wasn't able to find it in her archives, which makes me think it was intentional removed.  I still want to give credit where credit is due though.

Monday, August 24, 2015

Bags to hold kids' treasures

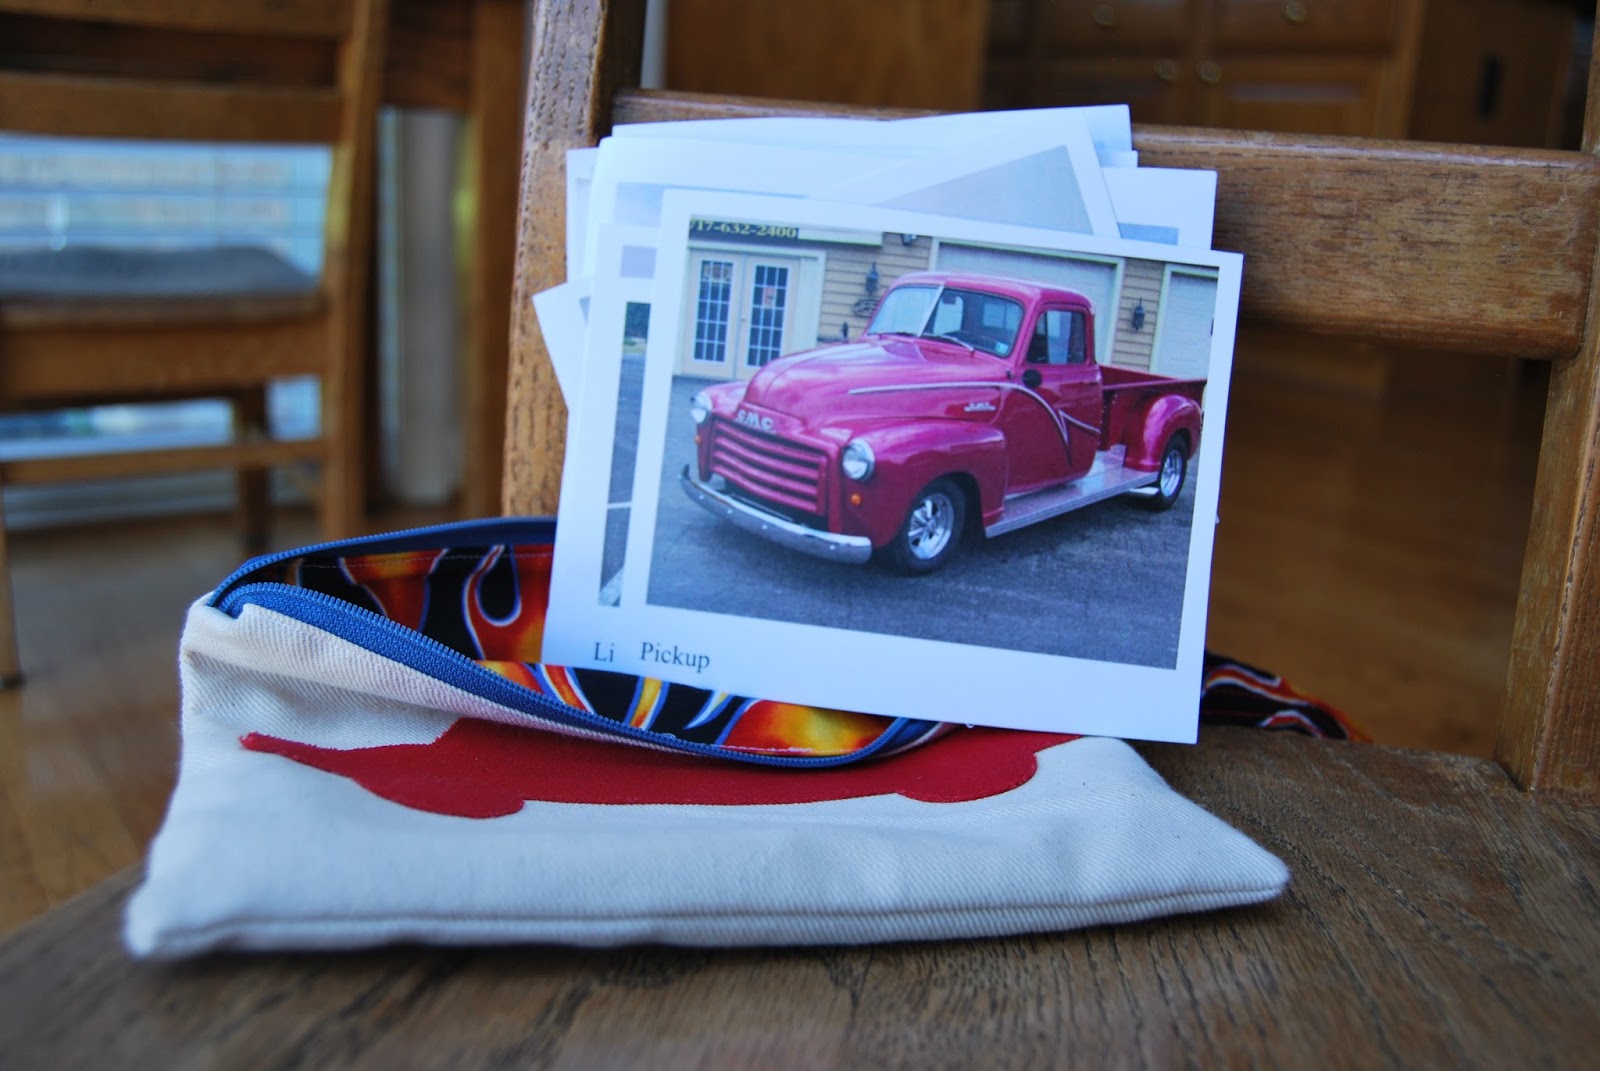
I made each kid a little bag recently.  First, for Peter, I was asked by Corey to make a zipper pouch to hold a bunch of cards with photos of cars on them.


The boys (including GrandDad and Peter's cousin, Quinn) were headed to the Woodward Dream Cruise and Corey had thought Peter might like to be given a mission of finding particular types of cars while wandering around the show.  Since Peter can't quite read yet and might not really know what each type of car was from words only, Corey printed out a bunch of sample photos from the internet.  I didn't really think Peter would participate in this game for long, but I was dead wrong.  He and his cousin found most of  the vehicles in the pictures, and had a great time doing that.  Now I'm really glad I made a cute pouch for it!

The outside is canvas from my inherited stash.  The appliquéd car is out of red duck cloth.  I left it rough around the edges to make it tougher looking.  The interior and strap are, of course, flame fabric!  I didn't use any particular tutorial -- just winged a lined pouch made to the dimensions Corey supplied.

Last week Charlotte had her adorable friend, Silvana, over to play.  I had bought some frame clasps a few months ago and had never used them, so I decided to make Silvana and Charlotte some cute little purses just for fun.  I was dreading the last step -- hand sewing the frame clasp to the sewn body, and it was every bit as annoying as I thought it would be.  The end result was pretty cute though, so I might try it again.


I tried a couple of different nylon threads for sewing the frame to the purse.  The one I used for Silvana's (which I unfortunately failed to photograph) was thicker and much harder to pull through.  Every stitch was a struggle and I used pliers to help me with almost every stitch.  For Charlotte's, I used fishing line from my beading supplies.  It was a tad easier.  Next time, I will go ahead and buy the invisible thread that the tutorials suggest.  I refuse to try gluing it, because I have no faith that the glue would hold and I think the stitches holding the purse to the frame are actually kind of cute.


The exterior is some quilting cotton from my stash, and the interior is a home decor weight fabric left over from another bag I made.  The lining is fusible fleece.  For the pattern drafting and machine sewing directions, I consulted a tutorial from Flutter Kat.  She glued her purses to the frames, so I referenced another tutorial from So Sew Easy for guidance on how to hand-sew mine.

Sunday, June 14, 2015

Latest sewing projects

I have been slowing down on sewing lately, but I still have been creating from time to time.  I really love this round-bottomed drawstring bag that I sewed for Corey's coworker's birthday.  That fabric makes me so happy.  I vaguely followed this tutorial, but I changed the dimensions and a few of the construction techniques.


I also was hired by a friend of my mother-in-law's to make pillows out of commemorative t-shirts from her family's annual reunions.  I talked her into adding piping and they turned out pretty cute.  These are the front sides . . .


. . . and these are the backs.


I'm really annoyed that I accidentally packed away the kids' new Easter baskets before taking good photos of the kids posing with them.  I followed this tutorial for the general direction of the basket, but I went rogue and added some trim to the design.  All of the fabric and trim was courtesy of the amazing sewing stash I inherited from Corey's grandmother when she moved out of her condo.


For my daughter's friend, Mia, I sewed a simple little padded zipper pouch to hold a gift card for her birthday.  The fabric also came from Granny's stash.


I'm really really mad I forgot to take pics after I finished these bags for my neighbor's sister.  I made five of the usual Peek-a-boo Toy Sacks that I have made a million times before, but the backs of them incorporated some special old t-shirts worn by her sons.  I love the fabrics I found to pair them with, which were also part of Granny's stash.


I need to get back into taking nicer photos of my finished products!

Thursday, March 12, 2015

Birthday party goody bags

Charlotte's seventh birthday party was last weekend!  I sewed some goody bags for the party guests (and one for Charlotte, because she would have been incredibly sad if she didn't get one too) out of all of my girliest fabrics.  They're just very basic drawstring bags with the inside raw edges pinked to minimize shredding.


Inside, we put some Hershey's kisses and gummy bears.  Charlotte really wanted a "crafting" party, so the girls also went home with glittery bracelets, decorated cardboard letter (the first letter of each of their names), and some ribbon and paperclip bookmarks.  I forgot to take a good photo of Charlotte on her birthday in her "7" shirt, so I will have to post a shot of that after I wash it this weekend.

Sunday, March 1, 2015

The Replacement Frog Princess Bag

Charlotte's birthday is coming up, so she gets to be the "Frog Princess" next week in first grade.  (It's basically a student of the week thing.)  The Frog Prince/Princess Kit came home with her on Thursday afternoon in a ratty old tote bag that had once served another purpose.  If you look closely, you can see that the words "Emergency Kit" have been crossed out with Sharpie.


UM, I DON'T THINK SO!  There was no way I was sending the kit back to school in that bag.  Not when I love making tote bags so much.  (And I have sewn a few things for Mrs. Bayma this year that she uses a bunch, so she probably won't be offended by the switch.  At least I don't think she will.)

I ran to Jo-Ann's and hunted for frog fabric.  I could only find one bolt, and it had frogs with pink hearts.  Not exactly gender neutral.  I did find some flannel, but that just seemed odd for a tote bag and the print did look a little babyish.  I know the bag needed to be tough because it was going to be dragged home almost weekly by a seven-year-old (or soon-to-be seven-year-old!) on a bus, so I chose denim and duck cloth for the main exterior fabrics.  For the lining and exterior pocket, I chose this cool "transportation print" that matched the colors of the stuffed frog.


Because I couldn't find good frog fabric, I made a frog appliqué for the other side opposite the pocket.  I may grab some golden puffy paint and add a little crown to the frog later if I have time.  I don't want to get all cutesy and paint on a face or anything, though.


I'm totally in love with the lining fabric.  I think I'm going to use it for a couple of projects I need to finish in the next couple of days.


The Frog Princess (still in her jammies) approves!  I think if that girl loses any more teeth, she's going to need dentures to tide her over until the adult teeth grow in.


We need to take the frog on an adventure, take a photo of it, and then do a write-up to put in a notebook that stays in the bag.  After that, we will fill the "guessing jar" with small objects for the class to practice estimating.  And then I need to send in a bunch of photos of Charlotte.  And then she needs to fill out an info sheet all about herself.  Sheesh -- maybe I should have been working on that instead of sewing . . .

Monday, February 16, 2015

Sax Stand Bag (aka a lined drawstring bag)

My dad commissioned me to make a bag to replace the one he was using to hold his saxophone stand.  The one it came with was thin and soft, which did not play well with some rough screws sticking out of the accessories.  The bag was rapidly deteriorating, and he decided he needed something nice and tough instead.

Denim to the rescue!

Dad's Sax Stand Lined Drawstring Bag


Let me back up, though.  It cracked me up that when he was trying to describe the bag to me, he decided a visual was the best way to do it.  So Dad, aka the Man Who Owns a Million Tape Measures, grabbed a couple of them and sent me this picture:


Even better, he decided he had better show me what needed to go inside the bag:


Yes, that weird-looking contraption is a portable saxophone stand, and the two odd black things are for screwing onto the stand so it can also hold an alto sax and a clarinet.

Dad was not only displeased with the flimsy nature of the original bag -- he also felt it needed to be a few inches longer and wider.  Plus, holding the stand (which is pretty heavy) in the bag by just a thin cord wasn't super comfortable.  The new bag needed a handle as well.  The original bag was flat, which seemed dumb if it was going to hold items that weren't flat.  I figured boxed corners would work a whole lot better.

I wanted there to be an additional layer of fabric between those pokey screws and the outside world, so I made sure I lined the bag as well.  I still had another one of Dad's old work shirts lying around, so I cut that up and used it for the lining as well as a strip of decoration stitched onto the front.  Dad recognized it right away.

Dad's Sax Stand Lined Drawstring Bag


Here is the handle, which is on the back near the top.  I used 1" wide cotton webbing and sewed it on as securely as I knew how.  Only time will tell if it holds.  My mom can always repair it if there are any issues.

Dad's Sax Stand Lined Drawstring Bag


When the bag is closed (using the opposing drawstrings rather than a single drawstring with a stopped like the original bag had), the handle naturally pops out for easy access.

Dad's Sax Stand Lined Drawstring Bag


I wanted to make sure I made this bag the proper way instead of just winging it, so I followed a tutorial for a Crochet Project Bag from Gleeful Things.  I altered the dimensions a little, added the embellishment and the handle, and ended up with what I hope will be the perfect bag.  All the other guys in the community band will be so jealous, right?  Or something like that...

Sunday, February 15, 2015

Valentine's Day reusable drawstring gift bags for my little valentines

I keep meaning to make reusable gift bags for the major gift-giving holidays.  Then I forget until I'm wrapping gifts at the last minute, which is not particularly helpful.  This time, I actually remembered a few hours ahead of time!  Charlotte and Peter woke up bright and early on February 14th to find their Valentine's Day treats in these:

Valentine's Day reusable drawstring gift bags


After I put the kids to bed on February 13th, I sat down at the sewing machine and sewed until nearly midnight.  Typically, this is not a good strategy for sewing because mistakes tend to be more frequent when exhaustion sets in.  I was wired, however, because I was monitoring Corey's overseas flight and tracking its progress while he flew to Germany on a business trip.  Yes, my lovely husband ditched the family for Valentine's Day (though not by choice!).  Notice I didn't bother making HIM a gift bag.  We are going to celebrate together when I fly to Germany to meet him in a few days though!

Anyway, I knew that the tutorial I was following (The Lined Drawstring Bag Tutorial by the amazingly talented Jeni Baker of In Color Order) was a no-fail proposition.  I have made a bunch of these before and have always loved the results.  This time, I got all fancy and added appliqué initials and some trim between the exterior panels.  It was the first time I had every used that little puff-ball trim (on the "C" bag) and only the second time I had ever used ric rac (on the "P" bag).

Valentine's Day reusable drawstring gift bags


I opted not to use any interfacing in these since they were meant to just be gift bags.  They are made from some quilting weight cottons, and they fit Charlotte's Beanie Boo and Peter's Slugterra action figure (along with some chocolate and other treats) with lots of room to spare.  I'm going to pack them up with the Valentine's Day decorations so they will be a nice surprise to find again next year.

Now I just need to get motivated to make some Christmas and birthday gift bags!  Charlotte's birthday is coming up in a few weeks . . .

______________________________________

Linking up to: ChrisW Designs

Friday, February 6, 2015

A crocheting & knitting bag for Erin -- FINALLY!

Weeeeeeeell, I kind of promised Erin a new crocheting bag a long time ago.  Then I promised her I would have it to her by Christmas.  Then, it got to be February and I still didn't have it finished.  I'm the worst twin sister ever sometimes.

The good news is that I finally finished it!  She wanted it to have vinyl because apparently she has exhibitionist yarn.  Her skeins like to be be seen, darn it.  Here it is with the drawstring top closed (and sagging down a bit on the inside).


And here is it with the top open.  It can fit a buttload of yarn, a bunch of hooks, a crapload of needles, and a few works-in-progress without breaking a sweat.


I always love a project that includes vinyl, but inevitably I feel like I have wrestled an alligator by the end of it.  I made up this bag as I went along, which is always a dangerous thing to do.  I don't think I would make it the same if I ever made it again (and I'm not in a hurry to do so).  Some of the finishes are not the greatest, but I'm hoping Erin will promise me that she won't look too closely at it.

The exterior is a home decor weight fabric and the lining is actually from an old sheet Erin gave me.  I didn't add any interfacing because the bottom has a double layer of the heavier exterior fabric, but if I made it again I might rethink that decision.

I'm popping it in the mail this morning if all goes well!

__________________________________

Featured at: Sugar Bee Crafts

Linking up to: Creating My Way to Success, Scattered Thoughts of a Crafty Mom, A Bright and Beautiful Life, Sew Can Do, ChrisW Designs, Skip To My Lou, Nap-Time Creations, Sugar Bee Crafts, The Silly Pearl, The Stitchin' Mommy, Sweet C's Designs, Tiny SidekickMabey She Made It, Funky Polkadot Giraffe And Sew We Craft

Thursday, January 1, 2015

Toy Tote -- Sewing Tutorial


All kids need a way to carry the myriad toys they insist on bringing everywhere they go.  This toy tote is the perfect size for a half a dozen Rescue Bots, a herd of My Little Ponies, or enough small Beanie Boos to keep a kid entertained for well, at little while at least.

The finished dimensions of the tote are approximately 11" high, 8" wide, and 8" deep.

Toy Tote -- Sewing Tutorial

Materials Needed:

Exterior fabric: 1/2 yard if non-directional print, 3/4 yard if directional print (quilting cotton or lightweight home decor)
Lining fabric: 1/2 yard if non-directional print, 3/4 yard if directional print (quilting cotton)
Felt or fusible fleece
1" wide webbing: 18" long (cotton or nylon)
Cording: 68" (nylon or cotton)
Thread: to match both exterior and lining fabrics
Freezer paper (or regular paper): at least 8" x 18"


Seam allowances will all be 1/4" unless otherwise noted.  


STEP ONE: Drawing the pattern and cutting the fabric

The pattern piece is basically an 8" x 18" rectangle with the bottom corners cut off.  The easiest way to create this is to:
  1. Draw an 8" x 18" rectangle.
  2. Mark a point at the center of the bottom short side (4" in from both sides).
  3. Mark points 14" down on each of the long sides.  Connect each of the long side points with the bottom center point.
  4. Cut along those diagonal lines to chop off the little triangles.  You should be left with a shape that looks like a fat pencil.
  5. At 3" down from the top and at 6" down from the top, draw lines parallel to the short sides.  Don't go crazy and cut on those lines just yet though.
Honestly, it's probably just easier to show you a diagram.  Aren't my drawn-on graphics AMAZING?


Here is a closer shot of the tip of the triangle (with an unnecessary marking whited out).


Once you have your pattern piece all squared away, iron it onto (if you used freezer paper) the LINING and cut FOUR of these shapes.  I like to fold the fabric such that I only have to cut once to get all four pieces.  If you do this, just be careful that you keep the direction of the print in mind.  The point on the pattern piece should be pointing down.  

After you cut the lining pieces, chop 3" off the pattern piece at the first horizontal line you drew.  Then, use the pattern piece to cut out FOUR of these shapes from your EXTERIOR fabric.  

Chop off another 3" from the top of the pattern piece (at the second horizontal line you drew) and cut FOUR of that shape from your FELT/FUSIBLE FLEECE.

You should have this now:


STEP TWO: Sewing the body of the tote

Adhere the felt/fleece to the wrong sides of the exterior fabric, matching the tips of the points.  I spray basted my felt to the fabric, but ironing on fusible fleece would have been even easier.  You could also just machine-baste the felt/fleece by sewing down the edges to the points.


Next, cut your webbing into two 9" lengths.


On the right side of one of the exterior pieces, measure down 4" from the top and align the top edge of the strap at that point.  Match the raw end of the webbing with the left raw edge of the exterior piece (the right side will hang over by an inch for now).


Take a second exterior piece and lay it face down on top of the first piece (right sides facing each other).


Pin (or use the fancy new Wonder Clips you got from your sister for Christmas!) along only the left side, all the way down to the point.


Repeat those steps with the other two exterior pieces and the second piece of webbing.


On both of these, make a mark 1/4" up the left side from the tip of the bottom point.  This will be where you START stitching.


Thread your machine with a color of thread that blends well with your exterior fabric.  Starting at the mark you made on the point, stitch all the way up the left side only.  Do not stitch across the top or down the right side.


Closer look at how the stitching at the bottom point should look.


Repeat with the second set of exterior pieces.  Then open them with the right sides facing up and the webbing draped to the left.  You should have this now.


Flip one horizontally over on top of the other (keeping the webbing in place).  The webbing pieces should now be sticking out in opposite directions.  If they aren't, then switch one of them so they are. Match the bottom points and the other corners on the raw edges.


Before you pin them together, measure down from the top on each side 4" and make sure the other ends of the webbing are in place.  Then stuff those ends in a bit to align the raw edges of the webbing pieces with the raw edges of the fabric pieces.  Pin into place on both sides.


Pin the raw edges together down both sides (leaving the top open).  At the bottom point, flatten out the sewn seams like this:


Sew each side separately, starting at the top and stitching down until you reach the bottom point.  Flatten out the point and pull the seam allowances back to get as close as possible to the existing stitching lines.  Once you have sewn down both sides, you should have this:


If you open it up and peek inside, you should have this:


Before you flip the exterior right side out, trim a bit at each of the corners.  Don't worry about trimming at the bottom point -- the bulk isn't really that crazy and it's probably not a good idea to weaken that juncture unnecessarily.


Flip the exterior right side out and marvel at how cute it's looking!


STEP THREE: Sewing the lining

This is pretty much identical to the process for the exterior, but you don't have to worry about any pesky webbing.  Take two pieces and place them right sides together.  Repeat with the other two pieces.  Pin down one side.  I went wild and pinned down the right side (instead of the left side like I did with the exterior pieces).


Mark that 1/4" point just up from the point and stitch down the right side to that mark. Do this with both sets.


As with the exterior, open these up and pin them right sides together (matching at the point and each of the corners).  Sew down both sides separately, stopping when you get to within 1/4" of the point.  Do not sew across the top.  When you have done that, you should have this:


STEP FOUR: Assembling the tote

Keep the lining with the pretty side facing inward, but open it up and flatten out the bottom.  With wrong sides facing, nest the lining inside the exterior.  Match up the seams on the sides and bottom corners.  The lining will stick up 3" taller than the exterior.


Before pinning it all the way around, measure to make sure the lining sticks up exactly 3" all the way around.  Adjust if necessary and pin into place.  Do this at the seams and in between as well.


Sew the exterior to the lining all the way around 1/4" from the top raw edge of the exterior.  Make sure you do this in a color of thread that matches the lining, because this stitching will be visible from the inside of the tote.


STEP FIVE: Creating the casing for the drawstrings

Fold and press down the lining down to the outside (wrong sides together) so that the raw edge of the lining meets the raw edge of the exterior all the way around.


Fold it down again (and press) at the point where the raw edges meet, covering the stitching line.


This is what it should look like now -- about 1 1/2" of the right side of the lining showing on the outside.


On the inside, you can see the stitching line from when you sewed the exterior to the lining.  It should be about 1/4" down from the top.  From the inside, stitch right over this line again.  (You could just stitch from the outside 1/4" down from the top and trust that you will stitch exactly on this line, but I'm not that great at keeping a consistent seam allowance.)


Once you have stitched around the top, it should look like this from the outside.


Now stitch around the top again, this time 1 1/4" from the top (which is 1" down from the existing stitch line).  The easiest way to do this, actually, is to just stitch around again 1/4" up from the bottom if the folded lining.


Now the top of your bag should look like this from the outside.  (Yes, my machine is having some issues keeping a consistent tension and I'm taking it in for service ASAP!)


STEP SIX: Adding the drawstrings

Grab your handy dandy seam ripper and carefully unpick the stitches at one of the seams between the two stitching lines on the outside of the tote.


Pick out the teeny threads or snip them really closely.


Locate the same spot on the opposite side of the tote (diagonally across).  Rip out those stitches between the stitching lines as well.  Sometimes it's hard to get started, but if you pull at the seam a little, it exposes the stitches enough to get your seam ripper under one.  Once you have one stitch picked, the others are a lot easier.


Grab your 68" of cording and cut it in half.  I used nylon cording that is a little thinner than parachute cord.  The best way to make sure it doesn't unravel at the ends is to melt them a little with a flame.  I never realized how often I would use my little kitchen lighter thing in sewing, but it comes in handy to melt the ends of cording, the cut edges of ribbon, the cut ends of zippers, etc.  I couldn't figure out how to do this while taking a photo, so you'll just have to trust me that those little ends were melted properly.


Attach a safety pin to the end of one of the strings, then stick it in one of the holes you just made in the casing.


Work it all the way around and back out the same hole you went in.  Tie them together.


Grab your other piece of cording and do the same thing in and back out of the other hole you made on the opposite side.  Tie those ends together as well.  Now you have two drawstrings that can be pulled in opposite directions to shut the tote.  This is much easier for little kids to handle than working a drawstring stopper.


Voila!  A great little toy tote for transporting all those treasures.  I made this one for my daughter's magic tricks.  She just got a bunch of them for Christmas and has grand plans to take her show on the road.


One of the best features of the bag is that it can stand open on its own while the kids load and unload their toys.


And it looks kind of cool from the top when you look inside!


[It's no secret that I love the Drawstring Tidy Caddy from the awesome and amazing book Fabric-by-Fabric One-Yard Wonders that Erin got me a few years ago.  I have never actually followed the instructions for that bag as they were written, though.  By the time I added all the different features I wanted to the bag, I realized I needed to memorialize my version so I would remember how to do it next time.  Please do go out and buy that book for all of the other projects in it (like the adorable Playdate Frock, and the super-functional Bag Holder), and perhaps you would like their version of this tote much better!  This is just my tutorial on how to make my take on a tote with the same basic structure.  For more on the concept of creative process, I love this post on the topic by Deanna of Sew McCool.]

-----------------------------------------------------------------------

Featured at: Totally Tutorials, Sew Pretty Sew Free, Sugar Bee Crafts, Threading My Way, And Sew We Craft, The Crafty Blog Stalker

Linking up to: Threading My Way, Pretty Pintastic Party, I Heart Nap Time, Sew Can She, Gingerly Made, Reviews Chews & How-Tos, Flamingo Toes, Creating My Way to Success, Scattered Thoughts of a Crafty Mom, Sew Can Do, ChrisW Designs, Modern Tradition Quilts, Blossom Heart Quilts, The Silly PearlMaybe She Made It, Sugar Bee Crafts, Sweet C's Designs, Nap-Time Creations, Sew Fresh Quilts, Fine Craft Guild, Someday Crafts, Ginger Snap Crafts, Smart School House, The Life of Jennifer Dawn, A Glimpse Inside, Saving 4 Six, Fort Worth Fabric Studio, Diana Rambles, Straight Grain, The Better Half, Just Us Four, The Crafted Sparrow, Reasons to Skip the Housework, Uncommon Designs, Skip To My Lou, Tiny Sidekick, Quilt Story, I Have To Say, Funky Polkadot Giraffe, The Stitching' Mommy, One Krieger Chick, The DIY Dreamer, Sew Many Ways