I was lucky enough to win a great little bundle of fabric from the super-talented Sanae Ishida that included some ridiculously fun rainbow spiderweb tulle and spiderweb flocked tulle-esque polyester. At the risk of spiderweb overload, I was unable to resist putting the two together for the ultimate Halloween skirt. Charlotte promptly renamed it her "spooky skirt", so I guess I had better follow suit.
If anyone can pull off a double spider web skirt, it's definitely going to be a girl who was named after a spider, right?
I made the skirt by cutting the bottom layer 17 1/2" by the entire width of the fabric, and the top layer 14 1/2" by the entire width of the tulle. The tulle ended up being a little wider than the polyester, so I had to cut a few inches off the width.
I turned the hems of both pieces of fabric under twice and stitched the polyester with a straight stitch and the tulle with a zig zag. Man, that stuff is squirrelly! Then I basted the two layers together with a zig zag stitch at the top and sides before I sewed it into a tube with a French seam. I had to take the extra step of basting at the sides because the tulle had a mind of its own. Then, I made a casing for the waistband and threaded in some elastic. Easy as pie! I would totally write a tutorial for it if there weren't already about 8,000,000 other better tutorials for simple skirts on the web.
The rainbow spiderwebs on the tulle are metallic and awesomely sparkly, so I tried to capture the sparkle by taking a photo in direct sunlight. The skirt is fabulous and will look great with some black leggings (it's already too cold for bare legs!).
Now I'm thinking I need to use the mottled red fabric that was also part of the giveaway bundle to make a fun appliqué shirt to go with the skirt. I have plenty of fabric left to make skirts for Sonia and Maisie, too, so that will probably be my weekend project.
Here is my little goblin, modeling her skirt (over her corduroys because I didn't have any black leggings handy). I tried to get her to stand on the ground, but she has decided that she can only properly model something I made for her if she stands on the post on our back deck.
This is her idea of a "sweet pose".
This is her alternate "sweet pose".
This is her "elegant pose".
And finally, this is her "spooky pose".
I don't think Barbizon will be calling any time soon.
Linking up to: Get Your Crap Together, Sew Can She, U.S.S. Crafty, Scattered Thoughts of a Crafty Mom, Creating My Way to Success, Craft-O-Maniac, Sumo's Sweet Stuff, Skip to My Lou, Sew Can Do, Blossom Heart Quilts, Nap-Time Creations, Feather's Flights, Funky Polkadot Giraffe, And Sew We Craft
Friday, October 18, 2013
Tuesday, October 15, 2013
Odessa's Tea Party Purse
Odessa (the daughter of my good friend, Kym, and one of Charlotte's favorite buddies) is one of the sweetest little girls I know. I have sewed her a few things over the past couple of years, but somehow I never made her a purse. She asked me very sweetly for one a few weeks ago, and I finally got around to making it this afternoon.
The purse's design came from a tutorial by Fancy That. I loved how the top was gathered with elastic to give it a ruffly look without having to actually sew on ruffles. I quilted the outside (using felt for the batting) with diagonal lines because I'm still too chicken to try any other design.
It's the perfect size to store a few of Odie's treasures, and Charlotte and I decided it would be ideal bag to carry to a tea party.
I do wish I had added boxed corners to the bag -- I'm not a huge fan of the pointy bottom and the boxed corners would have helped the bag stand up on its own. If I make the bag again -- and I probably will, because this would be a perfect addition to a birthday present for any one of Charlotte's friends -- I will definitely box the corners. I think I would also use cotton webbing for the handles because I love the finished look that gives to a casual bag. I just can't sew as straight as I want to and when I make the turned tube handles with stitching down them it always looks too home made for my taste.
Linking up to: ChrisW Designs
It's the perfect size to store a few of Odie's treasures, and Charlotte and I decided it would be ideal bag to carry to a tea party.
I do wish I had added boxed corners to the bag -- I'm not a huge fan of the pointy bottom and the boxed corners would have helped the bag stand up on its own. If I make the bag again -- and I probably will, because this would be a perfect addition to a birthday present for any one of Charlotte's friends -- I will definitely box the corners. I think I would also use cotton webbing for the handles because I love the finished look that gives to a casual bag. I just can't sew as straight as I want to and when I make the turned tube handles with stitching down them it always looks too home made for my taste.
Linking up to: ChrisW Designs
Monday, October 14, 2013
Frog Mary Jane Baby Shoes (9-month-old size) -- a free crochet pattern
A picture of an adorable collection of crocheted baby mary janes and sandals was circulating the internet last month, and several people brought it to my attention. One of my old high school honor band and band camp buddies, Erin (she has the best name!), asked if I could crochet a pair of the frog shoes for her seven-month-old niece, so I tried to find the source of the picture and locate a pattern. As far as I could tell, the picture was just showing shoes for sale-- not a pattern. So, I decided to come up with a pattern of my own. Voila!
Ok, I'll be honest-- these were my second attempt. The first ones turned out WAY too large. I had looked up the average shoe size of a 9-month-old, but somehow it still all went wrong. The only good part of it is that now I have made up patterns for two different sizes of the same shoes! Not sure who would fit in the bigger ones-- maybe an 18-month-old? Gotta see if I can locate some of my little buddies from playgroup to try on the shoes. I will try to find the time to type the larger-sized shoe pattern up and post it.
If anyone uses my pattern, please let me know how it goes! I'd love to see how yours come out! Either leave a comment on here or post your project on Ravelry and link to the pattern.
Rds 6 & 7: Working in both loops (throughout rest of pattern): Ch 1, sc in joining st and around, join. (52)
Strap for Right Shoe:
(with white yarn)
Strap for Left Shoe:
(with white yarn)
Row 1: Count 11 stitches from where you just finished off, join with sc (to work backwards toward the heel), 21 sc. Ch 19, turn. (22 sc and 19 ch)
Rows 2-4: Work the same as for the strap for the right shoe.
Hand sew shank buttons on with needle and thread. Cut pleather soles by tracing around the soles of the crocheted shoes. Hand sew pleather soles onto bottom of crocheted shoes using a needle and thread.
Frog face:
(with green yarn)
Rd 1: Ch 8, skip first 2 ch (counts as first hdc), 5 hdc, work 5 hdc in the last ch, 5 hdc, work 4 hdc in next ch, join to top of first hdc.
Eye #1:
Row 1: Ch 1, sc in joining st, sc, sl st. Do not finish off.
Row 2: Ch 1, turn; sl st, sc, sl st. Finish off.
Eye #2:
Row 1: Skip 2 st between eyes and join with sl st; sc, sl st.
Row 2: Ch 1, turn; sl st, sc, sl st.
Finish off leaving long tail to sew onto shoe (but not until after you have attached eyes and embroidered mouth). Weave in all other ends.
Frog eyes:
(with white yarn)
Magic circle 4 sc; join with sl st and leave long end for sewing to face.
***
Ok, I'll be honest-- these were my second attempt. The first ones turned out WAY too large. I had looked up the average shoe size of a 9-month-old, but somehow it still all went wrong. The only good part of it is that now I have made up patterns for two different sizes of the same shoes! Not sure who would fit in the bigger ones-- maybe an 18-month-old? Gotta see if I can locate some of my little buddies from playgroup to try on the shoes. I will try to find the time to type the larger-sized shoe pattern up and post it.
I borrowed the sole pattern from the free pattern for some adorable baby Converse shoes (remember, I made a pair this past summer), but the upper part, strap, and frog are all out of my own head.
If anyone uses my pattern, please let me know how it goes! I'd love to see how yours come out! Either leave a comment on here or post your project on Ravelry and link to the pattern.
To download the free crochet pattern in a pdf file, click here.
Materials Used:
- US - F/5 hook (3.75mm)
- Yarn needle
- Red Heart Super Saver Yarn (acrylic, worsted weight) in white, green, red, and black
- Small shank buttons (not sure what size-- they were from my stash)
- Pleather (for sewing onto the soles)
- Sewing needle and black thread (for sewing pleather on soles)
Stitches/techniques/abbreviations used:
- st (stitch)
- ch (chain)
- sl st (slip stitch)
- sc (single crochet)
- hdc (half-double crochet)
- dc (double crochet)
- sc inc (two single crochets in the same stitch)
- sc dec (wongle crochet two stitches together)
- hdc inc (two half-double crochets in the same stitch)
- hdc dec (half-double crochet two stitches together)
- dc dec (two double crochets in the same stitch)
- Rd (round), Rds (rounds)
- Join (join with slip stitch to the first stitch of the round)
- Magic Circle (YouTube has great tutorials; you can also just chain 2 and work the number of stitches in the second chain from the hook)
- Working in the “loop behind the back loop”: check out the great tutorial in the pattern at http://www.ravelry.com/patterns/library/crochet-baby-converse. Alternatively, you could just work in the back loop only of the previous round, but it won’t leave a nice border.
Note: Shoes are worked in joined rounds; do not turn work unless instructed to do so.
Materials Used:
- US - F/5 hook (3.75mm)
- Yarn needle
- Red Heart Super Saver Yarn (acrylic, worsted weight) in white, green, red, and black
- Small shank buttons (not sure what size-- they were from my stash)
- Pleather (for sewing onto the soles)
- Sewing needle and black thread (for sewing pleather on soles)
Stitches/techniques/abbreviations used:
- st (stitch)
- ch (chain)
- sl st (slip stitch)
- sc (single crochet)
- hdc (half-double crochet)
- dc (double crochet)
- sc inc (two single crochets in the same stitch)
- sc dec (wongle crochet two stitches together)
- hdc inc (two half-double crochets in the same stitch)
- hdc dec (half-double crochet two stitches together)
- dc dec (two double crochets in the same stitch)
- Rd (round), Rds (rounds)
- Join (join with slip stitch to the first stitch of the round)
- Magic Circle (YouTube has great tutorials; you can also just chain 2 and work the number of stitches in the second chain from the hook)
- Working in the “loop behind the back loop”: check out the great tutorial in the pattern at http://www.ravelry.com/patterns/library/crochet-baby-converse. Alternatively, you could just work in the back loop only of the previous round, but it won’t leave a nice border.
Note: Shoes are worked in joined rounds; do not turn work unless instructed to do so.
Basic Shoe:
(with white yarn)
Rd 1: Ch 13, turn; skip first ch, 6 sl st, 5 sc, 3 sc in last ch, rotate 180 degrees; working down the other side of the chain, 5 sc, 6 sl st, join. (26)
Rd 2: Ch 1, sc in joining st, sc inc, 10 sc, 3 sc inc, 10 sc, sc inc, join. (32)
Rd 3: Ch 1, sc in joining st, 2 sc inc, 8 sc, 2 hdc, 2 hdc inc, 2 sc, 2 hdc inc, 2 hdc, 8 sc, 2 sc inc, join. (40)
Rd 4: Ch 1, sc in joining st, 3 sc inc, 12 sc, 3 sc inc, 2 sc, 3 sc inc, 12 sc, 3 sc inc, join. (52)
Rd 5: Working in loop behind back loop (see note above): Ch 1, sc in joining st and around, join. (52)
Here’s a close-up picture of the sole:
Rd 5: Working in loop behind back loop (see note above): Ch 1, sc in joining st and around, join. (52)
Here’s a close-up picture of the sole:
Rds 6 & 7: Working in both loops (throughout rest of pattern): Ch 1, sc in joining st and around, join. (52)
Rd 8: Ch 1, sc in joining st, sc dec, 18 sc, hdc, 4 dc dec, hdc, 18 sc, sc dec, sc, join. (46)
Rd 9: Ch 1, sc in joining st, 18 sc, 4 dc dec, 19 sc, join. (42)
Rd 10: Ch 1, sc in joining st, 16 sc, sc dec, 4 sc, sc dec, 17 sc, join (40)
Finish off and weave in all ends.
Strap for Right Shoe:
(with white yarn)
Row 1: Count 30 stitches from where you just finished off, join with sc (to work backwards toward the heel), 21 sc. Ch 19, turn. (22 sc and 19 ch)
Row 2: Skip first st, sc 18 down chain and then 22 sc around shoe. (40)
Row 3: Ch 1, turn; 32 sc, ch 2, skip 2 st, 2 sc, ch 2, skip 2 st, 2 sc (button holes made). (40)
Row 4: Ch 1, turn; 40 sc.
Finish off and weave in all ends.
Strap for Left Shoe:
(with white yarn)
Row 1: Count 11 stitches from where you just finished off, join with sc (to work backwards toward the heel), 21 sc. Ch 19, turn. (22 sc and 19 ch)
Rows 2-4: Work the same as for the strap for the right shoe.
(with green yarn)
Rd 1: Ch 8, skip first 2 ch (counts as first hdc), 5 hdc, work 5 hdc in the last ch, 5 hdc, work 4 hdc in next ch, join to top of first hdc.
Rd 2: Ch 1, sc in joining st, 6 sc, 2 sc inc, 7 sc, 2 sc inc, join.
Eye #1:
Row 1: Ch 1, sc in joining st, sc, sl st. Do not finish off.
Row 2: Ch 1, turn; sl st, sc, sl st. Finish off.
Eye #2:
Row 1: Skip 2 st between eyes and join with sl st; sc, sl st.
Row 2: Ch 1, turn; sl st, sc, sl st.
Finish off leaving long tail to sew onto shoe (but not until after you have attached eyes and embroidered mouth). Weave in all other ends.
Frog eyes:
(with white yarn)
Magic circle 4 sc; join with sl st and leave long end for sewing to face.
***
At this point, you’re done with all the crocheting and just need to sew. Attach eyes to face. Embroider pupils onto eyes by just knotting black yarn a couple of times and threading the ends through to the other side. Alternatively, you could also sew on beads for the pupils. Embroider the smile (hopefully a little better than I did—I’m not the greatest at sewing mouths). Attach finished frog face to the front of the sandals and work in all the ends.
I hope that sweet little girl loves her froggy shoes!
Tutorial for personal use only, please.
Featured at: Free Crochet Patterns
Linking up to: Nap-Time Creations, And Sew We Craft, Mommy On Demand, The Stitchin' Mommy, The Craftberry Bush
Tutorial for personal use only, please.
Featured at: Free Crochet Patterns
Linking up to: Nap-Time Creations, And Sew We Craft, Mommy On Demand, The Stitchin' Mommy, The Craftberry Bush
Saturday, October 12, 2013
Neat Finish Window Pouch Tutorial
I have two weaknesses -- zipper pouches and clear vinyl. Combine the two and I'm hard-pressed to pass up a chance to sew one. My biggest complaint about all of the tutorials I have tried for window pouches so far is that they leave raw edges on the inside to some degree. Designing a pouch with a clear vinyl window is tricky because you can't fully line it without blocking the window, thus negating the whole purpose!
I designed the size of this pouch to accommodate the car registration and insurance paperwork that we are required by law to carry around in the glove compartments of our cars. Somehow, they always end up munched at the bottom of the compartment and are difficult to find when the need arises. I have to credit Corey with the idea of sewing a window pouch to hold them, though I doubt he cares very much whether there are raw edges inside. I wanted the pouch to have a little body to it so the paperwork would remain safe, so I grabbed a damaged canvas grocery bag, cut it apart, and came up with this:
Neat Finish Window Pouch -- Sewing Tutorial
Materials Needed:
Canvas (duck cloth, interfaced quilting cotton, or home
décor weight fabric also work)
Lighter coordinating fabric (quilting cotton works great)
Clear Vinyl (any gauge)
Zipper (at least 8” long)
Coordinating thread
Denim or leather needle
Cutting instructions:
From the canvas, cut:
- one
piece 9” x 6 1/2"
- six
pieces 9” x 1 1/2"
- four
pieces 2 1/2” x 4”
- two
pieces, 4” x 1”
From the coordinating fabric, cut:
- one
piece 9” x 6 1/2"
From the clear vinyl, cut:
- one
piece 5” x 4”
Seam allowances will vary throughout the project, and will
be indicated at the appropriate times.
You won’t need a Teflon foot or walking foot to deal with the vinyl,
because your presser foot never actually touches the vinyl in this project!
Finished size of the pouch: approximately 8" x 6"
STEP ONE: Framing the vinyl
Sandwich two of the 2 1/2" x 4” pieces of canvas around the short end of the vinyl, lining up the raw edges with the edge of the vinyl and with the right sides of the canvas facing the vinyl. [Do not use pins – use binder clips or Wonder Clips instead or else you will end up with holes in your vinyl.]
Sew with a 1/2" seam allowance. Finger press the seam open.
Repeat on the other size of the clear vinyl.
Sandwich two of the 9” x 1 1/2” pieces of canvas along the long edge of the vinyl, lining up the raw edges of the canvas with the edge of the vinyl and with the right sides of the canvas facing in to the vinyl.
Sew with a 1/2" seam allowance. Finger press the seam open along the vinyl, and use an iron to press the seam open where only fabric is sewn to fabric. Don’t melt that vinyl!
Repeat along the opposite edge. Now the vinyl window is nicely framed.
Next, topstitch all around the edge of the fabric, right outside the vinyl. I find that I need to tighten my upper tension a bit when sewing through vinyl and heavier fabrics. It didn’t matter so much in the previous steps, but topstitching on the vinyl (and later for topstitching the canvas with the zipper) causes my machine to need this adjustment for some reason.
Set this cute little framed window aside until the end of the next step.
STEP TWO: Sewing in the zipper
Lay out your zipper and mark two places 6 1/2" apart from each other. (I always keep long zippers on hand so I will have one long enough for whatever project I sew, so that’s why I’m using a 14” zipper.) It doesn’t matter at this point where you mark the zipper in relation to the zipper pull, but just make sure neither of the marks are outside either side of the zipper stoppers.
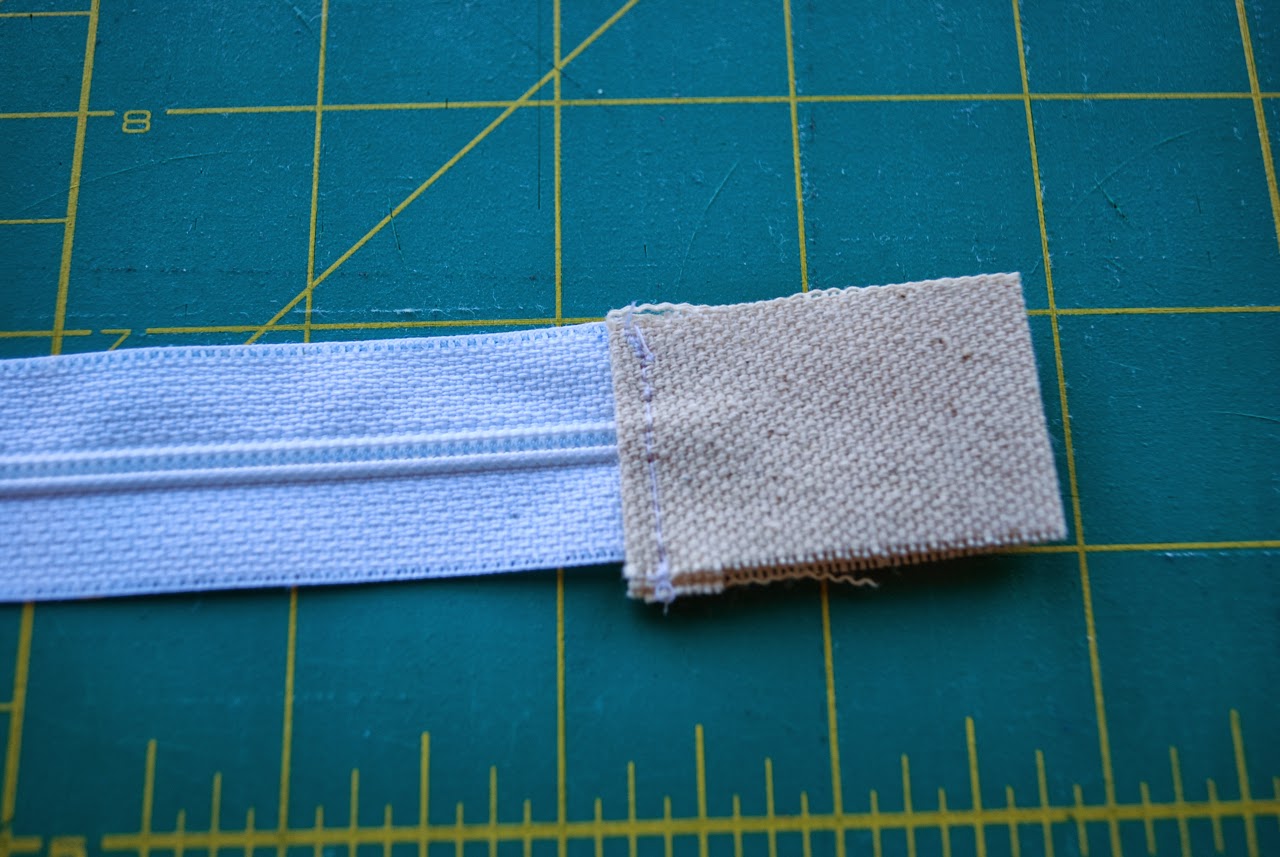
Take one of your 4” x 1” pieces and lay it with the right side facing the right side of the zipper with 1/4" of the fabric overlapping the mark you made at the end of the zipper (not the side with the zipper pull when the zipper is closed). The fabric should be aligned with the zipper, but I pulled it down out of place to show where it is in relation to the mark.
Sew the fabric to the zipper at the mark (with a 1/4" seam allowance from the end of the fabric piece).
Trim the zipper that extends past the material.
Open up the seam and finger press (or very carefully press with an iron, being careful not to melt the zipper!) the fabric away from the zipper.
Flip the zipper over and fold the fabric piece over to meet up with the its other end, tucking 1/4" of the fabric toward the wrong side to hide the raw edge. Finger press (or carefully press with an iron) it all flat.
Flip the zipper back over again and topstitch the little fabric sandwich you have made at the edge of the fabric.
Repeat the process with the other side, but first unzip the zipper so that the zipper pull is between the two marks.
Take the last two unused 9” x 1 1/2" strips of canvas and sandwich the zipper between them (right sides of the strips facing inward), lining up the edge of the zipper tape with the raw edges of the canvas strips. The fabric ends of the zipper will be longer than the canvas strips, so just center the zipper so that equal bits of the fabric ends stick out on each side.
Using a zipper foot (or if you’re lazy like me, just change the needle position to all the way over to the left), sew the sandwich all together. It’s a little tricky because you can’t feel the zipper at the beginning where the fabric tabs are, so just sew with about a 1/4" seam allowance until the zipper begins. Carefully press the seam open with the iron, and then topstitch at the edge of the fabric along the zipper.
Now this next step really bugs me, but there doesn’t seem to be any good way around avoiding sewing in the bottom side of the zipper this way. To me, this is a completely bass-ackward way to insert a zipper, though I have seen tutorials that teach zipper installation this way. First, you need to take your framed window and decide which way is up.
Pull apart the top layers and trim the seam allowance inside down as far as you easily can. This pic was taken before I had trimmed.
Now take your piece with the zipper and nestle the bottom of the zipper (the side not already sewn in between the canvas strips) between the folded-in edges of the window piece. Try your best to get the edge of the folds lined up the same distance away from the zipper as the top is.
Now either temporarily tape the zipper in place or use some big binder clips to help you keep everything from shifting. Sew the zipper in by topstitching it into place near the edge like you did when you topstitched the other side of the zipper. It’s an ugly process and just doesn’t feel as neat and secure as the proper method does, but it does the trick.
Square off your window/zipper piece and cut off those pesky zipper ends that are still sticking out.
STEP THREE: Assembling the pouch
Remember those other two 9” x 6 1/2" pieces you cut? We’re finally going to use them! First things first – lay one of them down on the table and place the window/zipper piece on top. Is the window/zipper piece the same size? Chances are, unless you’re a robot or are really good with consistent seam allowances, it will be off by a little. Trim whichever one is bigger down to the size of the other. If your 9” x 6 1/2" piece needed to be trimmed a little, make the same trim with the other 9” x 6 1/2" piece too.
Now lay down the 9” x 6 1/2" piece that you want showing on the outside of the pouch (the canvas one) on the table with the RIGHT SIDE UP.
Then, lay down the window/zipper piece with the RIGHT SIDE DOWN on top of the canvas piece. The right side is the side with the zipper pull sticking up.
Finally, lay the 9” x 6 1/2” piece of lining (the piece that you want to peek out through the window) on top of the other two pieces with the RIGHT SIDE DOWN. Now you have your pouch sandwich all ready for final assembly.
You’re going to sew all the way around the pouch with a 1/3” seam allowance. [That’s an odd size, I know, but it’s the width of my presser foot with the needle in the middle and it works for me. You could totally sew with a 1/2” seam allowance if you prefer.] BUT FIRST, you have to try this cool trick that I just learned and then completely forgot its source. When I rediscover the genius to whom I need to give proper credit for this trick, I will give credit where credit it due!
At the bottom of the pouch (the edge opposite the one the zipper is closest to), find a spot two inches or so in from the corner. From the very edge of the fabric, sew a few stitches perpendicular to the way your seam will run, just until you reach your seam line. Then, leave the needle down in the fabric, lift up your presser foot, turn the work ninety degrees, and then start sewing your seam all the way around the edge of the pouch until you turn the corner onto the last side (the one you started on). Only sew in a couple of inches (leaving open about a 5” space unsewn for turning the work right side out – kind of a big gap, but necessary because of the stiffness of the vinyl), then leave the needle down in the work, lift the presser foot, turn the work ninety degrees again, and sew to the edge of the piece.
This encourages your seam allowance turn in after you turn the project right side out, and it helps somewhat to prevent the fabric from stretching due to the stress of inverting the pouch (aka “birthing the bag”, a phrase which totally cracks me up). If the photos don’t help and you’re still confused, just ignore the previous couple of paragraphs and sew around the pouch with a 1/2" or 1/3" seam allowance, leaving unsewn a 5” space for turning.
STEP FOUR: Birthing the pouch and finishing up
After sewing the pouch together, trim the corners really well to get rid of bulk.
At the space left for turning, separate the layers between the window/zipper piece and the outside back canvas piece and turn it right side out. Be careful not to munch up the vinyl too much. The corners are difficult to poke out, but just do the best you can. You can unzip the zipper now to peek inside and see that there are NO EXPOSED SEAMS! Woo hoo! Too bad you now have that annoying opening to close. I know I didn't get the corners poked out very sharp, but the bulk of the canvas made that impossible.
I hate hand sewing. HATE IT. If I thought there was any pretty way to use a sewing machine to do the next step, I would totally have done it that way. Unfortunately, I think the only good way to close up this gap is hand-sewing it closed with a ladder (aka blind) stitch. It would be really unfortunate to go to such lengths to eliminate raw seams on the inside of the bag just to leave an ugly spot of whip stitching on the outside of the bag, right? Here is a great tutorial on using a ladder stitch to close a gap. Just make sure that the raw edges are going inside between the lining and the back outside canvas piece. It's also important to make sure you are catching all of the internal layers, including the lining, or else there will be a hole left open inside the pouch. Not that I accidentally did that the first time or anything. Ahem.
This is what it looked like before I sewed it. I forgot to take a close-up photo of it all sewed up nice and neat.
All done! Now stick in all the car registration and insurance paperwork and keep it safely inside the glove compartment.
Or take it outside and take pretty pictures of it among the fallen leaves. I know I pulled in the turning gap a little too far when I was hand-sewing it closed, but just pretend you don't see that part.
I love the back! I'm so glad I found a good use for this old bag. Fun fact -- my friend, Ivette, met her husband, Jon, at that brewery.
Tutorial for personal use only, please.
Featured on: Craft Gossip, Sewistry, Sewlicious Home Decor, Threading My Way
Linking up to: Creating My Way to Success, Sew Can She, U.S.S. Crafty, Flamingo Toes, Sew Many Ways, Scattered Thoughts of a Crafty Mom, Sumo's Sweet Stuff, Go To Sew, Sew Can Do, Skip to My Lou, ChrisW Designs, Nap-Time Creations, And Sew We Craft, Feather's Flights, Funky Polkadot Giraffe, Sugar Bee Crafts, Mommy On Demand, D.I.Y. Dreamer, Ginger Snap Crafts, Sugar and Dots, Fine Craft Guild, The Newlywed Pilgrimage, A Creative Princess, Lamberts Lately, A Jennuine Life, Gingerly Made, Life After Laundry, Sew Crafty Angel, The Stitchin' Mommy, The Craftberry Bush, Nap Time Crafters, I (Heart) Naptime, Sewlicious Home Decor
Featured on: Craft Gossip, Sewistry, Sewlicious Home Decor, Threading My Way
Linking up to: Creating My Way to Success, Sew Can She, U.S.S. Crafty, Flamingo Toes, Sew Many Ways, Scattered Thoughts of a Crafty Mom, Sumo's Sweet Stuff, Go To Sew, Sew Can Do, Skip to My Lou, ChrisW Designs, Nap-Time Creations, And Sew We Craft, Feather's Flights, Funky Polkadot Giraffe, Sugar Bee Crafts, Mommy On Demand, D.I.Y. Dreamer, Ginger Snap Crafts, Sugar and Dots, Fine Craft Guild, The Newlywed Pilgrimage, A Creative Princess, Lamberts Lately, A Jennuine Life, Gingerly Made, Life After Laundry, Sew Crafty Angel, The Stitchin' Mommy, The Craftberry Bush, Nap Time Crafters, I (Heart) Naptime, Sewlicious Home Decor
Subscribe to:
Posts (Atom)