Friday, October 11, 2013

Fall Stack & Slash Table Runner for Ivette

My friend, Ivette, is a super talented photographer and has two terrific kids.  Her son, Ben, and my son, Peter, are such good buddies that they can play happily for hours and hours together and all we have to do is throw a snack or two at them every once in a while -- no toy refereeing needed.  That is pretty amazing for a three-year-old and a four-year-old!  Anyway, after she took some beautiful fall photos of our family, I decided to make her a pretty fall table runner to say thank you (and practice my nascent quilting skills as well).

I used a very simple Stack & Slash Table Runner tutorial from Samelia's Mum.  It's great for someone like me who hasn't quite got the hang of intricate (or, to be honest, even basic) piecework but who wants practice with the basic steps of quilting beyond the piecework.  I used some of the gorgeous fabrics that my friend, Amanda, bought for me, and came up with this:


You really can't see it in these cell phone pictures (I forgot to take glamor shots with my good camera, so I asked Ivette to send me some phone shots of it on her table), but I quilted it by tracing a bunch of different-sized overlapping circles all over it.  That was actually a pain in the butt to do because I had a ton of thread ends to tie off and work in on the backside.  Then, I had to wash the runner because I don't have one of those cool disappearing ink markers on hand anymore and I needed to get the pencil marks off.  That caused the fabric to bubble up a bit, which made me realize I needed to make my quilting lines a little closer together in the future to minimize that.


Ivette has a really neat long, rustic farmhouse style table in her kitchen, and it turned out that the runner fit perfectly on it under her cool candle holder.  The back of the runner is the same black and white damask print as the binding.

I would love to make this runner again for my table!  I think I would start out with larger blocks (the pattern is based off of squares from a 10" layer cake, so that's why it turned out a tad skinny.  It looks great on Ivette's long table, though.  I wish I could give Ivette something half as beautiful as what she gave me.  I mean, have you ever seen a better picture of Petey?  Thank you, Ivette!

Tuesday, October 8, 2013

Sneak preview of Peter's Jake & the Never Land Pirates costume

Shockingly enough, Peter decided he wanted to dress up like Jake (from Jake & the Never Land Pirates, a cartoon on the Disney Channel) for Halloween.  I was all set to buy (or even sew) another Batman costume, but he mentioned wanting to be Jake and actually stuck with the idea over several weeks.  I'm no dummy -- I know not to get a Halloween costume too early only to have the little twerp change his mind, but this seemed like a choice that was gong to stick.  Charlotte jumped on the bandwagon and decided she wanted to dress like another of Jake's crew mates, Izzy.  I'm working on her costume next.

I found a pretty good tutorial for the vest, but I had to draw my own pattern from some fairly vague instructions.  Luckily, I was smart enough to make a muslin first.  A few quick alterations to the pattern, and I had something I could work with!


Here is what Jake looks like in the cartoon:


I used some bottomweight navy material of some sort that I picked up at the store, and I paired it with some prepackaged bias tape and buttons. The tutorial left the armholes unfinished, but I decided to add a little bit of bias tape just to finish it off. I didn't have any navy bias tape, but I figured the cadet blue was close enough.

Peter loves it an has already worn it all over the house.  Now I need to work on getting the shirt, bandana, sash, pants, and boots ready.  I can scrounge for the rest of those by using old t-shirts and his cowboy boots.  I will post the whole finished ensemble when I get it done.  

Sunday, October 6, 2013

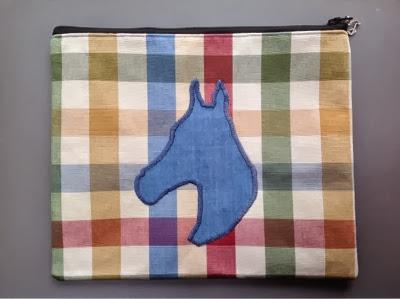
Aunt Sibyl's car registration window pouch

made a very simple pouch for Corey's Aunt Sibyl to hold her truck registration and insurance papers.  She owns a horse and loves anything with horses on it, but I didn't have any fabric with an equine print.  Appliqué to the rescue!  I also found a horse charm that I had with my bead collection and attached it to the zipper pull with a jump ring. 


Thursday, October 3, 2013

Thread Catcher & Notions Basket -- Sewing Tutorial

Title photo for Thread Catcher & Notions Basket Sewing Tutorial

Erin has officially sewed her first solo project on the sewing machine I handed down to her (a lining for a bag she crocheted for her friend, Toni), so I figured I had better make her a cool thread catcher to keep by the sewing machine.  After I made the thread catcher, I wanted to try making a bigger one to hold other sewing notions and I figured I might as well type up a little tutorial in case I ever want to make one in the future.  I even used fabric with Notre Dame's colors in her honor -- she and her husband both have two degrees each from ND!

I have an awesome thread catcher/pincushion combo that my amazing Aunt Janet made for me, but since Erin already has a pincushion (and adamantly denies needing another one, even though I doubt you can ever have too many!) I didn't need a design quite this complex.  Isn't it cool, though?

Example of cool thread catcher pincushion made by my Aunt Janet


Aunt Janet is so amazing.  Someday I hope to have half of her sewing abilities!  Anyway, here is what I came up with when I sat down to design a little something for Erin.  It's really simple, so this might be a good project to make with Charlotte when I start teaching her to sew someday.

Thread Catcher & Notions Basket

Materials needed:

  • Less than one fat quarter of main fabric
  • Less than one fat quarter of coordinating fabric
  • Felt (or other batting of choice such as fusible fleece)
  • Basting spray (unless you are using fusible fleece)
  • Extra wide double fold bias tape (about half a package)
  • Thread to match the bias tape

Materials needed for Thread Catcher & Notions Basket

I always hate it when tutorials don't really specify what type of fabric was actually used in the project, or don't give recommendations for such.  I used a couple of quilting weight cottons, but I bet this would work with just about any type of fabric other than something super heavy weight/bulky or something ultra lightweight/sheer.  I love the Riley Blake chevron fabric that I used -- I actually won it from a giveaway hosted by Sew Spoiled of fabric from All Stitched Up by Angela.


STEP ONE: FABRIC CUTTING AND ADHERING TO THE FELT/BATTING
First of all, decide which size of basket you would like to make -- the thread catcher (the smaller one) or the notions basket (the bigger one).  The finished dimensions of the interior of the thread catcher basket are 4" x 4" (not including the wings), and it is about 1.5" high.  The finished dimensions of the interior of the notions basket are 6.5" x 6.5" (not including the wings), and it is about 2" high.

For the thread catcher, cut your main fabric, coordinating fabric, and felt/batting in the shape of a circle with a 10.5" diameter -- it was the size of one of my dinner plates.  For the notions basket, cut it all in the shape of a circle with a diameter of about 14" -- this is the size of one of my serving platters.

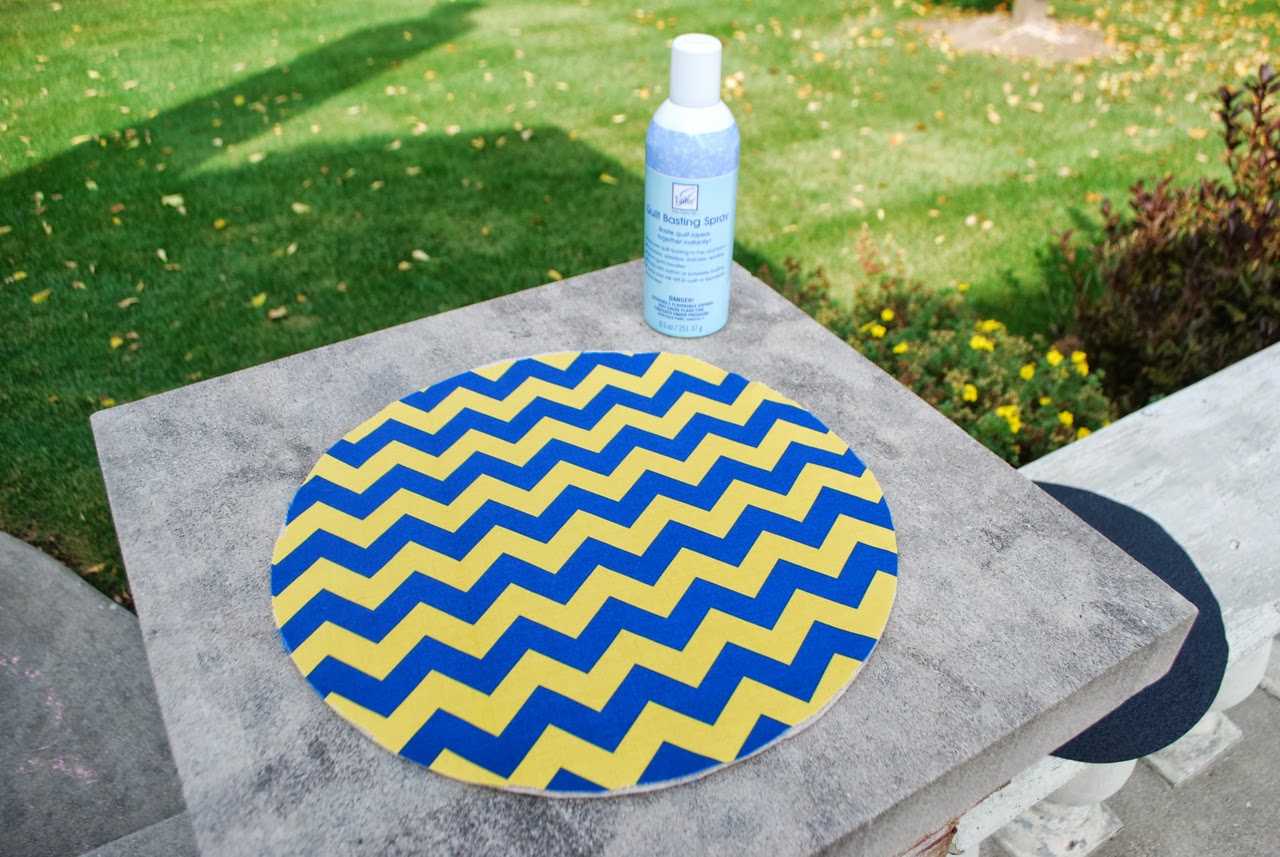
I used my favorite quilt basting spray to adhere the felt to the wrong side of the main fabric.  Remember to spray the glue to the felt rather than to the fabric.

Spray basting the felt to the fabric

Spray basting the felt to the fabric


Then I flipped it over, sprayed the other side of the felt, and stuck the coordinating fabric (the black) wrong side down onto it.  The end result should be a nice little sandwich with the fabrics facing right side out.

You could totally use double-sided fusible fleece for this, or you could use traditional quilt batting.  I like the stiffness of the felt and the added body it gives the basket.  Adding some quilting would give the basket some nice texture, but I didn't do that this time.  Next time, maybe!

STEP TWO: BINDING THE CIRCLE

You definitely don't need to use prepackaged bias tape, of course.  I do like using homemade instead, but since I had some of the prepackaged stuff on hand I just used that.  Here is the method I like best when using the prepackaged bias tape.

First, open up the tape and lay it with its right side facing the right side (the one with the main fabric), lining up the raw edges.  Usually, bias tape has one side with a shallower fold than the other side -- if it does, put that closest to the outside.  This bias tape didn't for some reason.

Fold about a 1/4" of the tape up (see photo) and begin sewing in the outermost fold.

Adding binding to the thread catcher & notions basket


Sew all the way around the circle, taking care to keep the edge of the bias tape precisely even with the edge of the main fabric.  Here, for some reason my coordinating fabric circle turned out a tiny bit bigger than the main fabric, so I trimmed it down to size before I folded the bias tape around.

Adding binding to the thread catcher & notions basket


When you get to the beginning of the circle, overlap the bias tape and sew over the original about 1/2" or 3/4".  Do a lock stitch and cut the threads.

Adding binding to the thread catcher & notions basket


Clip off the excess tail of the bias tape (and trim any wide spots in the coordinating fabric!).

Adding binding to the thread catcher & notions basket


Fold the bias tape around to the back side of the circle and give it all a little press with the iron.  Make sure the place where the ends overlap looks neat and tidy.  I also pin it all down to make sure it doesn't shift when I do the next step.

From the right side (the side with the main fabric), sew near the inside edge of the bias tape.  Periodically peek around to the back side to make sure you are catching the bias tape on the backside.  If you're not, shriek in frustration while you rip it out and resew with a slightly more generous seam allowance.

Stitching in the ditch while attaching binding to the thread catcher & notions basket


Here's how it should look from the front side.  I forgot to take a picture from the back, but ideally it should look pretty much like this from the back as well.

Close-up view of finished binding on thread catcher & notions basket


Now you have a lovely bound circle.  Mine kind of curled up at the edges, but that doesn't really matter.

Finished binding on thread catcher & notions basket


STEP THREE: CREATING THE BASKET SHAPE

Fold the circle in half with the coordinating fabric on the inside.  If you're making the larger basket, measure 2" up from the bottom "corner" and pin the layers together right on the bias tape.  Repeat on the other side.

If you're making the smaller basket, then pin the layers together 1 1/2" from the "corners".


Pinning the binding at the right place


This is what it should look like now.

Binding pinned on both sides


Open it up and pinch it back together in half the other way with the pinned places matching together in the middle.  Pin the other two "corners" together at the two-inch mark like you did above.

Fold circle in half the other way with the pins meeting in the middle


Here's what you should have now -- it's starting to look like a real basket!


Basket pinned and ready to sew


Sew right where each of the pins were a seam perpendicular to the bias tape, only as long as the width of the tape.  Yeah, white stitching on white bias tape is not so easy to see, but my messy lock stitches are right there in their full glory.

Sew where each pin was across the binding


Once you have sewn all four of the "corners", it should look like this from above:

Finished thread catcher & notions basket -- view from above


Stuff the basket full of some cute notions and you're in business!

Finished thread catcher & notions basket, filled with notions

Finished notions basket filled with notions

Finished basket -- front view

Filled finished basket -- view from above


Here is the notions basket with its little buddy, the thread catcher.

Finished thread catcher and finished notions basket together.


My sister has assured me that she is not looking to pick up sewing as a full-blown hobby, but she loves the idea of being able to line the bags and pouches that she crochets.  Then, she tell me that she is going to sew her daughter, Sonia, a Princess Leia costume for Halloween.  Bon voyage!


Tutorial for personal use only, please.

Featured at: A Jennuine Life, And Sew We Craft, Craft Gossip, Sewistry, Go To Sew, Feather's Flights, Threading My Way (and again!), Totally Tutorials

Linking up to: The Stitchin' MommyCraftberry Bush, Life After Laundry, A Jennuine Life, Gingerly Made, Nap Time Crafters, While He Was Napping, Nap-Time Creations, Threading My Way, Today's Creative Blog, Flamingo Toes, Scattered Thoughts of a Crafty Mom, Creating My Way to Success, USS Crafty, Sew Many Ways, Sew Can Do, Sumo's Sweet Stuff, Go To Sew, Feather's Flights, Nap-Time Creations, Adventures of a DIY Mom, Sew Crafty Angel, Ginger Snap Crafts, Sew Much Ado, A Creative Princess, The Princess & Her Cowboys, Life After Laundry, Sewlicious Home Decor

Tuesday, October 1, 2013

Frankenbag, or why I should just stick to others people's patterns

This is why I shouldn't go rogue -- with the exception of the Abbey Nightie and the Double Skein Yarn Bag, every time I try to design my own bag from scratch I get all sorts of things just plain wrong.  For this tote, I tried to combine a couple of elements that I was interested in trying: cool pockets (as opposed to a simple patch pocket or an internal zipper pocket -- both things I feel like I have mastered) and a recessed zipper closure.  Though I was able to get this bag completed, it was not without a million bumps along the way and kind of a wonky outcome.

First of all, I tried something new without making sure I had enough fabric to spare if (when?) I screwed up.  I love this bird printed twill (at least I think it's twill?) and the geometric chevron, and I thought the navy and aqua would look cool together.  But then I forgot I needed some sort of option for handles, and I ended up stealing some cotton webbing off of a very light tan cheapie market tote.  Not exactly matching, but not terrible either.  Enough talking and on to the horrifying photographs.

At first glance, it doesn't look so bad.


But then you look closer at the pocket I tried to design and you realize that you can see raw edges of the ends of the piping peeking out at the top corners.  Whoops. I was sort of following this tutorial from ikat Bag (another one of my favorite bogs), but I screwed it all up by deciding to add piping.  The pocket still turned out kind of cute though.  I guess I should have just wrapped the binding around the piping for a more finished look.


Here is the other side.  I tried a different technique for a floating inset pocket (also from ikat Bag's same pocket tutorial series).


The pocket itself didn't turn out so badly, but my topstitching is so cruddy that I probably should have used navy thread to hide it.  The pocket hangs down on the inside between the outer fabric and the lining -- it just has a big opening just for fun.


I then tried to adapt a tutorial for a recessed zipper and kind of miscalculated how long it should be.  Turns out it should have been several inches shorter so it wouldn't fight with the sides of the bag.


And, I guess I should have made the recessed zipper sides out of the lining fabric -- not the outer fabric.  I have to pull the entire recessed zipper up and out of the bag just to open and close it, so I might as well have just sewn an exposed zipper anyway.


The inside is lined with the aqua chevron, which is fine except for the fact that this is the lightest, most wrinkly cotton I have ever worked with.  I could hardly get the wrinkles ironed out, and then if I looked away for two seconds the whole shebang was even more wrinkled than before.  I need to get my hands on some spray starch for fabric like this.  No wonder it was so cheap.

I was going to get wild and put an internal zipper pocket to make the bag super cool, but after I finished the recessed zipper and figured out that things were about to go terribly wrong, I lost the will to do anything other than get the darn thing finished.


The actual structure of the tote is very basic (other than the recessed zipper).  I spray basted a layer of felt to the outer fabric so the tote actually had some nice structure to it.  Now I need to get my hands on another zipper and try this all again with better pocket design and the proper length of the recessed zipper.  I also want to find some other instructions for the recessed zipper because I have a hunch there is a better way to put it all together.

I can't in good conscience give this bag away to anyone, but it's going to annoy me every time I use it.  Hmm . . .


Linking up to: Chris W Designs, And Sew We Craft

Monday, September 30, 2013

Pattern testing -- the All-In-One Bag by Flutter from.Kat

Last week, I had a really fun opportunity to test out a bag pattern for a great sewing/crafting blogger -- Kat, from Diary of a Flutter.Kat.  She sews amazing quilts and other fun things in New Zealand, and her blog has many free tutorials as well as some terrific patterns for sale.  When she put out a request for pattern testers for her new bag, I jumped at the chance and was thrilled that she picked me.

Here is a shot of the "All-In-One Bag" I made (as posted on Kat's Instagram feed):


It really was a blast sewing a pattern and being able to make comments.  Kat and I e-mailed back and forth a few times over the past week about various parts of the pattern, and she did make some alterations to the instructions that I and the other pattern testers suggested.  The pattern was already in great shape when I tested it, and now it's perfect as far as I can tell.

Here is a shot I took as I started sewing last week.  I love capturing all of the various pieces that go into the bags I sew.  (Too bad I forgot to lay out the magnetic snap and the material I had cut for the strap.  Just ignore the second lobster clasp I laid out -- I really only needed one.)


The bag has a neat shape due to the darts Kat has you sew in at the top on the outside and on the lining.  It can be carried like a traditional bag if you attach the lobster clasp to the opposite side . . .


. . . or it can be more of a clutch/wristlet if you attach the lobster clasp at the same side.


I should have put cards in the card pockets to show how perfectly they fit.


There is also a divider inside created by an internal zipper pouch -- so handy to corral the band-aids, chapstick, tissues, etc. that I need to carry.


Here is the view from the back.


It's a purse!


No!  It's a clutch/wristlet!


I loved the bag so much that I wanted to try making it again after Kat sent me the second draft of the pattern.  This time I tried the alternate strap suggestion involving a ribbon sewed to twill tape, and I think it turned out pretty cute.  I'm mad because I accidentally put the magnetic clasp on the wrong side of the flap (it was totally my fault -- not the pattern's!) so the brown should have been the underside and the salmon/coral color on the outside.  (Yes, it appears I am on a floral fabric kick right now.)


Here it is converted to clutch/wristlet.


On the other side of the bag from the card pocket is an internal patch pocket that fits my cell phone perfectly.


Thank you so much for the opportunity to test this great new pattern, Kat!  It was fun corresponding with someone on the other side of the world (it's something like 17 hours later there, which is pretty cool).  Best wishes on selling the pattern -- it's worth every NZ$!

Click here to purchase a digital download of the All-In-One Bag pattern directly from Kat (in NZ$).

Click here to purchase the digital download of the All-In-One Bag pattern via Craftsy (in US$).

Sunday, September 29, 2013

Ike's Stork

Ike is one of my favorite kids in the whole wide world.  His mom, Emma, is awesome and loves to go on fun adventures, so Sonia and I have been all over Chicagoland with them.  Sonia and Ike are almost as close as (and sometimes fight like) siblings!  So for Ikey's fourth birthday, I knew I had to find something really special to make for him.

One of Ikey's adorable traits is his obsession with animals.  Any animal.  He doesn't discriminate!  Stuffed animals are his constant companions; he is totally that little kid that you see at the store, dragging a huge stuffed shark with him.  He also loves unusual animals-- how many little kids are passionate in their love for cassowaries?  During the months leading up to Ikey's birthday, he was loving storks.  Luckily, due to the whole "stork bringing babies" thing, stork crochet patterns are actually not that hard to find!  I found a really cute free pattern on Ravelry and had a great time crocheting it for my little animal-loving buddy.


Unfortunately, the pattern doesn't call for my beloved safety eyes, and because the head and body are worked in one piece (starting with the head and going down from there), I had no idea which side of the head to place the safety eyes.  If I had chosen wrong, the eyes could have ended up on the side or back of the head.  So, I had to wait until the body was complete and sew on buttons for the eyes.  Hopefully, they'll stay on okay.  They're too small to be choking hazards, anyway.


Knowing how hard little kids are on their toys, I shoved a thin wooden dowel up inside the neck in an attempt to keep the neck straight for as long as possible.  I love the wings and tail!


The legs were hilarious to make.... You take two 30 cm long pipe cleaners, bend them in half, and then stick them through a 10 cm length of drinking straw, leaving 2.5 cm of pipe cleaner hanging out at the top and bottom of the straw.  On the side with the four pipe cleaner ends hanging out, you splay those ends out into the four toes.  Then, you crochet over the whole thing (well, up to the top of the straw), stick the remaining 2.5 cm of pipe cleaners up into the body, and sew the legs to the body.  If the stork weren't so top heavy, it would actually stand up pretty well!  But the merest hint of a breeze knocks it over.  Here are two somewhat blurry cell phone pictures I took (to send to Niki, of course) of the legs in process:


So funny....  I love that technique!  I ended up crocheting the leg tube first and then sliding the straw/pipe cleaner support inside.  Then, I crocheted over the toes.  It was tricky and took a lot of concentration, but the result was great!  I love the subtle "knee joints" that the pattern includes.


The pattern is actually for a stork who is delivering a baby inside a blanket.  I didn't bother making the blanket, but I did make the hat in case Ikey wanted to accessorize his stork friend.


Sonia posed with the stork to give you an idea of how tall he ended up.  Love the finished result!  I would definitely make this pattern again. (Note the gorgeous t-shirt sundress Sonia is wearing.... Another lovely creation by Auntie Niki!)


Happy fourth birthday, Ike-a-buddy!  I hope you have many fun hours playing with the stork (and that the legs and eyes stand up to all that play).  Good luck to Emma in figuring out how to make Ike a stork costume for Halloween!