Tuesday, September 23, 2014

Peek-a-boo toy sacks for Quinn and Maisie

My sister-in-law liked the toy sacks I made for Charlotte and Peter that had clear vinyl windows in them, and so she commissioned me to make five bags for her kids' toys.  The toys she wanted to be able to sort fell into the categories of Disney Cars, Disney Planes, Star Wars, Rescue Bots, and Disney Princesses.  I was able to find licensed character fabrics for all of those, although the Rescue Bots will have to be represented by Transformers Prime (the older kids' version of that cartoon franchise).  I had to buy the Transformers fabric off of eBay (my first-ever official online fabric purchase!), but the rest of the fabrics were at Jo-Ann's.

The Princess bag is about 2/3 the size of the rest of them since Maisie doesn't have a ton of them.


Here is the Planes bag:


The Rescue Bots will go in here:


The Cars will go in here:


And finally, here is the Star Wars bag:


I used the same Peek-a-Boo Toy Sack tutorial as last time (modifying the dimensions for the Princess sack), and it worked great.  I did go rogue on the drawstrings though -- instead of sewing on an additional piece of fabric to serve as the pocket for the drawstrings, I just left openings in the seams and sewed a couple of lines an inch apart about an inch down from the top all the way around the sack to line up with the openings.  Much simpler, in my opinion.  I also designed it so there were two drawstrings to pull in opposing directions so the bag would stay closed better than with one.  I wish I had done that with my kids' sacks!


All of the fabrics are quilting weight cotton, but the Star Wars fabric was a little thinner than the rest. Each are lined with solid black cotton, just to make things easier on me.  The drawstrings are just nylon cord from my stash.

The woman at the fabric cutting counter had asked me what I was making when I was getting these fabrics cut.  I explained the bag to her, and she asked "well, if the bag has the characters on the outside, why do you need the clear window to see what's inside?"  She clearly does not know that vinyl peek-a-boo windows are ALWAYS awesome, no matter what.  I just smiled and shrugged in response.

Sunday, September 21, 2014

Spectrum Tote pattern testing for Cozy Nest Design

I was lucky enough to be able to be a pattern tester again for the lovely Sarah of Cozy Nest Design, and this time it was for The Spectrum Tote.  Sarah had originally envisioned it to be sewn in different shades of the same color (like on a paint swatch) -- hence the name.  Isn't her version gorgeous (and chatty!)?


Fabric selection took me forever.  I had a hard time finding enough different shades of the same color in the same type of solid fabric (Jo-Ann's solids section is always a disaster), and I wasn't sure I wanted to stray too far from the original concept.  [Some of the other testers had a bit more imagination, though, and picked some fantastic fabric and pattern combinations.  You can check out the testers' photos on the Cozy Nest Design blog -- they are all really cool.]

I finally decided to go with a bright and cheery rainbow effect using a ROYGBIV color palette.  Well, it was ROYGBP, anyway.   I followed Sarah's lead and used white for the binding and thin stripes between the color blocks, but it would have looked pretty cool with black or denim strips too. (As usual, red and orange don't seem to photograph well for me, so you will just have to trust me that the bottom panel is red and the next panel up is orange.)


The front and back of the bag are mirror images of each other, and it's cool to see how the color blocks meet up on the sides.  Shockingly enough, I got almost all of them to meet up nicely!


The tote is terrifically deep -- perfect for a laptop, a couple of beach towels for the pool, or even as an overnight bag for a quick trip.  The official dimensions for the finished bag are 18" wide x 15" high (26" with handles) x 4" deep.  I can imagine using it to haul supplies when volunteering at the elementary school, but I still haven't decided whether I will give this bag away yet.  It would make a great teacher gift for sure.

The quilting cotton is interfaced, plus there is a layer of medium-weight canvas interlining to give the bag nice substance.  Some of the testers quilted theirs with a layer of batting added, and they reported it gave the bag even more structure.  It's great un-quilted too, because it could easily be stashed away somewhere without taking up much room.


Inside, there is an internal zipper pocket, and it closes with a magnetic clasp.  After I finished my test bag, Sarah took the advice of a tester and added a couple of curved patch pockets inside as well.  It was a neat use of some fabric that was cut away after the shape of the handles was created, which I adored.  I'm kicking myself for finishing too quickly and missing out on adding those to my bag too.


The bag had a lot of pieces to it, plus each piece (including the lining) is interfaced.  That made for a long prep process before I could get to the fun part of sewing the actual bag.  It was totally worth all of the work, though, because the outcome is very striking.  Making that bag in just one solid color (without the color blocking) would have resulted in simply a nice, but unremarkable, tote.  The stripes are key.

When I first printed out the pattern pages, I started to panic a little.  My kitchen island is over seven feet long, and I just about covered the whole thing with the printed pages when I taped them together.  I was scared that my sewing skills weren't going to be up to par at this point.


My camera was broken at the time, so I took a photo with the iPad of all of the pattern pieces once they were cut out.  I had to take it after I had ironed on all of the interfacing because there wasn't enough space on the table (since I took out all of the table leaves, it's a lot shorter to make room for my sewing table in the dining room) for all of it!  Thank goodness the pattern includes little labels to pin to the fabric once you cut it out so you don't get confused.


Somehow, is magically all came together without a hitch.  (Well, perhaps it wasn't magic -- just great pattern design and directions!)  Here is another progress shot I took to send to Erin to brag about how amazing the bag was turning out.  Isn't that beautiful?  That would make a neat wall-hanging for a nursery.


Since I typically have a terrible time maintaining consistent seam allowances, I was afraid my finished product would be a little wonky.  Without all of the placement notches on the pattern pieces and meticulous directions to keep me on track, a hot mess probably would have been the result.  I can't even begin to image how Sarah can dream up her fantastic designs, engineer them, and then create the patterns for others to follow.  I bow down to the master.


The Spectrum Tote pattern can be purchased on Craftsy, and is absolutely worth every penny.  Thank you, Sarah, for allowing me to test for you again!  You are one in a million.

Saturday, September 20, 2014

Apple basket for September birthdays

Pretty much Corey's entire family was born in September.  It's kind of hilarious, actually.  He was born on his mom's birthday, and his dad's birthday is two days later.  Another cousin and a grandma are also born that month.  I will refrain from making jokes about everyone apparently having a good time on New Year's Eve.

I sewed a lot of birthday presents last year for the September birthday crew, but this year I only managed one quick project for my mother-in-law, Barb.  Apples are a pretty big deal up here in Michigan in September, so I made her a little basket to hold some of Michigan's finest.  The exterior fabric is a bit leftover from when Barb got her sitting room chairs upholstered earlier this year.

Front:


Back:


I didn't take a good photo of the lining, but it's a multi-colored gingham remnant I have had for ages.


I didn't use any tutorial in particular, because I have made so many of these kinds of baskets in the past that I could just about make them in my sleep.  I cut the fabric out in the shape of a cross (as opposed to a large rectangle, before boxing out the corners) with the center being 6" x 7", and 4" arms coming off of each end.  Then, I just matched the sides of the cross, sewed them, nested the exterior inside the lining with right sides matching (after slipping in the handles, which are cotton webbing), sewed it up, flipped it out, and closed up the gap by topstitching around the edge.  Oh, and I spray basted some felt to the lining way back at the beginning.  Perfect for holding some yummy "macs"!

Sunday, September 14, 2014

Charlotte's Snack Bag

Charlotte saw Peter's new snack bag and just HAD to have one of her own, so I grabbed some pre-quilted fabric my mother-in-law gave me a while back and whipped this one up.  I made it a couple of inches shorter since Peter's is a little too big.  This size fits her snack containers nicely.


Again, I used In Color Order's Lined Drawstring Bag tutorial.  It's just such a perfect little design that I didn't even bother looking for a different one.  Here is the view from the other side:


The lining is more of the red and white striped fabric that came from an old sheet my friend, Kym, gave me.  It's such nice weight material and it seems to match well with a lot of things that I sew!  I'm going to be very sad when it finally runs out.  The band of navy across the top on the exterior is left over from the vest I made for Peter last Halloween as part of his Jake costume.  The drawstrings are just nylon cord.  I have long since given up sewing my own drawstrings on projects like these.  It's a pain in the butt and never looks nearly as nice as the cords


Now I just need to figure out a good way to label the bag so it doesn't get lost.  Sounds like it's time to order some cool woven labels like the "Made by Niki Stringer" ones I got as a gift a while back.  I bet those are easy to find since kids with school uniforms always need them.

Saturday, September 13, 2014

Corey's keychains

A new job for Corey meant the opportunity to get a company car!  For someone like my husband, getting to add to his fleet was like Christmas.  The funniest part was that he had to choose only from cars that had parts made by his company, and no one seemed to have a comprehensive list for him to peruse.  You would think H.R. would maintain a list of something like that, but apparently not.  It was hilarious how long it took him to get a lineup of the authorized vehicles.

He finally settled on a Lincoln MKZ, and he loves it to pieces.  It came with all sorts of fancy features like a push-button start -- the darn key just needs to be somewhere inside the car.  The key isn't even a traditional-looking key.  It's just the fob part.  And for someone who usually doesn't carry a whole ring full of keys, this fob might be pretty easy to lose.  He asked me to make something like my keychain, and I made these (one in brown and one in black):


Here is a side view:


Tutorial?  Pattern?  I didn't need no stinkin' tutorial or pattern.  I just took a three-inch wide and eight-inch long piece of pleather, folded it lengthwise in thirds, and triple-stitched along the edges and down the middle.  Easy peasy.  I did make sure I put masking tape on the underside of the foot, selected the "leather/vinyl" setting on the machine, and used a denim needle.  It went a lot smoother than I even imagined it would to be honest.

Next, I trimmed the ends a bit, folded it in half width-wise, and grabbed a Dritz Key Fob Hardware Set (it was $2.79 at Jo-Ann's, but I had a trillion coupons and probably got 40% off or something).  Once I located Corey's rubber mallet, I pounded that puppy closed.  I repeated the process with the other pleather, and then I had two cute keychains.  Took me about 10 minutes total to prep the machine, thread the bobbin, cut the pleathers, stitch, trim, and hammer.  Made me wonder why I had put the whole thing off for so long.

I just realized I never posted a photo of the keychain I made for my van.  I also have one of those funny keys that has no metal part, but this one you actually have to stick into the steering column like a key.  I made keychains like these for me and my friend, Kym, and they are a bit longer so they can go around your wrist if you like.  I chose the fabric so it would match my Michigan mitten keychain that my sister-in-law gave me last Christmas.

Friday, September 5, 2014

Flaming snack bag for Peter

[I'm pretty sure the title of this post is going to attract some views by people using a search engine to find very different things, but Peter named this his "Flaming Snack Bag" and I'm not going to argue.]

ANYWAY, I wanted to sew him something fun to take in his preschool bag to hold his snack.  He has a Transformers lunch box and a Lightning McQueen lunch box, but I thought it might be fun for him to switch between those (plus, I really wanted to take a break from my current sewing project and do something a little different).  I used Jenni Baker's tutorial for a Lined Drawstring Bag (which I have made before, and just adored the result) with two of Peter's favorite fabrics from my stash -- flames and motorcycles.


Unfortunately, I kind of forgot that the motorcycles on the blue fabric would be lost once the drawstring was pulled shut.  Oh well -- Peter can enjoy that pattern when the bag is open.  The lining is a stiff shiny fabric of some sort that is heavier than rip stop nylon.  I have no memory of where I got it, but I'm guessing it was from the remnants rack.  Total shocker, I know.  The other two fabrics are quilting cotton.


I added a layer of InsulBrite to the flame fabric using spray adhesive to give the bag a little more structure and a smidgen of insulation.  I don't think the bag is going to be all that insulated since I didn't add InsulBrite to the top part, but it might help a little when I send some fruit and use a cold pack.  The kid is only in preschool for three hours and it's not like the snack has to stay cool for long.

The bag probably ended up a little taller than I needed, but I guess that means it should fit his water bottle inside as well with no issues.  If I made it again for a snack bag, I would probably shorten it by about two or three inches.  I also boxed the corners at 3.5" instead of 3" to make it a tad deeper and so the cold pack we have would fit a little easier.

One note about the cutting list in the tutorial -- it says to cut the fabric for the main outside part to 9" x 22", and then to sub-cut the piece into two pieces measuring 9" x 10.5".  I think she meant that the original piece should be cut to 9" x 21", though (since 10.5 plus 10.5 equals 21).  Not a huge deal, but it just resulted in me having to cut off that extra inch and throw it away.

And here is that little stinker on his first day of preschool yesterday.  He insisted on dressing himself, which is how he ended up with a black Batman appliqué t-shirt (which I made for him sometime last fall) paired with navy plaid shorts.  I couldn't talk him out of changing at least one or the other, so I let it slide.  It's funny how he cares so much more about what he wears than his big sister, Charlotte.  What a goofball.

Thursday, September 4, 2014

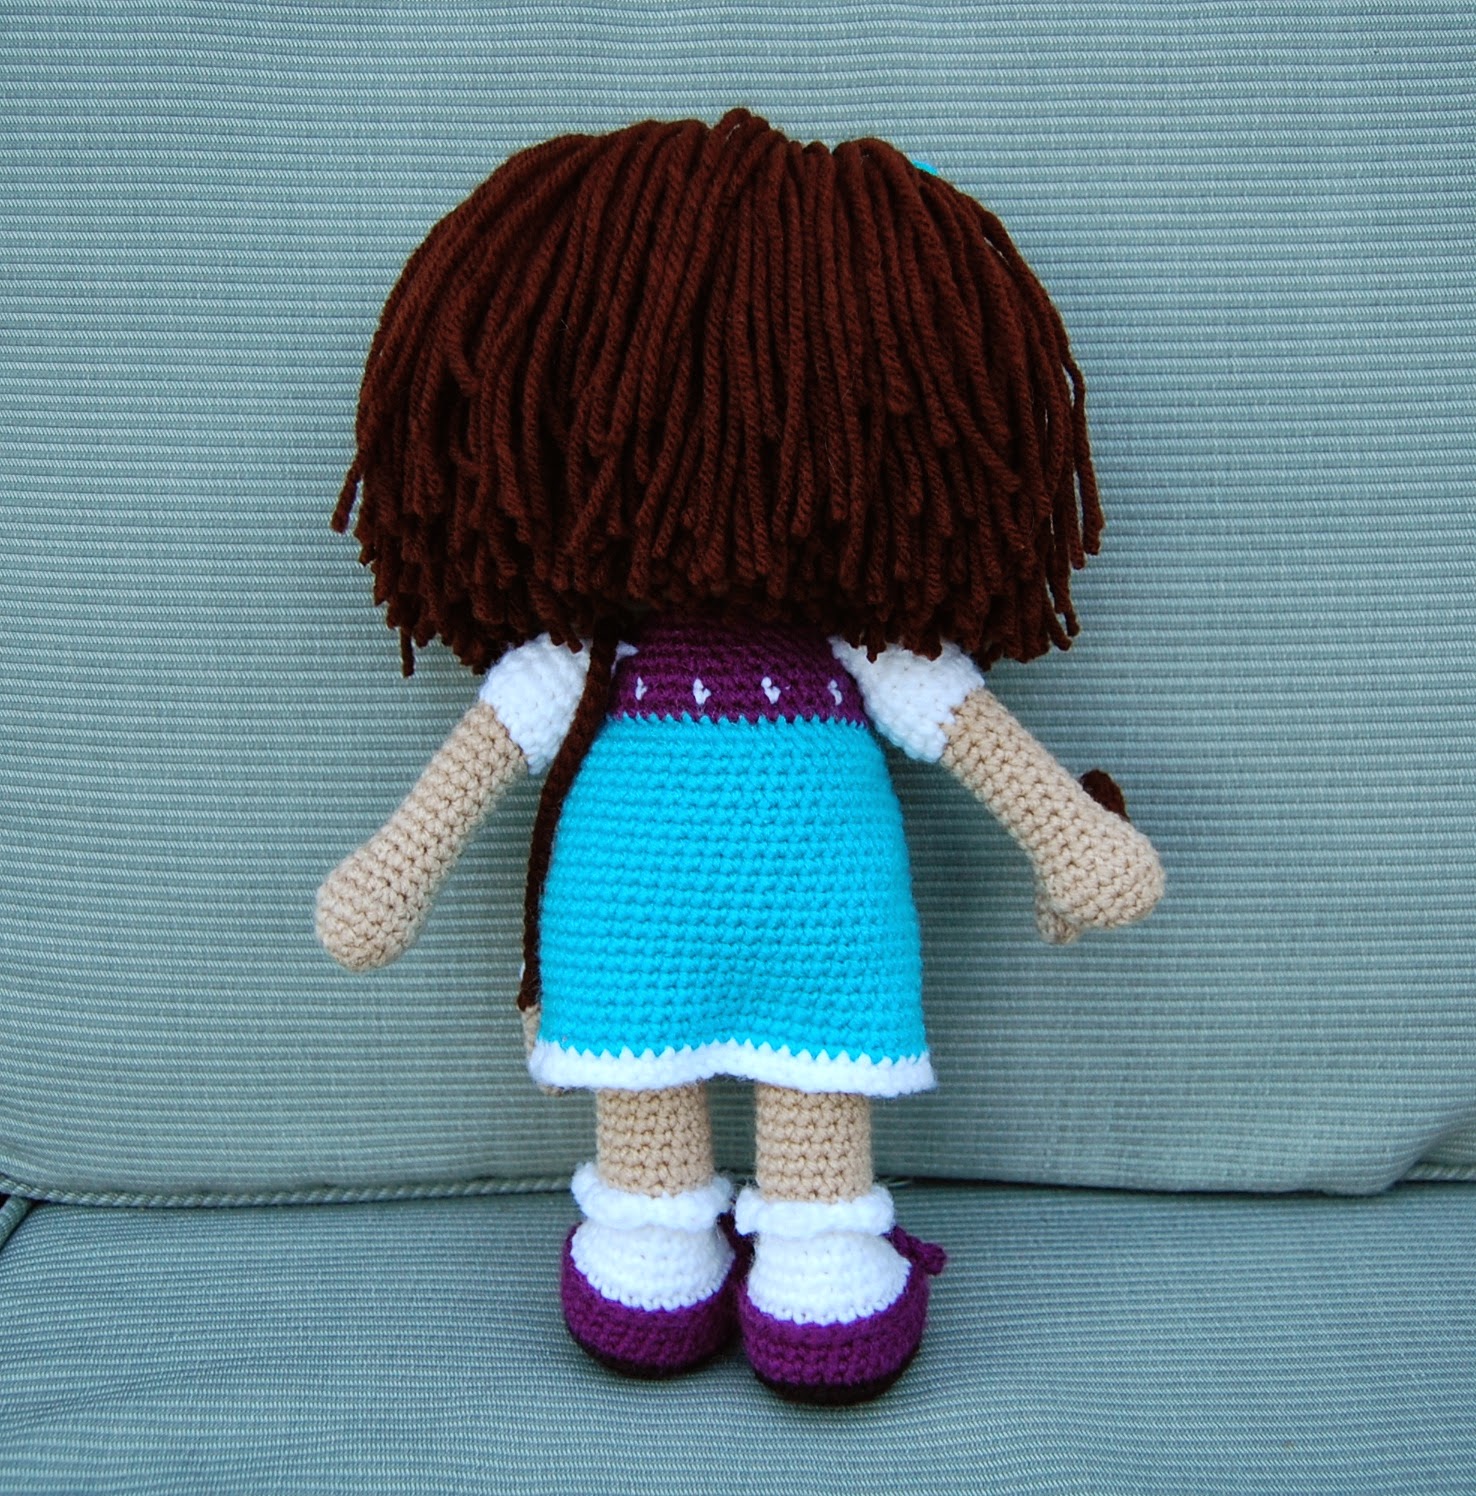
Sami's Summer Time Doll

Nipiti, one of my new favorite crochet pattern designers, has done it again....  Can you believe how adorable this doll is?


My friend, Toni, had commissioned me to crochet a doll like Sonia's for her daughter, Sami, for Christmas.  However, Nipiti asked if anyone would like to test this cute "My Summer Time Doll with Instagram Camera and Ice Cream", and Toni & I thought that Sami would like this doll even better!


How perfect are those little mary jane shoes and ruffly socks?  And I am IN LOVE with the cute little dot detailing on the bodice of the dress.  Toni chose the colors, and I think they work together perfectly.

The hair went shockingly fast....  I finished it in about an hour and a half.  Once you get all the strands cut and start attaching it to the head, it's kind of a soothing process.


Because I was doing a test, I took a few progress pictures.  The pattern worked up so nicely and is perfectly written, as usual.  The ice cream cone and camera are separate from the doll, but could be sewn on permanently.


It was at this point that I realized that this color combination was absolutely spectacular.  Good color choices, Toni!  I think Sami is going to love her new doll.


The pattern is on sale now (may favorite source to buy patterns is Ravelry, of course!), and Nipiti's Ravelry group is made up of some amazing hookers.  I can't wait to see what she designs next!

Only 111 more crocheting days until Christmas....  Better get crackin'....

Monday, September 1, 2014

And even more potholders (with a bonus hot pad)

I tried to make myself another potholder using a really cool afghan block by Julie Yeager called "Firenze", but unfortunately, it came out too large.  So, now I have a really beautiful hot pad!  I had planned to crochet the pattern until it got to the right size and then stop, leaving off the rest of the rounds, but unfortunately, the way Firenze was designed, it didn't "square up" until it got past potholder size.  Oh well!  It still turned out nice anyway.


After I posted pictures of my last round of scalloped potholders, I got orders for five more!  I made one for my Aunt Janet (Niki's and my crafting goddess muse) and four for my mother.  Mom gave them to our relatives who hosted her in Indiana when she went there last week for a family reunion.  My crocheted goods are being spread all over the country!

Potholder #1:


Potholder #2:


Potholder #3


Potholder #4 (whoops, forgot to take outdoor glamor shots of it, so these flash-lit ones are all I have):


Potholder #5 (whoops, forgot to take a shot with my real camera before I sent it to Aunt Janet, so this blurry cell phone picture is all I have... the other (not pictured) side of the potholder is all in the Lily Sugar 'n' Cream Cottage Twists):


More potholders are being planned and crocheted.....